


gzus11
-
Posts
33 -
Joined
-
Last visited
Content Type
Profiles
Forums
Gallery
Posts posted by gzus11
-
-
i am not sure what you have been doing but with the syringe its quite simple.
remove both bleed screws. attach your syringe filled with water to the lowest opening.
depredd syringe filling your system untill air stops coming out of the upper opening.
insert upper bleed screw remove syringe insert lower bleew screw.
-
no was merely pointing out that you do not require a brake booster to make a brake good, or to stop a frame from dying.
i have a dead grind, inspired pads, and a vee brake mounted to a brake adapter that is held on with jubilee clips and my brake is solid?

what brake adapter are you using?
the ones i had/have are stiff, and are now make my brakes even stiffer.
i found that my frame flexes and gives poor braking, i was also worried about premature failure due to the twisting.
the boosters are necessary on my brakes.
-
"flex is bad mmkaay"
the person is a major factor and opinions are subjective, i have noticed my fingers get a little pain now the
brakes are stiffer, but ill get used to it as having stronger brakes is more beneficial than spongy ineffective
brakes and comfy fingers.
from a design perspective, frame flex it the limiting force that can be appled ny the brake, force applied to rim
= force deflecting the frame.
I much prefer the situation where the limiting braking force comes from my arms and fingers, and not a flexing
brake mount.
think about your cars/motorbikes/ or even disc brakes
these callipers have no (noticeable) flex in order to apply maximum braking force.
imagine a BMW(anything) at 70Mph maximum braking force is limited by the grip tires have on the road surface
hence ABS and not flex/play/failure of the callipers.
no rider is wrong when they say X brake is better than Y brake, but in engineering/design terms flex is bad, it
causes a limiting situation (like our braking force) and puts additional stress/strain on the material (cracked mounts)
Ps, I am no expert rider.
Pps, ha strange indeed, the saracen frame gets me by for now, untill I get a nicer frame
-
boosters make your brake hold better, and that is a FACT.
when your brake slips backwards your pads try and grip the rim but dont hold enough,
so the frame flex's out more than normal. having a booster stops the frame from flexing
outwards so the pads stay in place and you have more hold...
This was my argument in the other thread.And as for the forks comment, i agree but depends which way your wheel is turning.

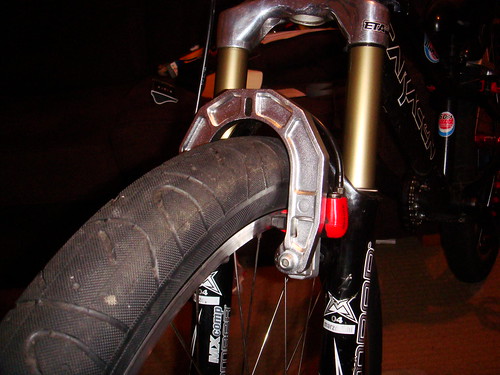
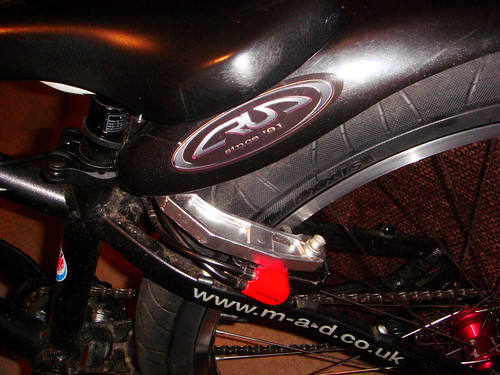
I agree with those. I had frame flex and poor brake power as a result.
I needed brake booster and remembered I had these DNA V-brake plates on an old bike.
I was going to use them to stiffen the frame and mount the brakes, but my tyres are too fat
for the maggie mounts to fit, so i removed the canti studs and mounted them as boosters, my
brakes are excellent now, no spongieness or frame flexing, and the pads apply much greater
force on the rims.
Pictures below

other pictures on flickr
-
Why's there two rings on your singlespeed kit?
There's one right on the inside, pushed up against the spokes. Or at least it looks that way.
Yes there is, it's due to a spacing issue, these sram cogs are slighty thinner than the single speed one
so I put the 14 tooth in to get the spacers clamped up tight, and if they are not strong enough for me
and I strip one i can swap them over and still be able to ride home.
-
Cheers guys, that is some really good information. I was not sure if the hub and sun ringle were the same.
I also contacted the guy I got it from and he can get a set for about a tenner.
Here are some pictures for peoples interest. If they look similar to other manufacturers parts i would like to know.

Three pawls, I do not know why one is of a different material, this one was slipping untill i stretcehd its
spring a little
Axle and hub.

Pawl.

-
Last installment I think. I have replaced the chainring bolts for machined down button head
hex bolts spacers and nylock nuts for strength. replaced the chainring for a middleburn 22
tooth and a 13 tooth (spare 14 th) on the rear from a Sram cassette.

22-13 feels a better ratio, good feel, but still not as much top speed as bmx, but is smooth
and a comfortable enough to learn on i think.
Close up rear

Now just to get out on it and get learning
-
Or try this calculator.
It is fairly straight forward.
you need hub flange diameter (spoke hole diameter)
flange offset fron hub centre line
Rim diameter (ERD diameter from nipple hole to opposite nipple hole)
and rim offset from hub centre line.
and number of holes.
that will give you the spoke lengths for various cross patterns.
-
Cool, that looks quite interesting

Did it work any good?
I does work well, they are better than any other brakes i have had and have more
force than the new bike as the frame is stiff and the larger studs reduce flex aswel.
Ill be pretty much using it for street, that and just riding around untill i can get better
at the basics for now.
-
Hello, I need a little help to find a replacement pawl for my ringle hub
you can see the hub in my topic from NMC here.
I would like to know if anyone is famliar with it, or if there are any places
to get spares for it. Tomorrow I will get some pictures of the pawls and
fingers crossed I'll be able to get a replacement.
Cheers.
-
Try it yourself, its is easier than it seems at the start.
I did recently adn I'm really happy how they turned out and I can fix them
myself aswell now. read the info here and there is plenty more to find on the
net.
-
Thanks guys, I'm really happy with how it turned out.
The pegs and axle were very effective for pressing the headset cups into the frame
and one of my mates was impressed by simplicity of it, has borrowed for his new frame.
I have to say I am impressed and surprised by the Simple Eject hub, not only does it look
great (to me) it was really nice to build up and is very smooth, i spun the wheel yesterday
and it kept going for a good five minutes.
here are some pictures for Revolver
Its a DB joker I have been using as it is lighter than my GT freestyle(?)

I though i would try a maggie on it to improve the brakes, I don't do any bar spins so no
need to have gyros and all that stuff. maggie mounts reversed as U-brake studs are in a
different position to Vees.

I had to drill out the mount blocks to take the larger U studs, and was lucky with the chain
tension and wheel location lined uo with the brakes set at maximum position.

It's pedals have been nicked for the new bike.
-
maggie bmx when I get home.
cheers I got this frame cheap and figured it should be decent to try and learn a few things on, I'm not going
hardcore any thime soon so will be good.
These are the first spring forks i have ever had, they are a little soft now, needing a bit more preload to take
my weight but the eta is good locking them down to the last 25mm of travel, just enough to reduce landing/impact
shocks up into my wrists.
If I'm upgrading ill be looking at Identiti as I like their frames, or go on a quest to find a Evil Imperial.
Advise on frames will be handy aswell.
-
Bleed from bottom to top so the air can rise, try have the lever hole at its highest, and make sure the TPA is fully wound out
to get the most oil in the system as possible.
I cant think of anything else, i just bled mine this week.
-
I had the bike out to unit 23, and it rides well, easy drop ins and I am getting more comfortable on it.
Slight problem though, sheared the chainring bolts and buckled the ring.
I'm always interested to see some damage, here you go.


I have replacement 22 tooth ring and I am now on the hunt for some good bolts to get running again.
-
It's done, I got the forks yesterday and finished the build, bled the brakes and took it for a spin.

After the quick shake down, the forks need a lillte more preload but are great with ETA/lockout
and I need a slightly bigger chainring or smaller rear sprocket, but that is only to get a little more
speed out of it.
It is a real smoothe ride, and in the wet the tyres still had good grip for general riding.
Any way thanks for looking.
Ps are there any recommendations for good brake boosters in red, and where to get them?
Cheers
-
Just go at it systematically. Start at the "key spoke" closest to the right of the valve hole.
Have one of the web guides handy as you do it to, they are all very similar.
I followed This Guide and it worked out well, and This page for the spoke lengths.
Have faith in yourself and you should be good, are you using new spokes?
-
Ride for the sake of riding man. Ride because you like to ride. Don't worry about other people.
Lets be honest here...
I suck balls at trials. Like, there is sucking and then there is what I do. It's like if there was a king of sucking I would be his assistant or some shit.
I ride because I have fun. I get nervous when I grab my bike and go outside, but that goes away right away after I start up. Everyone on this forum rides better than I do. Everyone I see outside rides better than I do. I was doing catwalks off a curb the other day and coming down this big ass hill by my house is this kid (couldnt have been more than 16) does a wheelie for a solid 150ft (50m) and shows me up like the jack ass I am. I felt bad, I'll be honest. I got schooled and the kid wasn't even trying. Oh well... some people are better and I keep in mind I'm new to this sport.
I got a little off topic but the point is, ride for yourself man. Don't worry about other people. People are sh*t anyways.
I agree, get out and enjoy.
though i think I may be worse than you. There is always someone worse.
-
A bit more for you all.
Very slow progress waiting for parts to arrive.
Cane creek headset arrived this week, nice sealed bearings all round

Pressed into the frame using and old axle and two pegs


All that is left now is seat post and clamp, forks and bleed front brakes.
-
The manual states to clamp the hose in a vice, 5-10mm protruding from the blocks that prevent damage to it.
Yuo then take the barb fitting and tap it in gently, then lift the hose another 5-10mm and tap the fitting all the way in.
You need to find something that will firmly hold the hose in a vice, the bleed i have came with it,
I cannot think of anything else that would be suitable, sorry.
I imagine it will be difficult to reconnect without the correct tools.
Good luck
EDIT: That's what you need linked above.
-
The way I got cables through tubes in my kit car was first drill the holes, preferably big enough
for the cable and a grommet. Placed some thread (longer than the tube) in the first hole and tie
the other end to to the cable/hose.
I used a hoover on the other hole to draw the thred through, then the thread to pull the cable
through.
Good luck with it.
-
Some more.
Lacing rear wheel.

Complete and straight

Chain and tensioner installed

-
Rear hub arrived this morning, will get built today.

Ringle superduper8 with 4 bearings, aluminium axle QR.

A few other bits came in too.
Onza t-rex hanger deore QR skewer

and gusset simple tensioner

More coming soon.
-
Sounds good.
Im going through the same process now aswell. It will be good to see some of your
pictures. As for uploading them I have previously used sites like photobucket and flickr,
photobucket is a littel easier to use but i cannot use it through my company laptop.
Copy the link to your uploaded photos and use the insert image button above to paste
your link. its usually a good idea to preview your post too check layout before submitting.
Awaiting your build pictures.
Broken Chainring
in Beginners Trials Chat
Posted · Edited by gzus11
i cannot find my first thread from building my bike, but this happened to me also
what i did was replace them with propper bolts, i think they are M8 dome headed bolts.
i broke these, sheared the bolt, cracked nuts and stripped threads.