


Heatsink
-
Posts
2303 -
Joined
-
Last visited
-
Days Won
23
Content Type
Profiles
Forums
Gallery
Everything posted by Heatsink
-
From the album: Heatsink's Photos
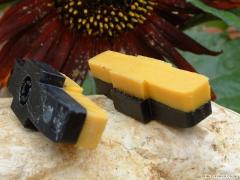
Brakes that work -
From the album: Heatsink's Photos
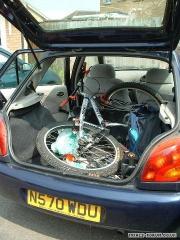
In she goes! -
From the album: Heatsink's Photos
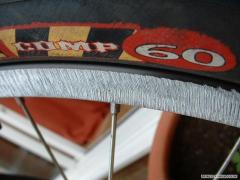
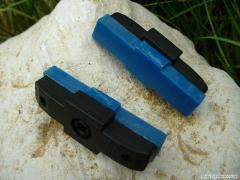
Grippy -
Functional and aesthetically pleasing (Y) Do you need a longer QR though? How do you adjust the in-board position of the chain roller? Maybe the roller is made wide enough for the various positions. Why not sell a few of those, as has already been suggested, there's plenty of room to undercut the tensioners on the market from people like Ripoff-All, whilst still making it worth your while :( First time I'd seen this tensioner too: Rennendesigngroup tensioner - $50 (£27 not including postage) Steve
-
From the album: Heatsink's Photos
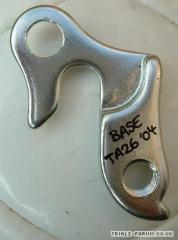
Of course this fits other bikes too: Saracen X-ile Sarcen X-tort ..... Cheapest source of this hanger to be confirmed -
From the album: Heatsink's Photos
Off these puppies go to be tested by someone other than my biased self -

More home-made pads Version 2- Different compound
Heatsink posted a gallery image in Member Galleries
From the album: Heatsink's Photos
About to be tested! -
From the album: Heatsink's Photos
420cm length -
From the album: Heatsink's Photos
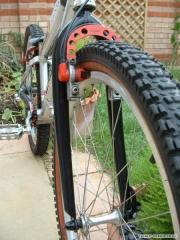
Base TA26 '04 frame 320mm Cromo forks Mavic D521 F+R, Hope Rear hub Middleburn cranks + 'Ard guard Single speed via custom cassette and rear mech with short cable length ziptied to frame. Rear brake: Magura + Heatsink "Konig" pads (in testing) Front brake: XT Vee + Heatsink Vees Echo bar & stem 2.4" Intense Blurr rear tyre 2.35" IRC El Gato front tyre -> Updated photo to come! -
From the album: Heatsink's Photos
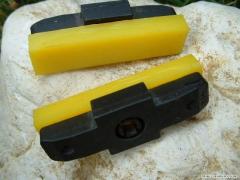
After a period of research, I got hold of some material which the best evidence available had highlighted as the very same used for Koxx Bloxx. Then I made these pads up to test their performance. No messy screws required, pads snuggly imbedded into the backings so only glue was used. All I can give away is that future versions will have 8mm of pad rather than the 6mm on these. 20th June '04: Took the Koxx Bloxx out of my rear brake and compared the material softness to my homemade pads. Although I don't have a durometer to measure the hardness, I have got hold of 9 samples across the hardness range, and I was pleased to see that the material I've used appears, in my limited subjective comparison looking at deformation with a point, to be of equivalent hardness. Fitted the new pads to my bike (fortunately I didn't need to set the brake up again since they have the same amount of material on them as the Bloxx - so everything in the braking system has remained unchanged for a fair comparison) I found they behave the same as my Koxx Bloxx Locking up with exactly the same ease, which helps my cofidence on the bike. I'd already roughed up the braking surface on the pads so they visually looked the same roughness as my Bloxx after being run for a while against a ground rim. I'm well chuffed they work! I need some new pads for the front, but the thought of buying another set of Koxx Bloxx was getting painful! June 25th: More pad material ordered so I can make pads up for other people to test...... I've been waffling away about how they work so well, but to be truely objective I need others to give them a try too. July 15th Jon Fisher (quick spider) recieves 1st released set of Heatsink pads for Tech04 July 19th: Feedback from Jon: "Update... Still got good lockage on my dying grind. They were working well enough to manual down the hill at Tech in the rain. Not sure if they've worn much either. I'll refresh my grind sometime soon and see what difference that makes. Bottom line is that they're easily as good as Bloxx Jon" July 20th Dann recieves 2nd set of Heatsink pads July 24th Pads released to all: I've made up a batch of pads ready for backings to be attached. If you're interested in being one of the first guys to have a pair of these pads, here's how much I am selling them for. There's actually a fair amount of careful work involved in making these so I've priced them at a level that I think makes it worth my effort and time spent If you supply a pair of old pads (so I can reuse the backings) - £10 Heatsink pads (includes postage) Since my pads rely on recycling old pads backings, if you send any extra pairs of backings to me: (still attached to old pads is fine) you can get a pair of Heatsink pads cheaper The table below summarises: Pairs of backings sent...............£ Pair of Heatsink pads 0............................................£12 1............................................£10 2............................................£8 3............................................£6 4............................................£4 5............................................£2 6............................................£0 7............................................I pay you £2 + pads 8............................................I pay you £4 + pads etc If you'd like a pair then give me a PM, and send me the backings and appropriate £. Cheques are fine, payable to "Stephen Spurgeon" or cash suitably taped together and maybe put in a jiffy bag to disguise it from being recognised and removed by an unscrupulous postie My address: Stephen Spurgeon The Technology Partnership Melbourn Science Park Melbourn Herts SG8 6EE ^ I've put my works address because I can pick the post up the moment it arrives Cheers, Steve -
I did my 1st grind the night before DJ's funeral. I'd been putting it off for so long thinking it would be tricky. Borrowed a grinder, and only had the cutting disc for steel. The grinder was very loud, but felt steadier and so safer than I thought when actually in contact with the rim Had a practise with a spare wheel to start with. Essentials to remember (Concerning the shards of Alu which you grind off!): 1. Wear safety glasses and gloves (I used my cycling gloves, and it's worth the hassle of going to B&Q and buying some safety glasses rather than getting a sharp shard of Alu in your eye!) 2. Cover the hub in some way to stop the tiny shards of Alu getting inside. E.g. use a carrier bag and some sellotape, an old sock, or some kitchen roll (as I've done in the pics) 3. Grind somewhere away from anything which could be damaged, e.g a car's paintwork, a stereo. I ground my wheels in the shed, and it was easy enough to hoover the shards up around all the junk in there. I found that dragging the cutter quickly in the motion shown below, and repeating this on the same portion of wheel until all smooth regions were removed gave a result identical to Mr Janson's. At first I thought that it didn't look as deep as others I've seen, but I haven't had any slippage. The Koxx bloxx on the back make a swoosh noise, no squeeking and squealing (edit: brakes weren't set up completely flat to rim - they squeaked after I'd set them up right :P ). The technique I use is completely different from the one I saw in the AndrewT video where he seems to hover in the same region, rather than work on an arc roughly 1/3 of the wheel. When I tried the hovering technique, it seemed to result in a relatively smooth surface. It was only when I tried moving the grinder quickly around the rim that the surface produced looked what I thought was acceptably rough. ^ My grind, it works for me :angry: ^ Disk used (note it's a "cutting disc" not a "grinding one") - 99p from B&Q :lol: (make sure you get the right size for your grinder!) ^ Technique: clockwise strokes around the rim from 1 - 5 pm. Upon touching the grinder to the rim, drag swifly for a courser surface. I find it takes me about 6 strokes to makes sure there are no missed bits. When that 1/3 (roughly!) of the wheel is done, rotate it around to present the next virgin part of rim. Works for me! Steve
-
Cracking idea :lol: I'm just going to print something out in Word, Heatsink one side, Steve S on the other and then double sided sticky tape it to my helmet, which will probabily be easier to see than my frame with my chunky person on it :lol: Steve
-
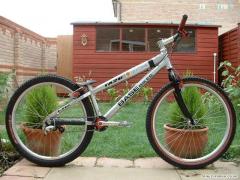
A decent bike for the first time :( Finally a use for the free MBUK grips!
-
The Base, at £169, is actually 57% of that price atm! Less than 1/2 the price of an Echo. You can't beat that value for money.....surely :(
-
The one in Redditch, where I used to live looked pretty insane, to my untrained eye :(
-
-
Please Delete
-
Hey, I've been doing some research - there doesn't seem to already be a roundup of miniseats available. It's based on info from the various vendors, which is dissappointingly sparse. Please post here if you can add to this info I.e. 1. Other seats available 2. Seat details I.e. Prices for Echo & Megamo seats, Seatpost size all seats fit in (I only know this for ONZA seats!) 3. Other vendors especially if the prices are lower (consider postage & packing though!) It seems that mini-seats are relatively expensive items for what they are - Has anyone found them for considerable cheaper than the typical £12-£17 that they seem to commonly retail for? My mini seat came without padding, and the previous owner had cut the sides away (Compare pics below of Brisa/Koxx, sides on seat with the slimmer Megamo/Echo seats) Sizing You need to find out what size seat post your bike takes, You may need a shim (as I need on my bike). Check sizing with the shop by phone since their websites are always crap and don't give the sizing you need to know! Of all the saddles below, it's only on the Onza website that they give the seat tube diameter (22.2, 23.4mm) for their saddles. The various shim sizes can be gleaned from: Chainreaction Seatpost shims - Check out the drop down menu for sizes. Miniseats Types: 1. Push-in: Plastic or Padded 2. Integral seatpost - Some are Carbon Look. 3. With rails: Typically padded (can be fitted to existing seatpost for convenience - no shims required there may be for 1 & 2) 1. Push In Echo push in from Echo UK - Phone them for price Megamo Uni seat, push in - £??? Phone them for price! Looks identical to Echo seat, if only the photo was better quality. Planet X Trials Saddles - £12.50 "Monty Neo" push in seat - £13 (+£2 P&P if order under £20) from Bikedock Unconventional looks. Koxx Tryall push-in Mini seat - £12.50 (+£2 P&P if order under £20) from Bikedock No Pic available! Very similar to Onza one but without a post. Onza plastic miniseat + post - £16 (+£??? P&P) - As fitted to Onza Raptor etc, 22.2 or 23.4mm Diameter "Koxx Tryall" Mini seat + post, Carbon look version - £Phone Koxx UK Brisa Seat + post, Carbon Fibre look (but just plastic!) - £15 (+£2 P&P if order under £20) from Bikedock www.b-4-t.com Paddled seat with rails - £17 Can be fitted to exisiting seatpost N.B. These guys make money on the postage so ask them how much it's going to be before you commit! Onza Padded trials saddle with rails - £13 (Postage & Packing £??) - Can be fitted to existing seatpost Which is the best for me? Smallest & lightest The Echo and megamo ones are very low profile and must be the lightest. (although the difference between these and the saddles with posts or rails is only going to be the difference between wearing your watch or carrying keys or not!) Aesthetics Then in terms of looks I like the Carbon look ones (Koxx C/F and Brisa) The funky graphics of the Planet X ones combined with some padding may suit your colour scheme and taste. Practical saddles For praticality (no need for shims or fettling, and a comfortable padded perch too) there are the railed saddles which have the downside of sitting higher though. Take your pick! Steve
-
If you're wondering where these bizarre fractional mm sizes have evolved from it's useful to know that they hark back to our imperial days: Just remember that there are 25.4mm in an inch and you can work out the larger sizes... 25.4 mm (1 inch) 28.6 mm (1 1/8 inch) 31.8 mm (1 1/4 inch) Hope this is helpful, Steve
-
You could always try and make your own SS arm: Home made SS Steve