Bruiser1
-
Posts
228 -
Joined
-
Last visited
Content Type
Profiles
Forums
Gallery
Everything posted by Bruiser1
-
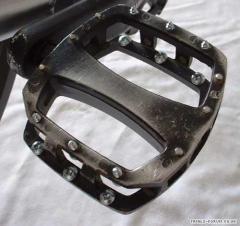
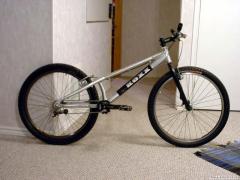
Crosspost from OTN. Still rocking it after 4 years. I found a crack in the driveside seatstay/seattube weld last year at a comp, but I don't want to give up dual disc just yet. This is the strongest, most consistent, reliable, maintenance free braking I've had on my bikes. It. Just. Works. Always. Next frame I'll go back to rear V's, but I'll miss rear disc. Some part changes for this year, with lots of light stuff managed to get it at 19.6 lbs now. Went back to 16/14 gearing with a 16t echo Ti threaded cog, Breath CNC cranks, DT revo 15/16g spokes front and rear, and ti bolts. Trial zone 203mm rear rotor, and Ashima 97g front 180mm rotor. Had to use a half link and a KMC quick connect link to use 16/14 on this frame. Latest shot with some new parts. For whatever reason I couldn't get the rotors to work 100%, and with Raccoon Rally coming up I had to put my G3's on again. I'll give the light rotors another try after the comp, maybe there's too little pad contact area. More rainbow Ti bolts. Don't normally need a tensioner, the funbolts are more than strong enough on their own. But since I changed gearing, the axle sits further back and slips a bit into its old indentations. Snail cam takes care of that. Trying out caged pedals, super grippy. Echo TR with rockman cages, had to grind 3mm from each mounting post. Ti rotor bolts. Red alu bolts on the XTR levers and grip stops. Chainring bolts More rainbow Ti Will try for some clearer non-phone pics
-
First off, "Last visit Dec 22 2005", daaamn it's been a while. I pretty much had to ask this queston only here though. I'm getting that Tryall stem for stocks, and don't wanna get the usual boring flat bars so I got thinking about those onza carbon flats. What's the general opinion on them, are they strong/last a while? I pretty much have to get a bar with a lot of sweep, since I broke my wrist my Tryall bars are just painful. I'd love a set of the Onza risers, but they're still too flat for what I'm looking for. Oh and supercycles has the flat ones for like 35 gbp, which is about the same price if not cheaper than zoo/echo/bt/tryall on this side of the pond. What are they like in terms of shipping overseas, and getting orders sent out quickly? Any other shops carry these bars? Thanks
-
Yes, it will work fine. I've been running my XTR one like that for 2 years, and have had zero problems. However, I wouldn't want to run it with up tension. My chain is tight enough to allow it, but you'd have to have zipties or something pulling up on the derailleur, and that's not gonna allow for any flex when you hit the bash, or even just pedaling along, so it's gonna give you crappy, uneven tension. I run mine pushing down on the chain. OBVIOUSLY, you aren't gonna run the derailleur locked out like you would with a normal derailleur. There won't be any spring to tension the chain, and it's just gonna come loose on you all the time. It would be like running a Singulator locked out... To the ones that say they've had problems: what went wrong? I can't see any way for any problems to happen to mine, so maybe you guys had different setups, or tried to lock the derailleur out. I'll post pics of mine with my most recent setup, Kool chain and 16t rear cog. I'm running just the one cog, but back when I had 5, the barrel adjuster allowed me to shift between 4 cogs with 8sp spacing with no problems. Loved it for when it was time to ride long ways.
-
Echo's been busy with external bb's. Go to the echobikes site (and the other deng brands) if you missed the news. I think the most significant advantage is now the bearings are MUCH larger than on current ISIS bb's, so they're not gonna explode on you like they tend to do now. About the external cup issue, we'll just have to wait and see how they hold up to smacks. I know I do hit my bb shell everynow and then, but i guess it's nothing a piece of plexi glass and some heat can't protect (make a cool protector plate that follows the shape of the bb area.... or something). Plus you can't deny they look pimp, and come in every color. The gold one would look quite nice on my white levelboss.
-
Holy old topic! Glad to see people still like these mods though :closedeyes:. Everything is still holding up just fine. The XTR is going on 3 years now, and I've had no problems with it. Funny to see the XC'ers cringe when they see it chopped up and used singlespeed. I don't have use for the pad bodge anymore, Heatsink pads take care of that just fine. The 10mm batch B let me use a 521 in my levelboss frame, and now the 8mm Konigs do the same with a DX32. If I went back to a 521, I'd have to use the bodge again though, since the Heatsinks aren't 10mm anymore. I still have my pedals like that, and yes they are pretty painful when you grind your shins on them, but I wouldn't give up that no-slip no-shifting feeling for anything.
-
With a 185mm rotor, you can get an avid 160mm adapter and run that on the forx. Would be like having a rotor 2.5mm less in radius, so part the very top of the pad won't contact the rotor. It would work, if you absolutely have to ride asap, and manage to get your hands on one. Your local shop should have Hayes 6" front adapters, those do the trick just fine as well with a 185 or 190 rotor. Getting a 6" adapter and a 190mm rotor from hope sounds like probably the easiest to do, so go for that if you can. The mono trial rotors look real nice. Magura also makes 190mm rotors, which is what Koxx supplies their stock bikes with, but they don't look as nice as the mono trial rotors if you worry about that type of thing. You can also get a 8" setup, by using a rear 203mm adapter upside down, or a front 160mm adapter with a bunch of spacers.
-
Perfect slo-mo side shot of Vincent hooking a massive ledge during the Koxx days Paris ride. Vid inside: http://www.observedtrials.net/vb/showthread.php?t=13463
-
A bit different geometry on the frame, 40 mm bb rise. How nice are those powdercoated white rims, mmmmm.
-
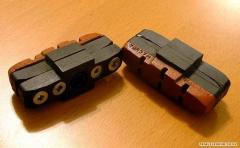
Monty X-Hydra pads, 35mm long.
-
The front wheel isn't turned when you measured, is it? Flip the bike upside down, align the front wheel with the downtube, and measure axle to axle, centre to centre. Measure from both sides of the bike, it should be the same. Forks will change the wheelbase, some are longer than others, some have more or less rake than others, etc. Just to add, and I know this doesn't make that much of a difference, since front hub spacing is narrower than rear hub spacing, your measuring tape will read a longer distance it will be triangulated about 18mm. :turned:
-
The first rider is Marco Hösel.
-
Contact avid, tell them you're a 150 pound XC rider using 160mm rotors, just to be safe.
-
I've seen this happen to 2 other calipers, that snapped clean off, but only because the adapers had to be cut a whole lot to fit on Brisa forks. But you guys didn't have to do that for your forks, did you?
-
I use the coins as well. It does ruin them after one use, but whatever. Right now, I can take my cranks off without tools though, so it's all good. A bolt works perfectly as well, and won't get deformed like coins. The derailleur hanger bolt is perfect for this.
-
Use the tape. Duct tape is super strong and comes in lots of colors. It's wide, so you won't need to double it up for any rim. Electrical tape comes in lots of colors as well. Go once around the rim, sticky side up, and then another loop, sticky side down. Depending on the rim width, tape width, and hole size, you might need to do 2 loops of each. I've seen people use different colored tapes side by side, for a stripe effect, some with different colors in each hole, and some that use wood molding strips like what you find along the edges of bookshelves cabinets etc. Others use a loop of tape sticky side down, and sprinkle glitter in the rim holes from the outside, for a glittery finish. I guess you could smear honey in the holes on the tape, leave the rim outside overnight, and find a nice collection of ants, flies, and bugs stuck to it to impress kids with. I'm gonna try some 1" wide gift ribbon, with maybe some wide clear tape sticky side up first, and a loop of tape over everything at the end. The ribbons come in tons of metallic colors, so I figured I'd use it.
-
http://www.trials-forum.co.uk/forum/index....&hl=coustellier
-
No, the quick bleed is done at the lever. I'll type up what you need to do for a quick bleed, and a full bleed. Read the steps, and see what they refer to on your brake. You should be able to easily figure out what parts of the brake the steps refer to. A quick bleed is for when you feel there is air in the brake. You tell this by pressing the lever and looking at the pads. If there is a delay between lever movement and pad movement, you have air. Do the quick bleed then. 1. You guys run rear levers on the left side of the bar. Pump the lever a couple times, then lay the bike down on its left side. 2. Undo the allen bolt, beside where the hose goes into the lever. 3. You'll see it might not be completely filled with oil. Press the lever a little bit to push any air out. 4. Top it up to the end of the threads, with whatever fluid the brake is bled with. If it's a stock magura, you have to use mineral oil. Do not use water for a quick bleed on oil-bled maguras. 5. Reinstall the screw, with a paper towel handy because oil will come out. Pads should now be moving as soon as you put any sort of pressure on the lever blade. For a normal bleed, you will need more than just the syringe. Go to your local Do-It-Yourself store, and get some clear tubing to fill the syringe. 2 feet will be more than enough, and be cheap as wood chips. You'll need at least one of those barbed fittings that Joe posted a picture of. Your bike shop should have somelaying around. Cut the hose in 2, install one piece to the syringe, and push the barbed fitting into the other end of the hose. Fill the syringe with whatever you're bleeding with, make sure to fill it enough. You don't want to have to refill the syringe half way through the bleed. You will also need an empty jar or bottle to catch the old fluid. An empty water bottle, tied to the handlebars with some wire or string works perfectly. So, materials again are: - fluid (mineral oil, water, etc. Choose one, do not mix them.) - 1 syringe - 2 feet of clear hosing (cut in half) - 1 barbed fitting - 1 empty container - string or wire to tie the container. - 5mm and 3mm allen keys. - 8mm open end wrench for the barb fitting. Onto bleeding. 1. Lean your bike against a wall. Loosen the lever, and rotate it until it's parallel with the ground. 2. On the brake cylinders, one cylinder will have the crossover line, and a 5mm bolt beside it. Remove the bolt. 3. Take the syringe, screw the barbed fitting into the hole you just removed the bolt from. Tighten the fitting a bit to form a good seal. 4. At the lever, remove the 3mm allen head grub screw beside where the hose goes into the lever. Stick the other piece of tubing in the hole, as far as it will go to make sure it doesn't come off during bleeding. This is where having a second barbed fitting would be handy. If not, just tape it onto the lever for more security. 5. Take the empty container, jar, or water bottle and tie it to your bars. Put the bleed hose coming out from the lever into it, so that the old fluid will go into the bottle. 6. Back to the syringe. Start pressing it to put the new fluid into the brake. Make sure to avoid any air in the syringe from being bled into the brake. You'll see dark fluid coming out from the lever. Keep bleeding until the fluid starts to come out clearer. 7. Remove the bleeding hose from the lever, and reinstall the 3mm head grub screw. 8. Remove the syringe and barbed fitting from the brake cylinder. Top it off with a drop of fluid from the syringe before reinstalling the 5mm allen screw. You're done. Check that the pads move at the exact instant the lever is pressed. If there is a delay, do the quick bleed. I hope this covered it all, good luck.
-
I've seen a lot of frames with the red stickers, but it's most likely just a mk1 frame. About the "beefy" coust that people want, what's wrong with the new T-Rex?
-
-
No problem. Glad to help.
-
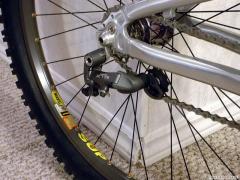
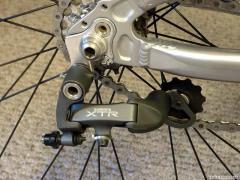
David, here's another pic showing where the pin is. On all Shimano derailleurs, except XTR and DuraAce, the pin will have to be cut off or ground off. On XTR and D.A it simply unscrews. Any more questions, just ask.
-
Thanks for the replies guys. Here's another picture of the XTR, this time from behind so you can see what to use and how to make the plate that lets you shift gears. The spring question, yes the b-tension spring is left in, as well as the spring for the cage. Another thing you'll have to do to get the cage spring to act as a second spring, is to remove the stud that keeps the derailleur cage from rotating too far backwards. On XTR derailleurs, it's a black bolt that unscrews. On other derailleurs, it's a stud that's riveted in place. hack saw it off or grind it off. This way both springs will be pushing down on the chain. The plate question, you can see in the picture what I used to be able to use gears. It's just some steel strapping that I bent to go over the pulley. You can use whatever sheet metal you have. The strapping comes with holes already, so that's a plus. Jon, you run 2 gears right? This bodge will work great for you. Just make sure the chain is as tigh as you can make it around your trials gear, this way the derailleur will be able to hold better tension when you shift into the small cog. Everyone else, thanks for the comments. Any more questions, just ask.
-
bike stuff and such
-
-

From the album: Roman's pictures
view from behind. metal plate allows for the use of gears. -
Glad to hear you guys like these. For the pedals, yes you could use some shorter screws if you wanted to, some 3/8" long ones, and even cut the tip off them if screws like these scare you. Yes they are super sharp, I've taken a few hard hits to the shinpads and they have gouges now from the screws. Don't try to ride these without shinpads, unless you want to risk getting seriously mangled. You can use some 3/8" screws if you want. I had the 1/2" ones on hand, so I used those. I think the extra lenght of the 1/2" ones give them a bit more holding power, but with 4 screws per pad, some shorter screws should be fine. Oh yea because VP pedals are so grippy. Oh wait... Nope the b-tension spring pulls the derailleur down. You can see this when you take the rear wheel off and the derailleur swings towards the back of the bike, if you don't have the derailleur locked out that is. Also the adjusting screw for the spring lets you choose how much tension you want for it. Unless you have it with up tension, how is a singulator, tension seeker, etc any better?