RobinJI
-
Posts
4720 -
Joined
-
Last visited
-
Days Won
10
Content Type
Profiles
Forums
Gallery
Everything posted by RobinJI
-
Sounds right to me. 12v is 12v, the only thing it could change by not being a bulb is the current draw, but it's very, very unlikely that a little solenoid has a higher draw than a halogen bulb, so it should be safe with the factory wiring. Also, while it's a slightly sketchy attitude, if it doesn't work, that's why Seat put a fuse in for you . I believe the HID bulb should also draw less current than a halogen, so there shouldn't be any need for any new relays for what you're doing. The only thing I can think of that could cause issues would be if the original halogens used a twin filament lamp like a H4, because they cut the feed to the dipped bean when they switch to full, meaning your flaps would be open, but everything would go rather dark. In which case you'd want to sort something out with a relay to remain open for both dipped and full beam, but the flaps to open only with high.
-
Ah, fair enough, I won't do that then!
-
The laptop's literally a month old, which is why I'm cautious to do anything like take it apart. Usually that's the first thing I'd do, and I've stripped down my old personal laptop a couple of times to clear out dust and replace heat-transfer paste, but I'm more hesitant with one that's brand new and 5 times the price! I don't want to do anything that could invalidate the warranty. The heat sinks are quite easy to see down and they look perfectly clear (it's a dell Precision 7720.) The place we were working was very damp with a lot of moisture in the air, which I'm sure is what has carried the smell into it, and cooked it onto the heat sinks. (the model was from a supplier and they'd exported it in about the most memory-hungry way imaginable, so the laptop was working hardish). It's got better over the last few days with some use, but I'd still like to find a safe way to deal with this smell if anyone knows one. Luke, I'll definitely blow the air line through it at low pressure next time I head to the workshop. I can't really think of anything else that isn't a risk!
-
Ok, I know this is a bit strange, but I need to do something about it! I work for a company that imports, installs, maintains and sometimes manufactures waste management equipment. I'm a design engineer, so 90% of my time's in the office drawing machines for squishing, squeezing or mashing stuff, but on Friday I had to go and help with an installation. Sadly this one happened to be in a biogas generating plant. These places are basically swimming in decomposing food waste, they're foul, the smells wretch-inducingly bad, and it lingers. Most of the stuff we used can be wiped down, or thrown in the washing machine and everything's fine again, you'd never know you'd been there. However it came to light that the guys didn't really have enough in the way of drawings of the kit we were fitting, and with the clock ticking I had to resort to loading the CAD model up on my laptop so we could get the info we needed as we went. Stupidly, to save a lot of time, I did this in the back of our truck, inside the foul smelling building, and as a result my nice one month old design work-station took a few gulps of stinky air now has a distinctive aroma of rancid food waste. I've wiped down all the wipe-able surfaces with disinfectant, but I can't really wipe down the insides. I've tried leaving it next to a curry I was cooking with it rendering something complex so the fans were at full-pelt, and it was breathing in a load of curry smell, but it hasn't shifted the stench. All I can think to do is spray something like oust or fabreeze through it, but I'm a bit cautious about spraying anything into a fair bit of money's worth of nearly new laptop. Does anyone know is these kind of products could cause any harm to the insides of a laptop? TLDR: I took a laptop somewhere smelly, now it smells, how do I get the stink out of it without taking it apart or risking causing any corrosion.
-
They are ridiculously useful, I'd have been completely screwed without the lathe and welder yesterday. I'd have needed to get a friend to come and get me, get a dealership to order the part next day for God knows how much money, then get a lift or dig out the road bike to collect the part and go fit it. Not to mention leaving my car in the way of the guys I share the unit with.
-
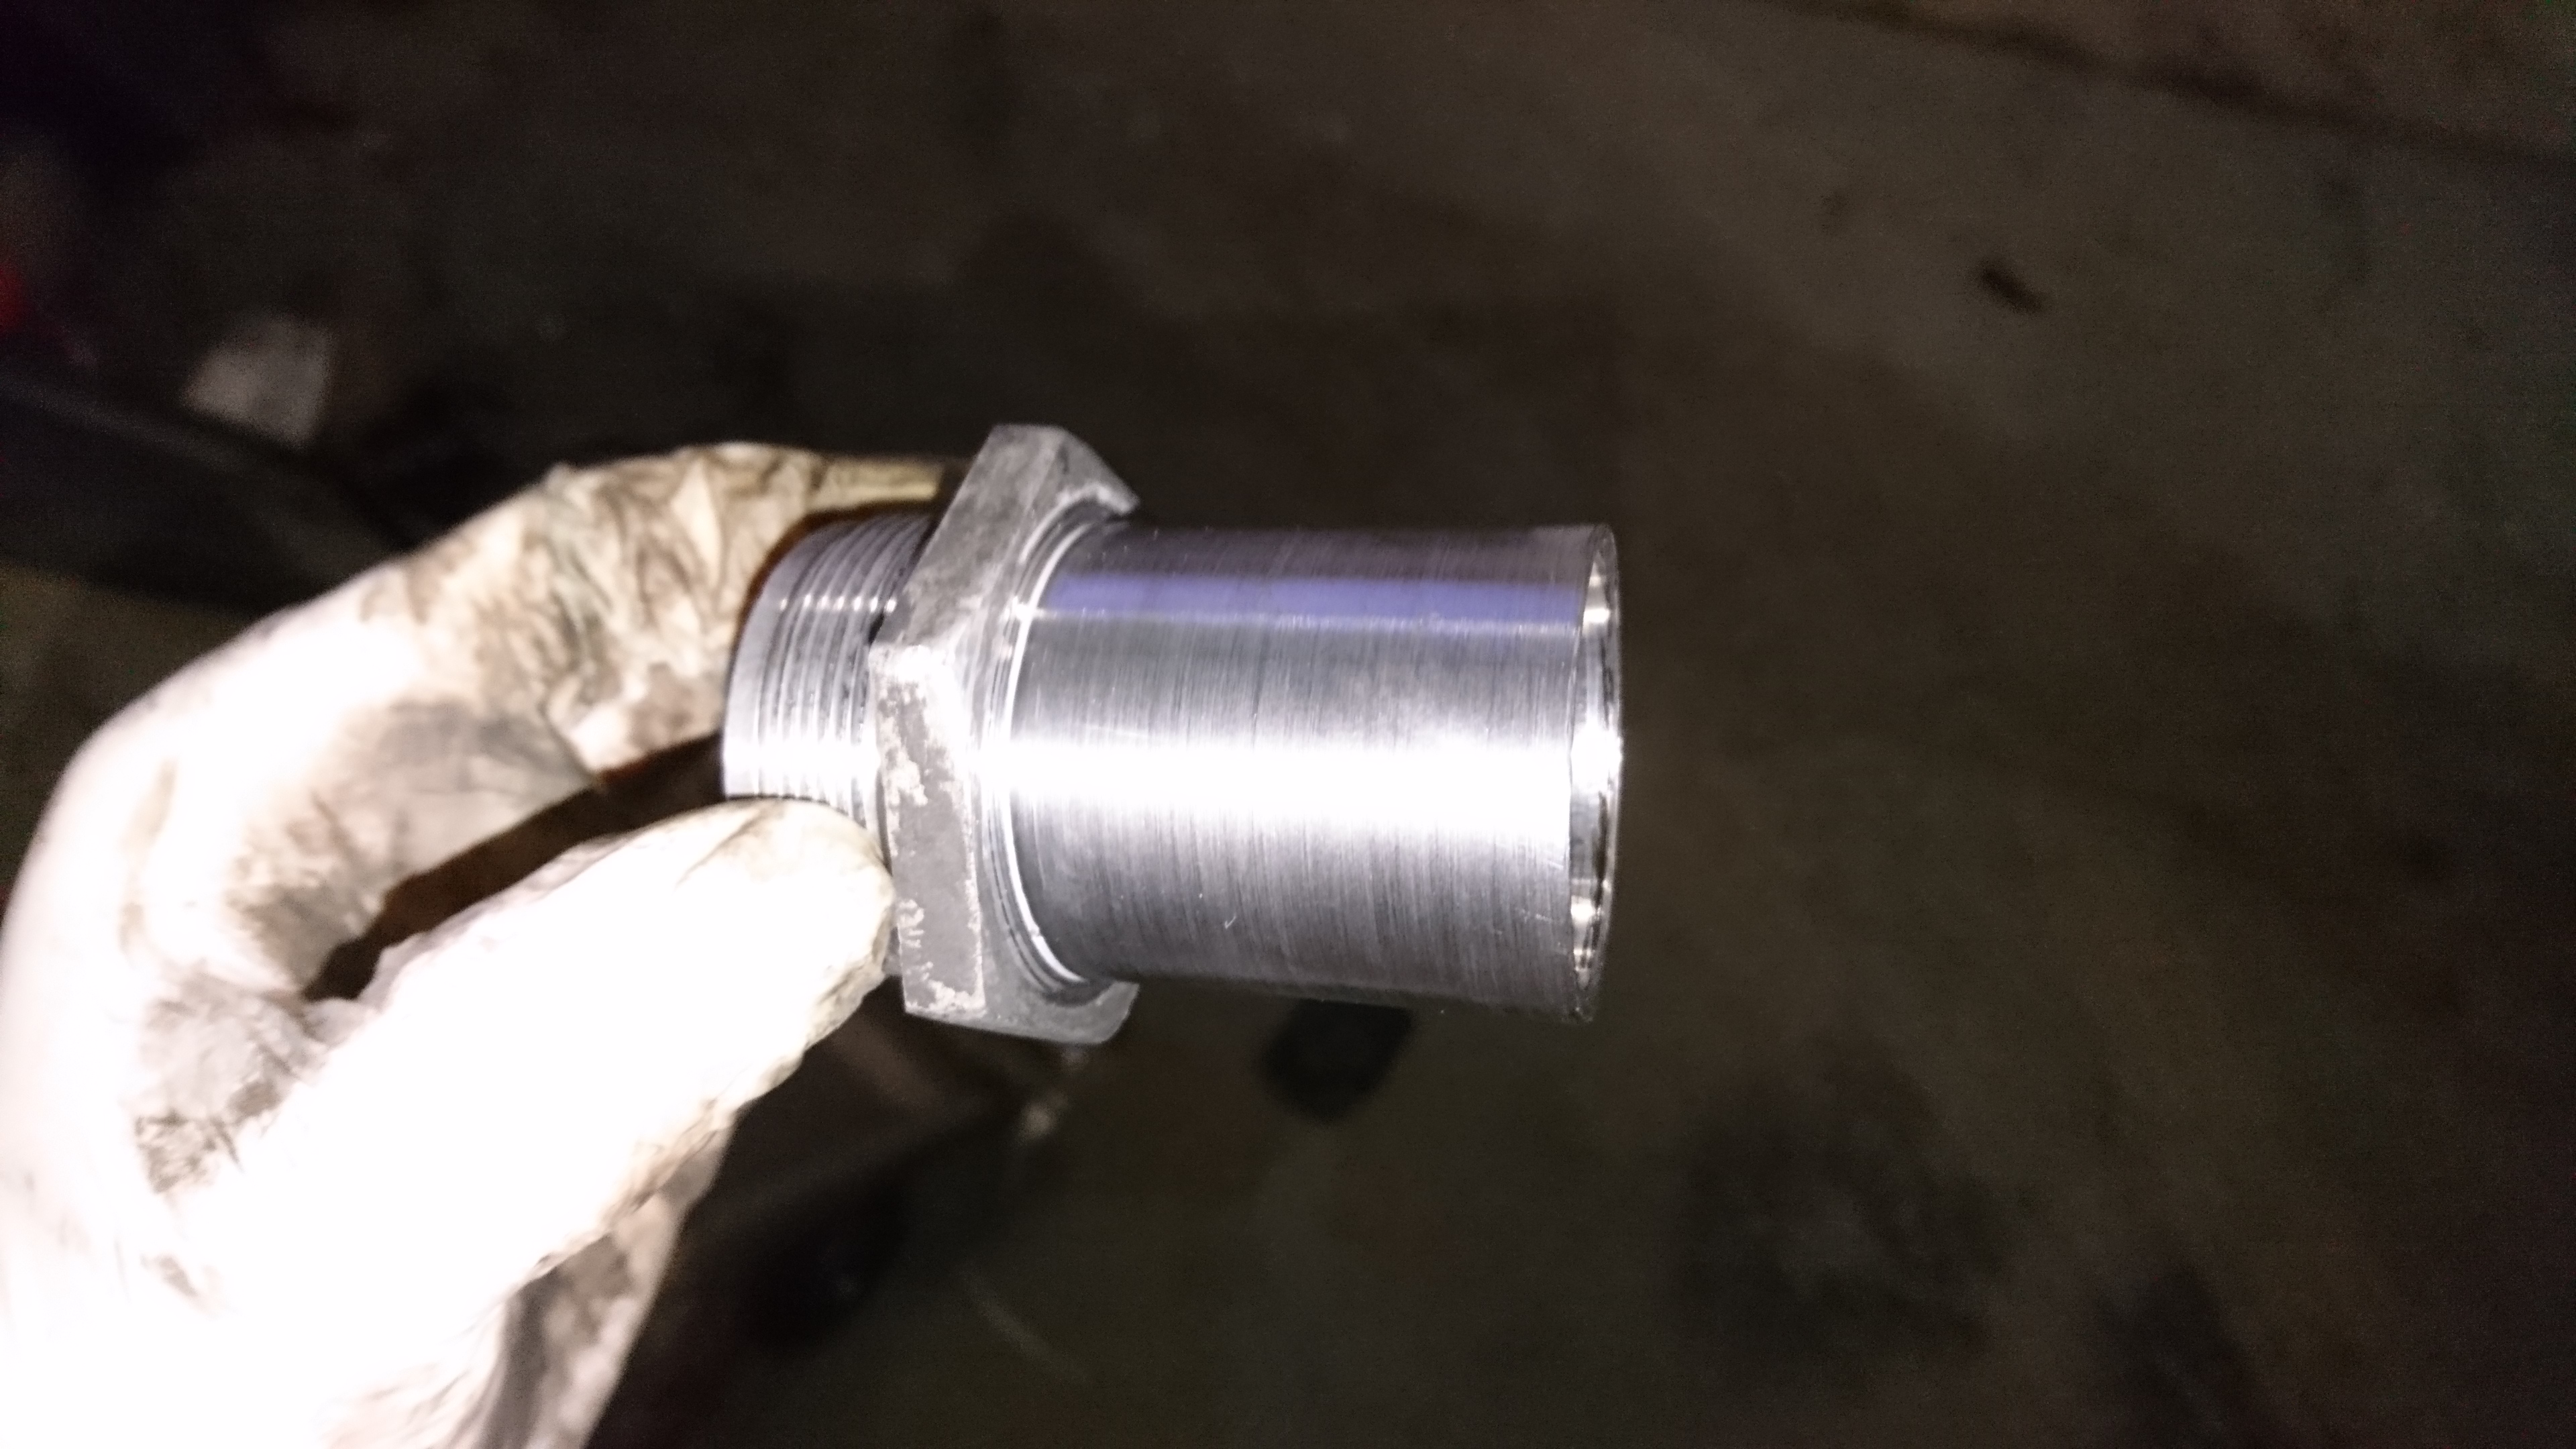
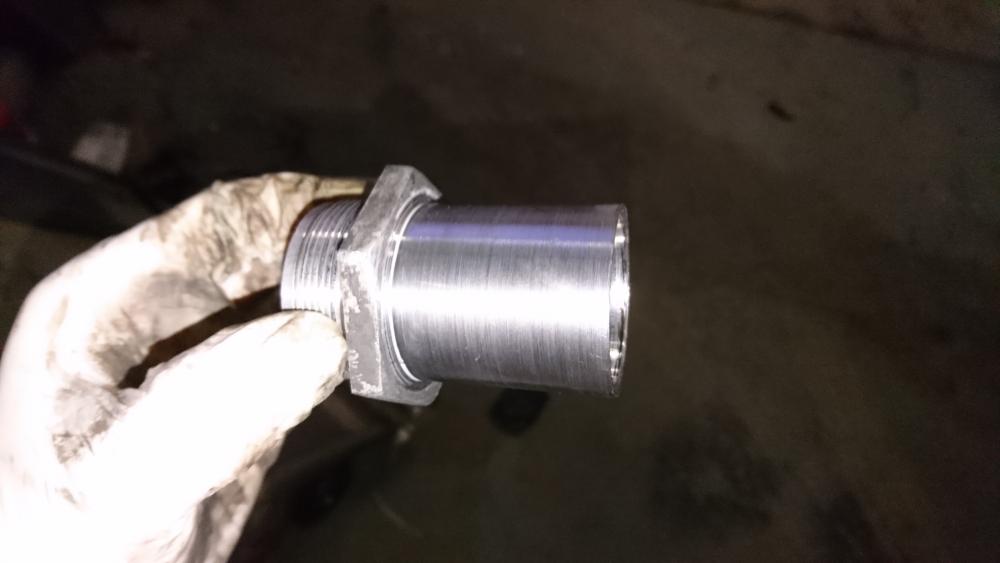
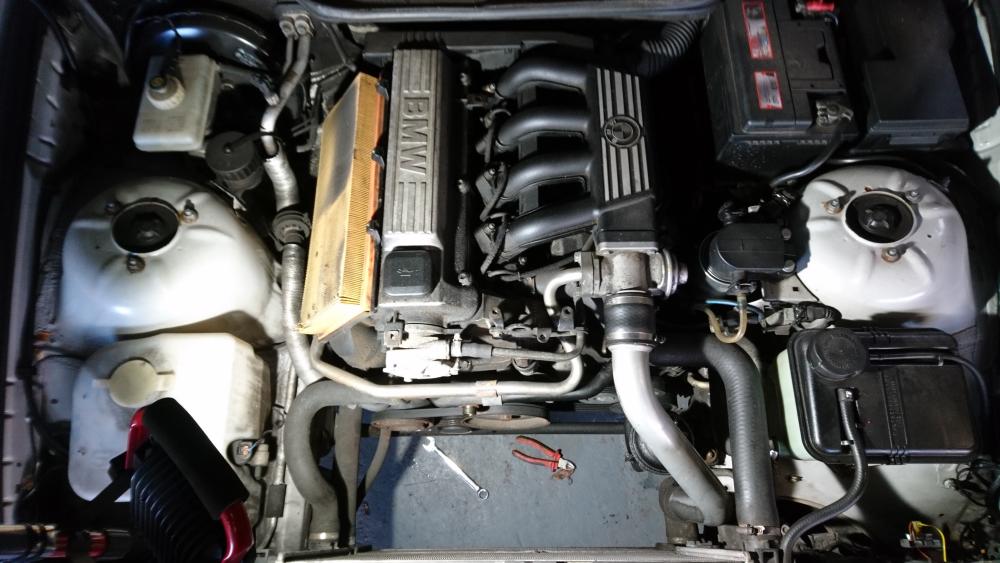
Just got home from a 12 hour aux-belt change on the e36 On the bright side, it's successfully fixed the horrible rattle/sqeak the car had at low revs, on the down side.. 12 hours!!! Everything came apart fine, besides the fan removal tool I'd bought being a 36mm, when it needed to be 32mm, but a quick chop and weld and it became 32mm anyway. Oh, and the tensioner needed a 'tool' making to release it, in the form of a 1.5m length of box with 2 old head-bolts in it. Once the fan' off, there's no shortage of space at the front of the engine in 4-pot BMW's Once the belts were off, it was clear what was making all the noise, the belt tensioners pivot had warn to the point that the tensioners idler wheel was skimming the back plate of the crank pully. The tensioner needed a 17mm allen key to remove it, which I don't have, so I welded a 17mm bolt to the handle end of the fan removal tool which did the trick nicely. Removing the tensioner showed why it was sitting so out of line; the peg it rotates on was badly warn at an angle. Oh yeah, getting this peg out of the tensioners arm needed a 50mm socket, I don't have one, so some time with the welder and some 3mm plate later I did have one. A quick check on real OEM and the new part's £120 and wouldn't be here until January. Sod that! I threw the peg in the lathe, skimmed a couple of mm off it then bored out some tube to a snug fit and chemical metalled it on. I let it cure while I changed the oil, then chucked it back in the lathe and turned the O.D. back down to the right size. Job done, time to throw it back together. Before (well, after a 1st pass in the lathe, excuse the embarrassing state of the lathe!) After: I got as far as having the belt back on with all the bolts in, then when I tried to torque the bolt that holds the tensioners idler pully to the arm, it just span. Balls, off it comes again, luckily I had helicoils to hand, so it was easily sorted. I assembled things to exactly the same point I got to before, then as I torqued up that same bolt, a loud crack preceded a chunk of aluminium hitting the floor. The end of the arm had split off around the bolt hole! As I removed it to inspect the damage another chunk fell off the other end of the arm! Lots of swearing later and wondering how the hell it was going to get home (my unit/workshop's about 7 miles from home), I decided the best option I had was to remake the whole bloody arm in steel. I dug a length of an old baluster out of my off-cuts pile, which almost had the right I.D. for the pivot 'pin' I'd already fixed. It was close, but still needed slitting, squeezing smaller, welding closed again, then boring out in the lathe to get it to the right size. Then after some time cutting and bending 3mm steel plate, I welded it up and had a new tensioner arm! It took a couple of test fits to get the pully sitting spot on, but luckily from that point on everything actually went smoothly, and the arm seems to work well. I'm bloody knackered, but it's so nice to finally not have any dodgy noises coming from it! The rattle had been there for a while, slowly getting worse while I struggled to work out where it was coming from. I was worried it could be the DMF, so I'm relieved not to be forking out ~£200 for a new one!

-
Cool, Thanks Tom. Those look like cool little pods, I'll more than likely be on the lookout for something similar for the Porsche to take the monotony out of motorway drives. (The joy of living in the corner of the country!) I've ended up ordering some Pioneer TS-A132Ci Component speakers which seem really well reviewed. I'll have to see what they're like when they turn up. I went with components in the end because the rear speakers are in the roof facing straight down into the top of the boot, and with the components I can mount the tweeters either in the C-pillars or a forward facing section of the roof lining, to hopefully get things facing a more sensible direction.
-

A practical machining/engineering problem. Please look in. Tah.
RobinJI replied to CC12345678910's topic in Chit Chat
We all do it occationally! Speaking of over-thinking, might it be possible to get bearings with a 15mm ID that fit the other dimensions? It might be worth checking somewhere like www.simplybearings.co.uk in case you can save your self a whole lot of hassle that way. -
Cool, I'm glad you didn't have any trouble with it, even if it's because you hadn't tried rather than tried and failed!
-
A practical machining/engineering problem. Please look in. Tah.
RobinJI replied to CC12345678910's topic in Chit Chat
I might be confused, or missing something, but surely the 16 by 1 tube (14mm I.D.) will need boring out to fit over a 15mm axle? Or is that the plan all along and I'm just misinterpreting it? Personally I'd just be looking to replicate the fit of the bearings onto the axle, as the sleeve's basically doing the same thing as the inner bearing race in terms of loading. So a press fit with everything at room temp, and in most hub's cases not even a hugely tight press fit. As forteh says, a snug sliding fit and some loctite should do it. No need to mess around with heating and contracting things, certainly not both or as he says, getting it off will be near impossible. -
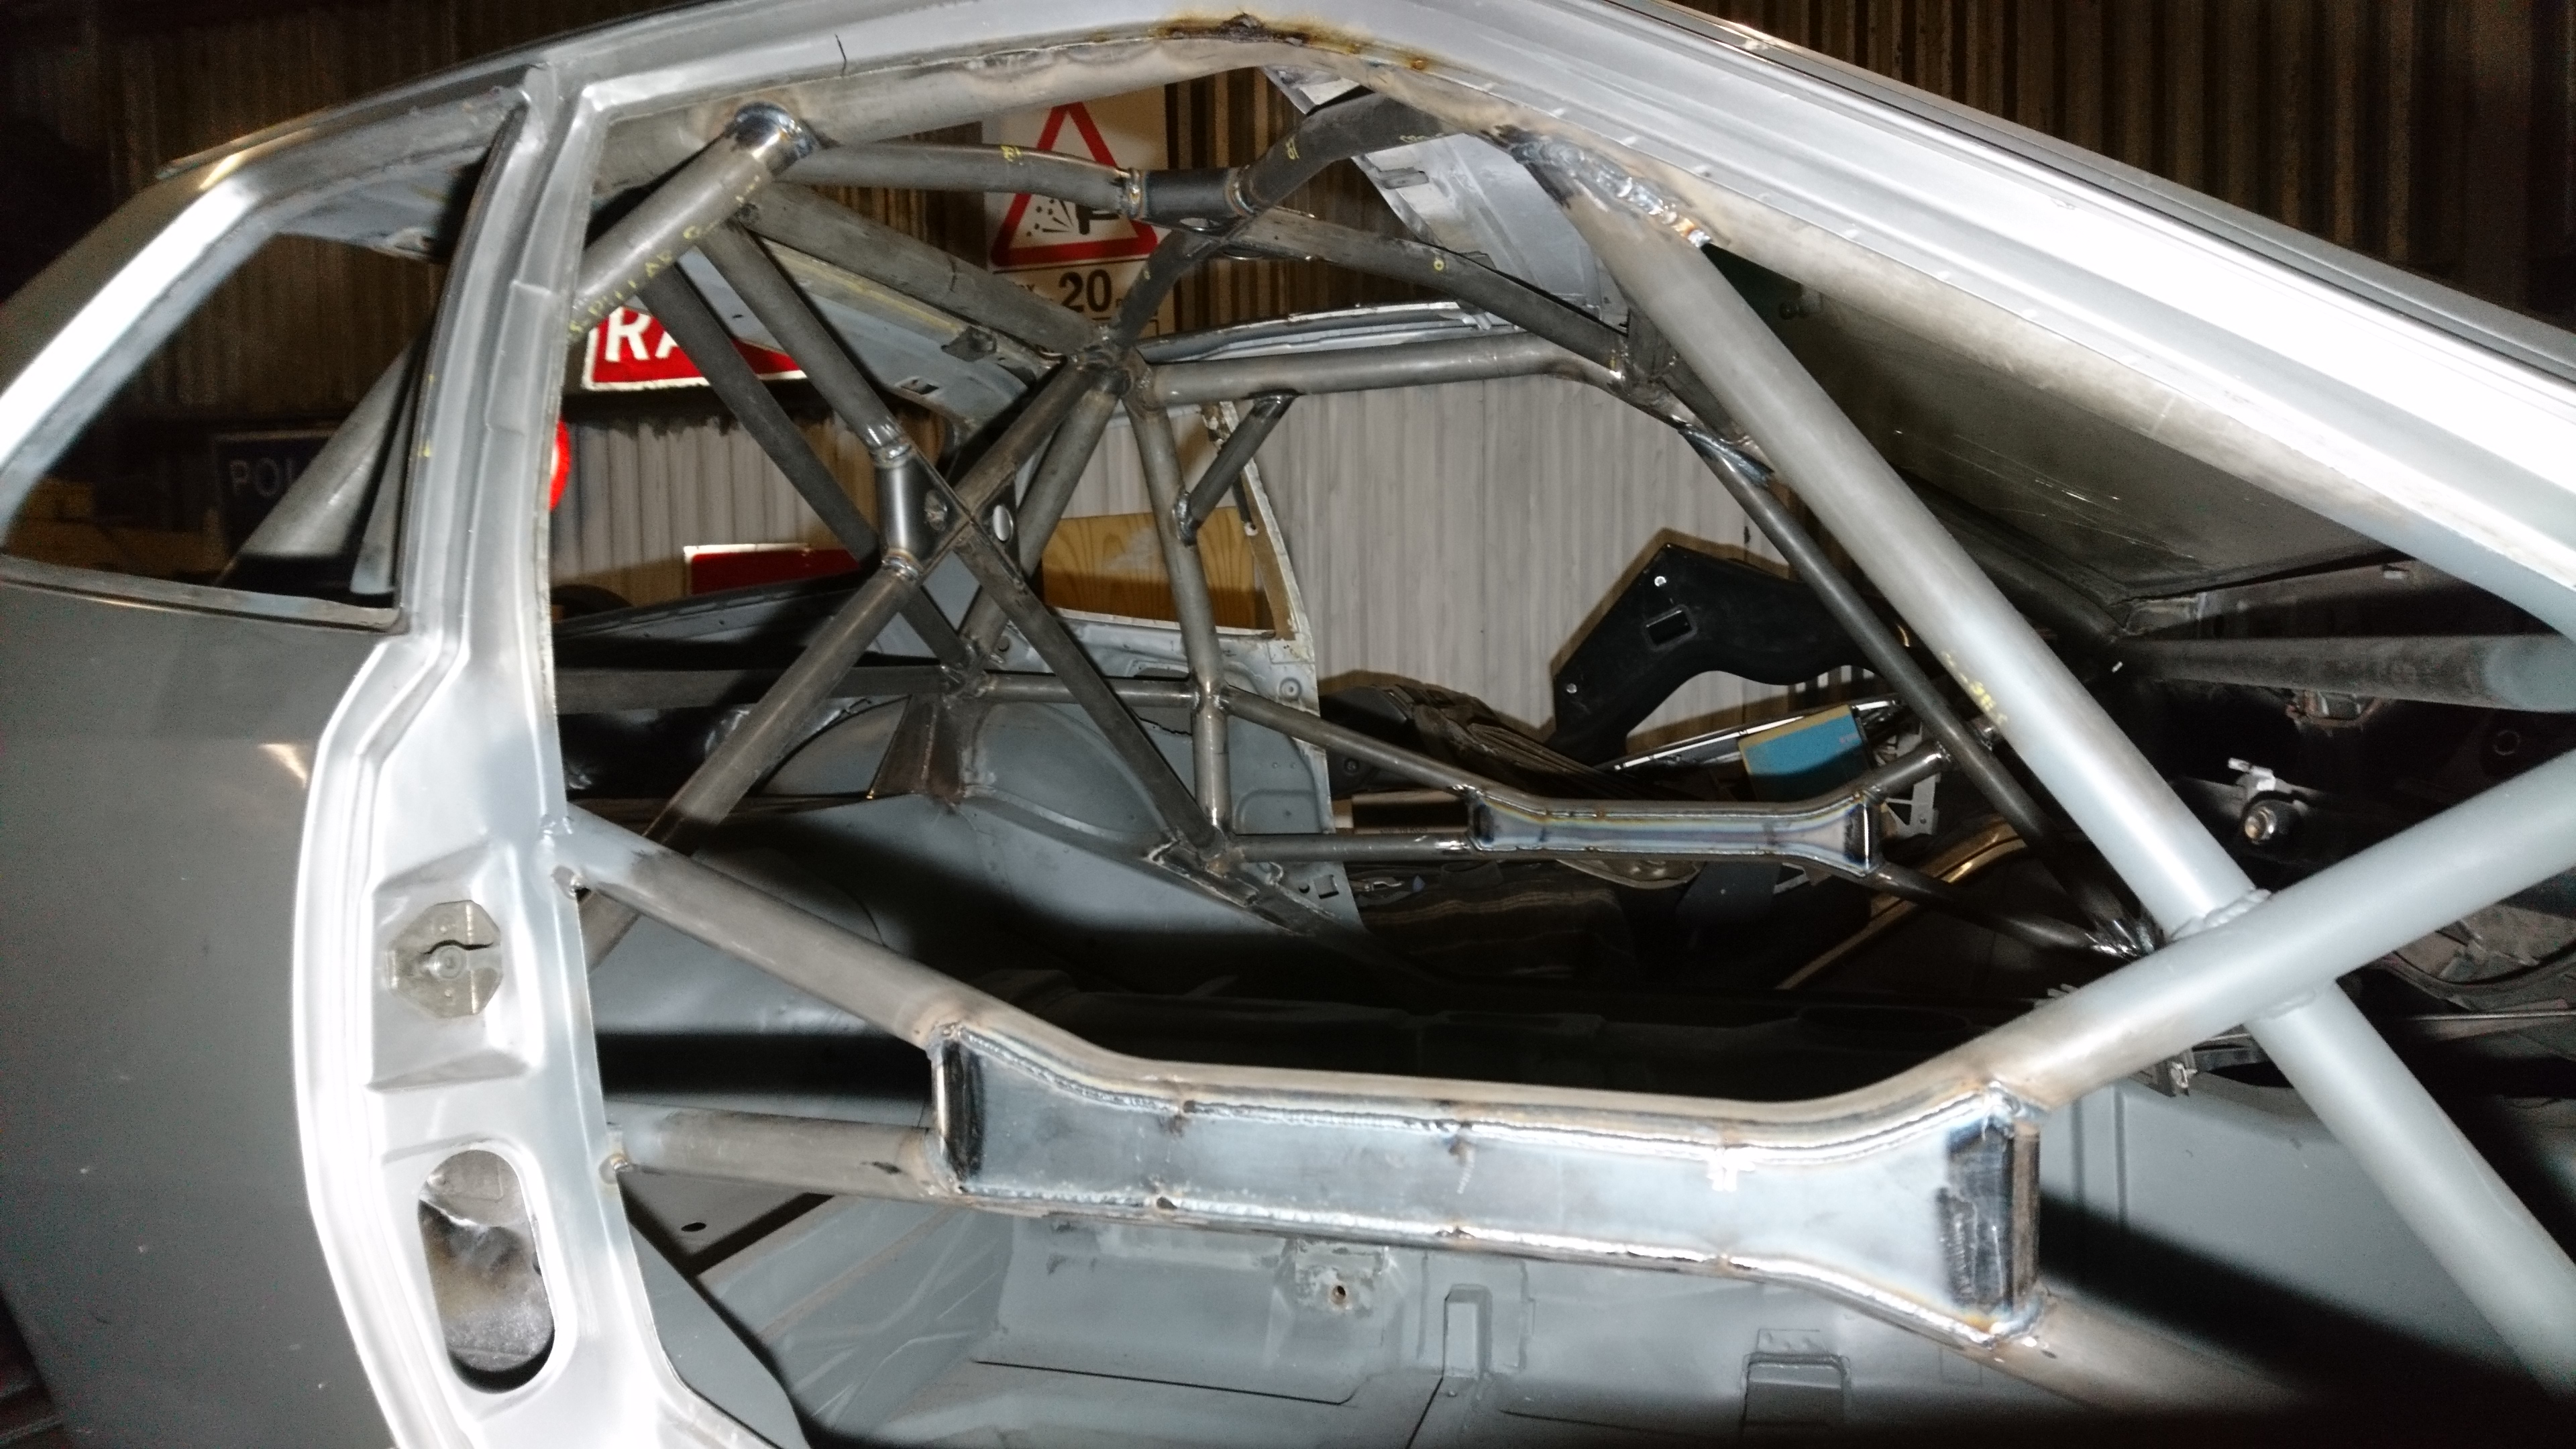
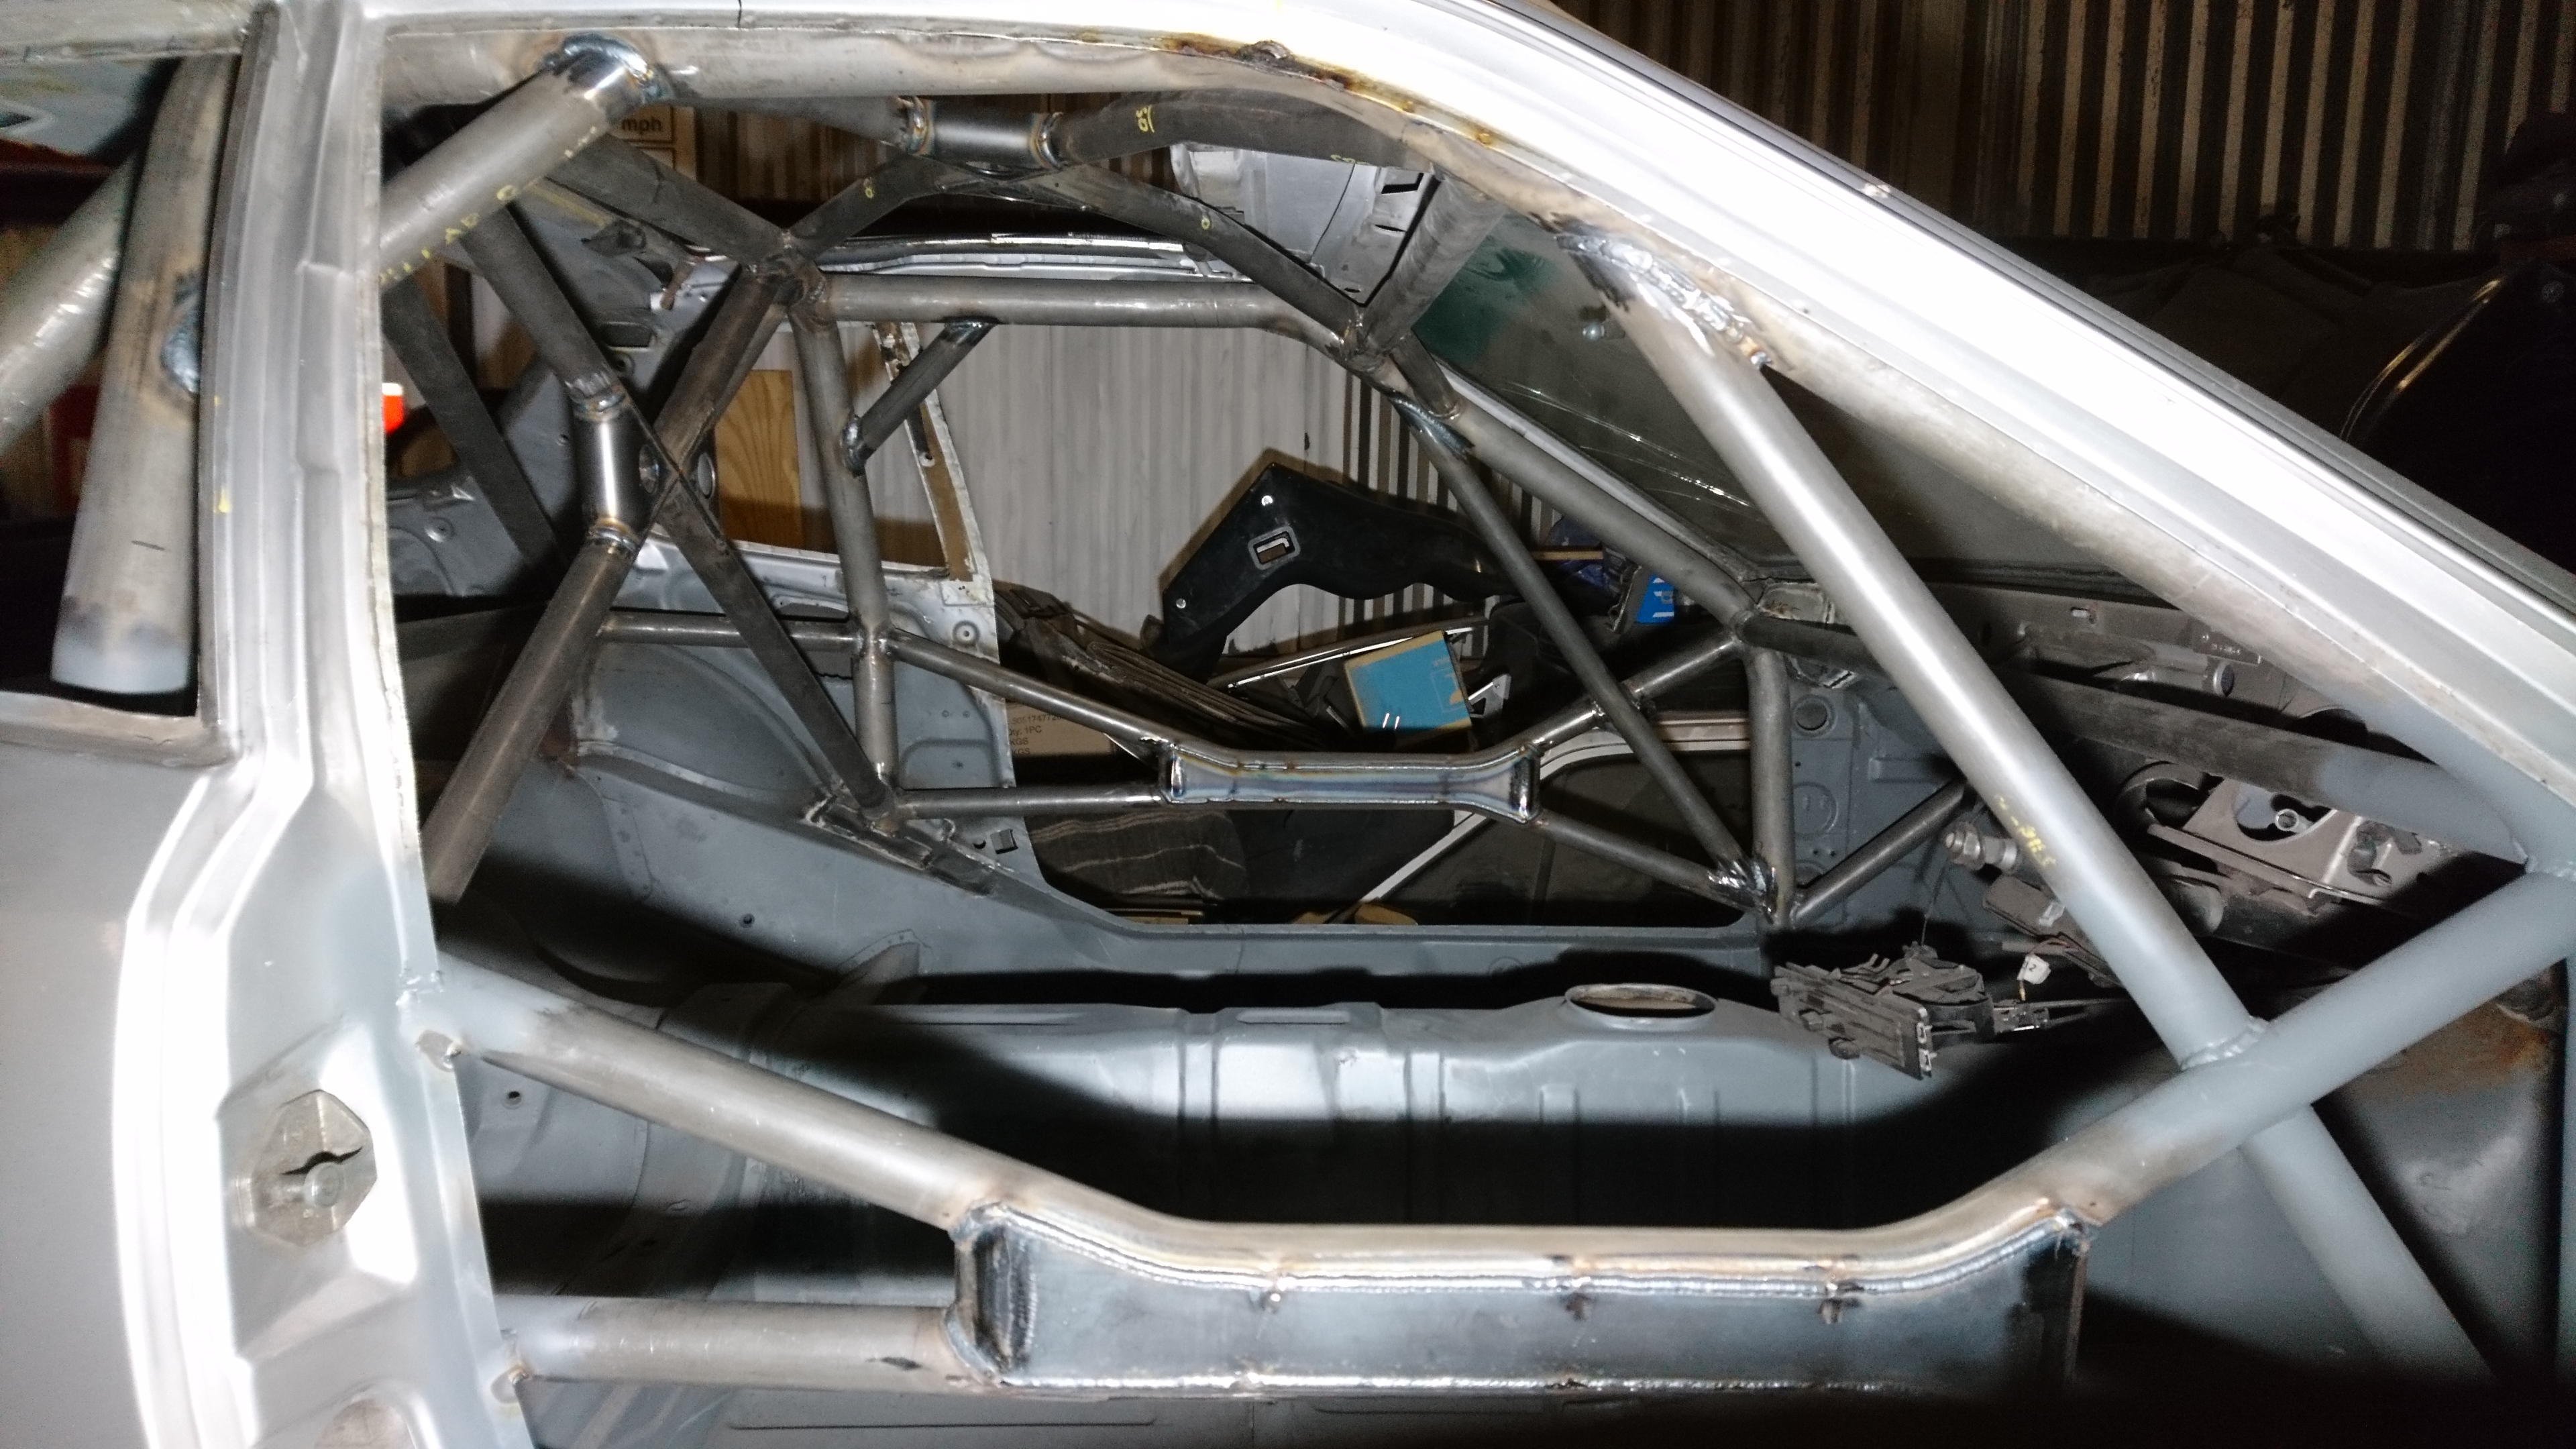
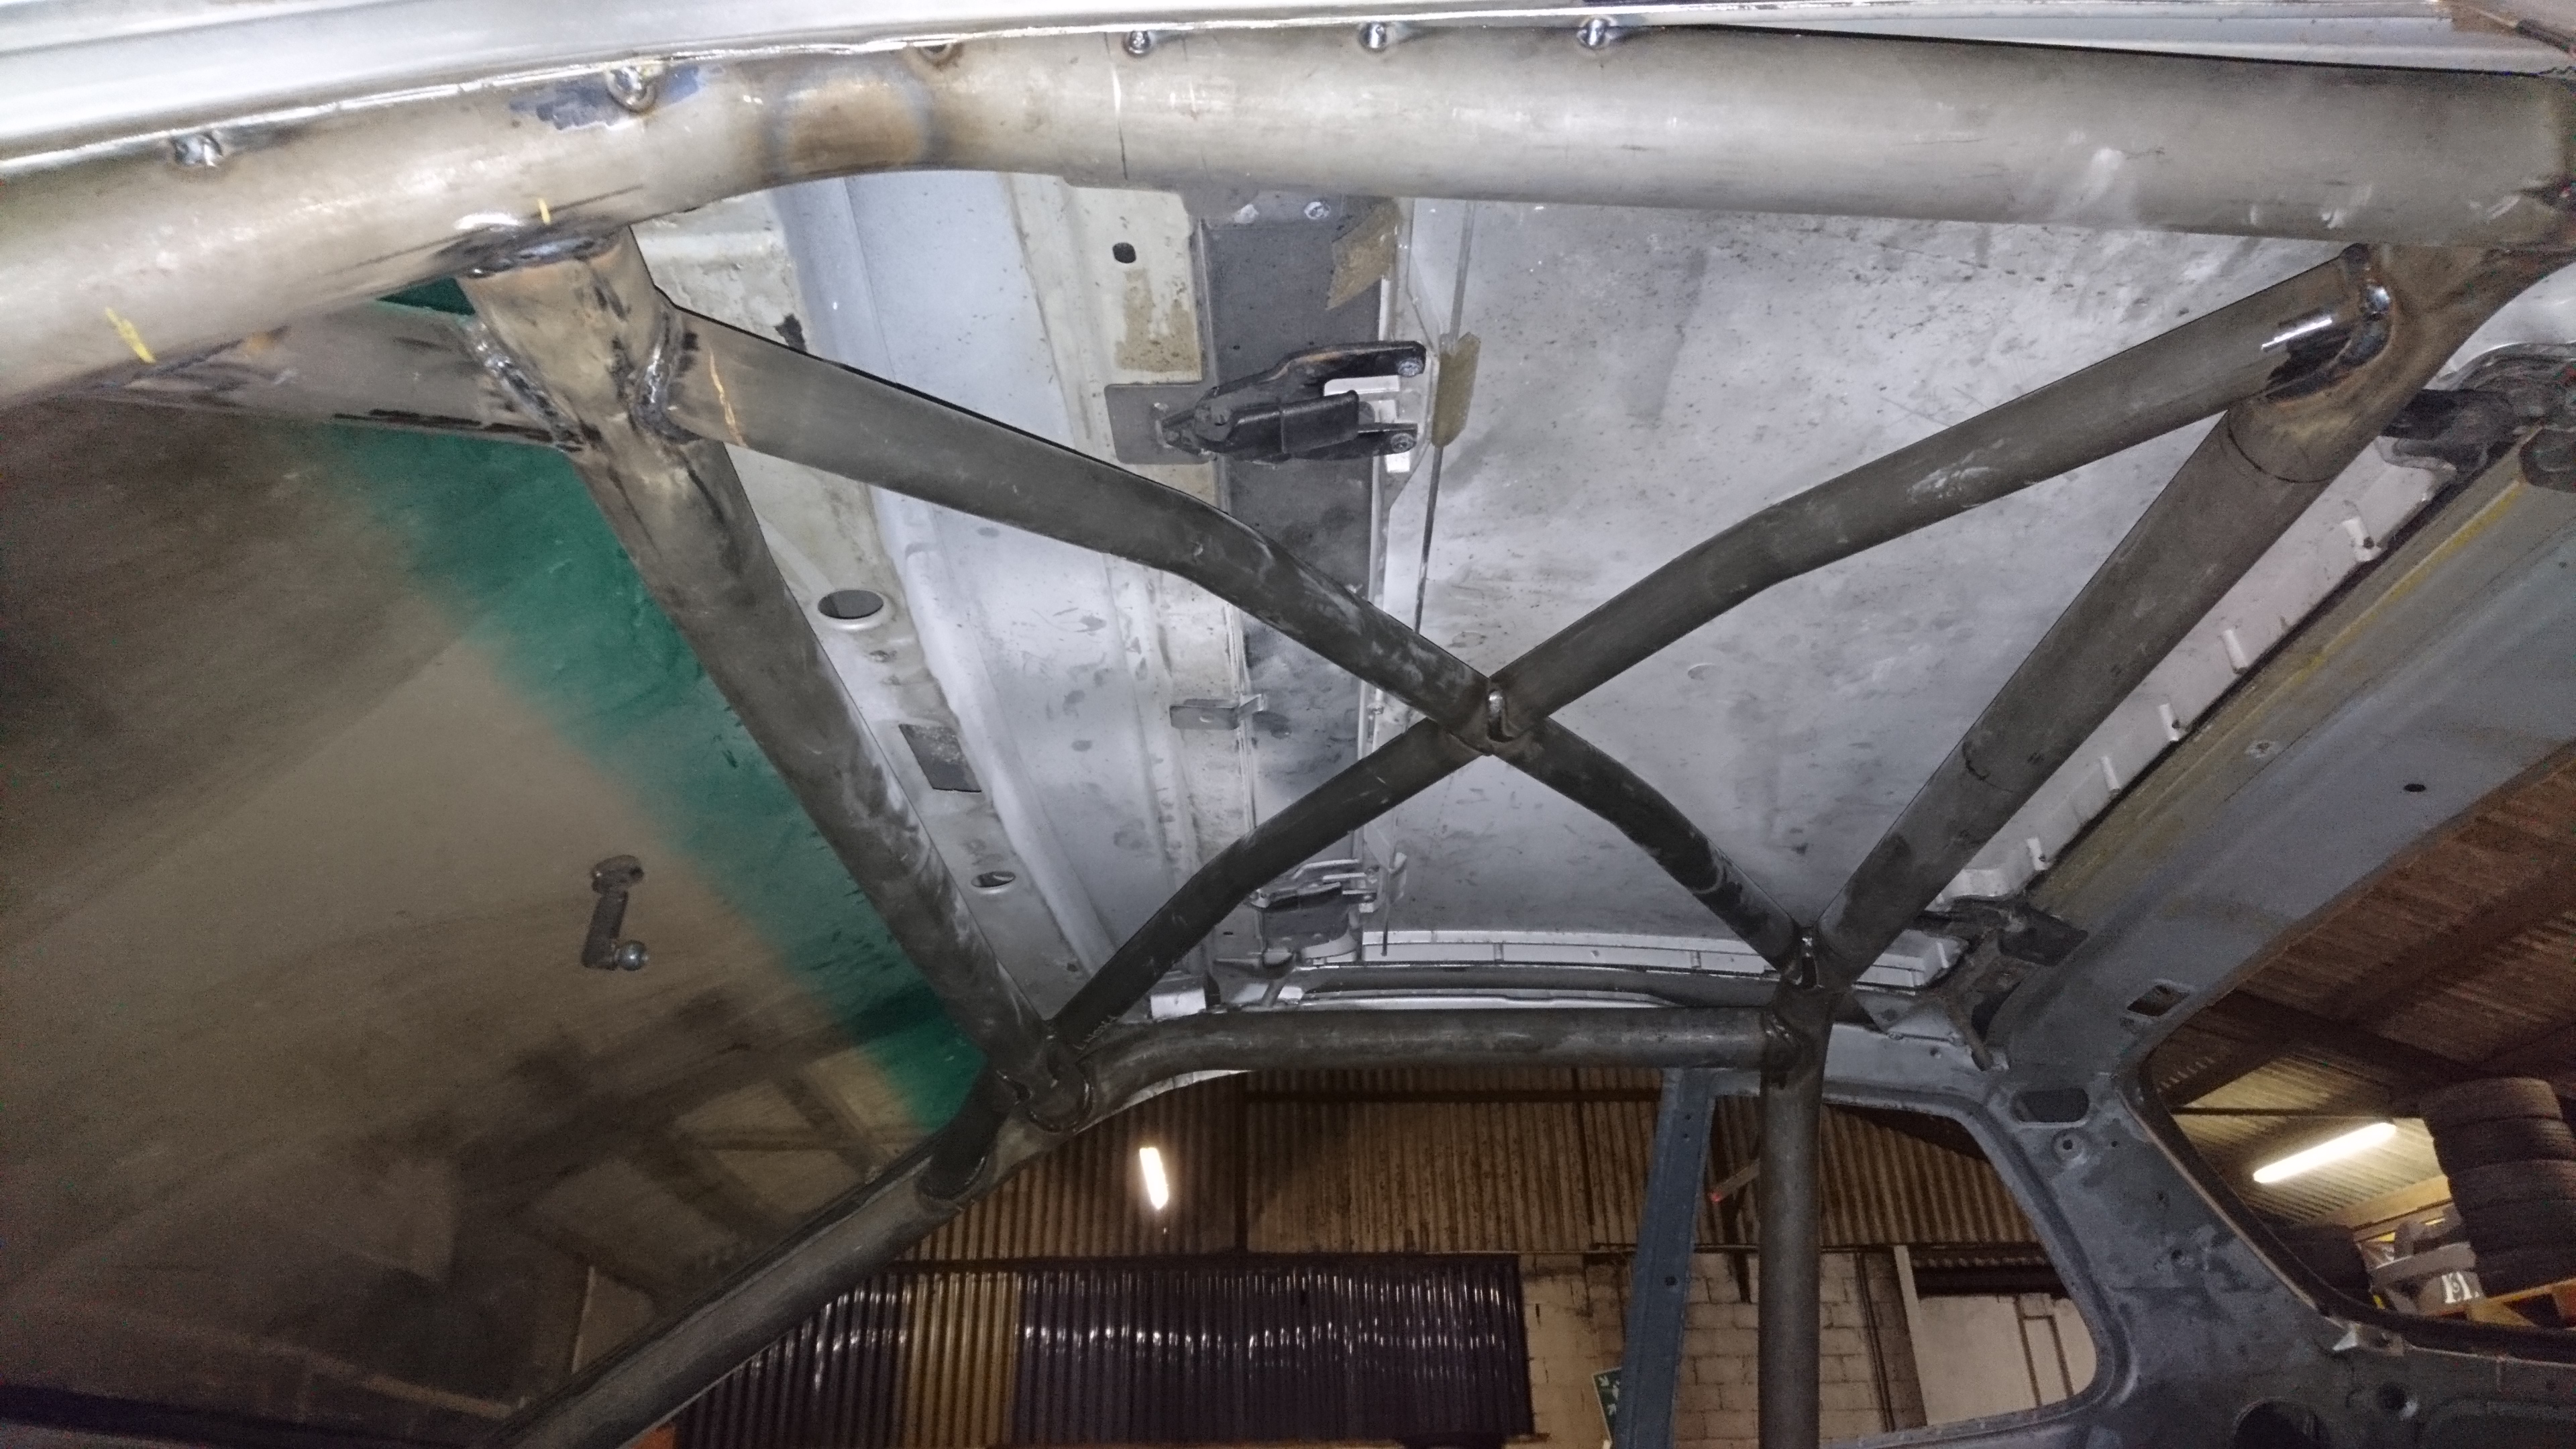
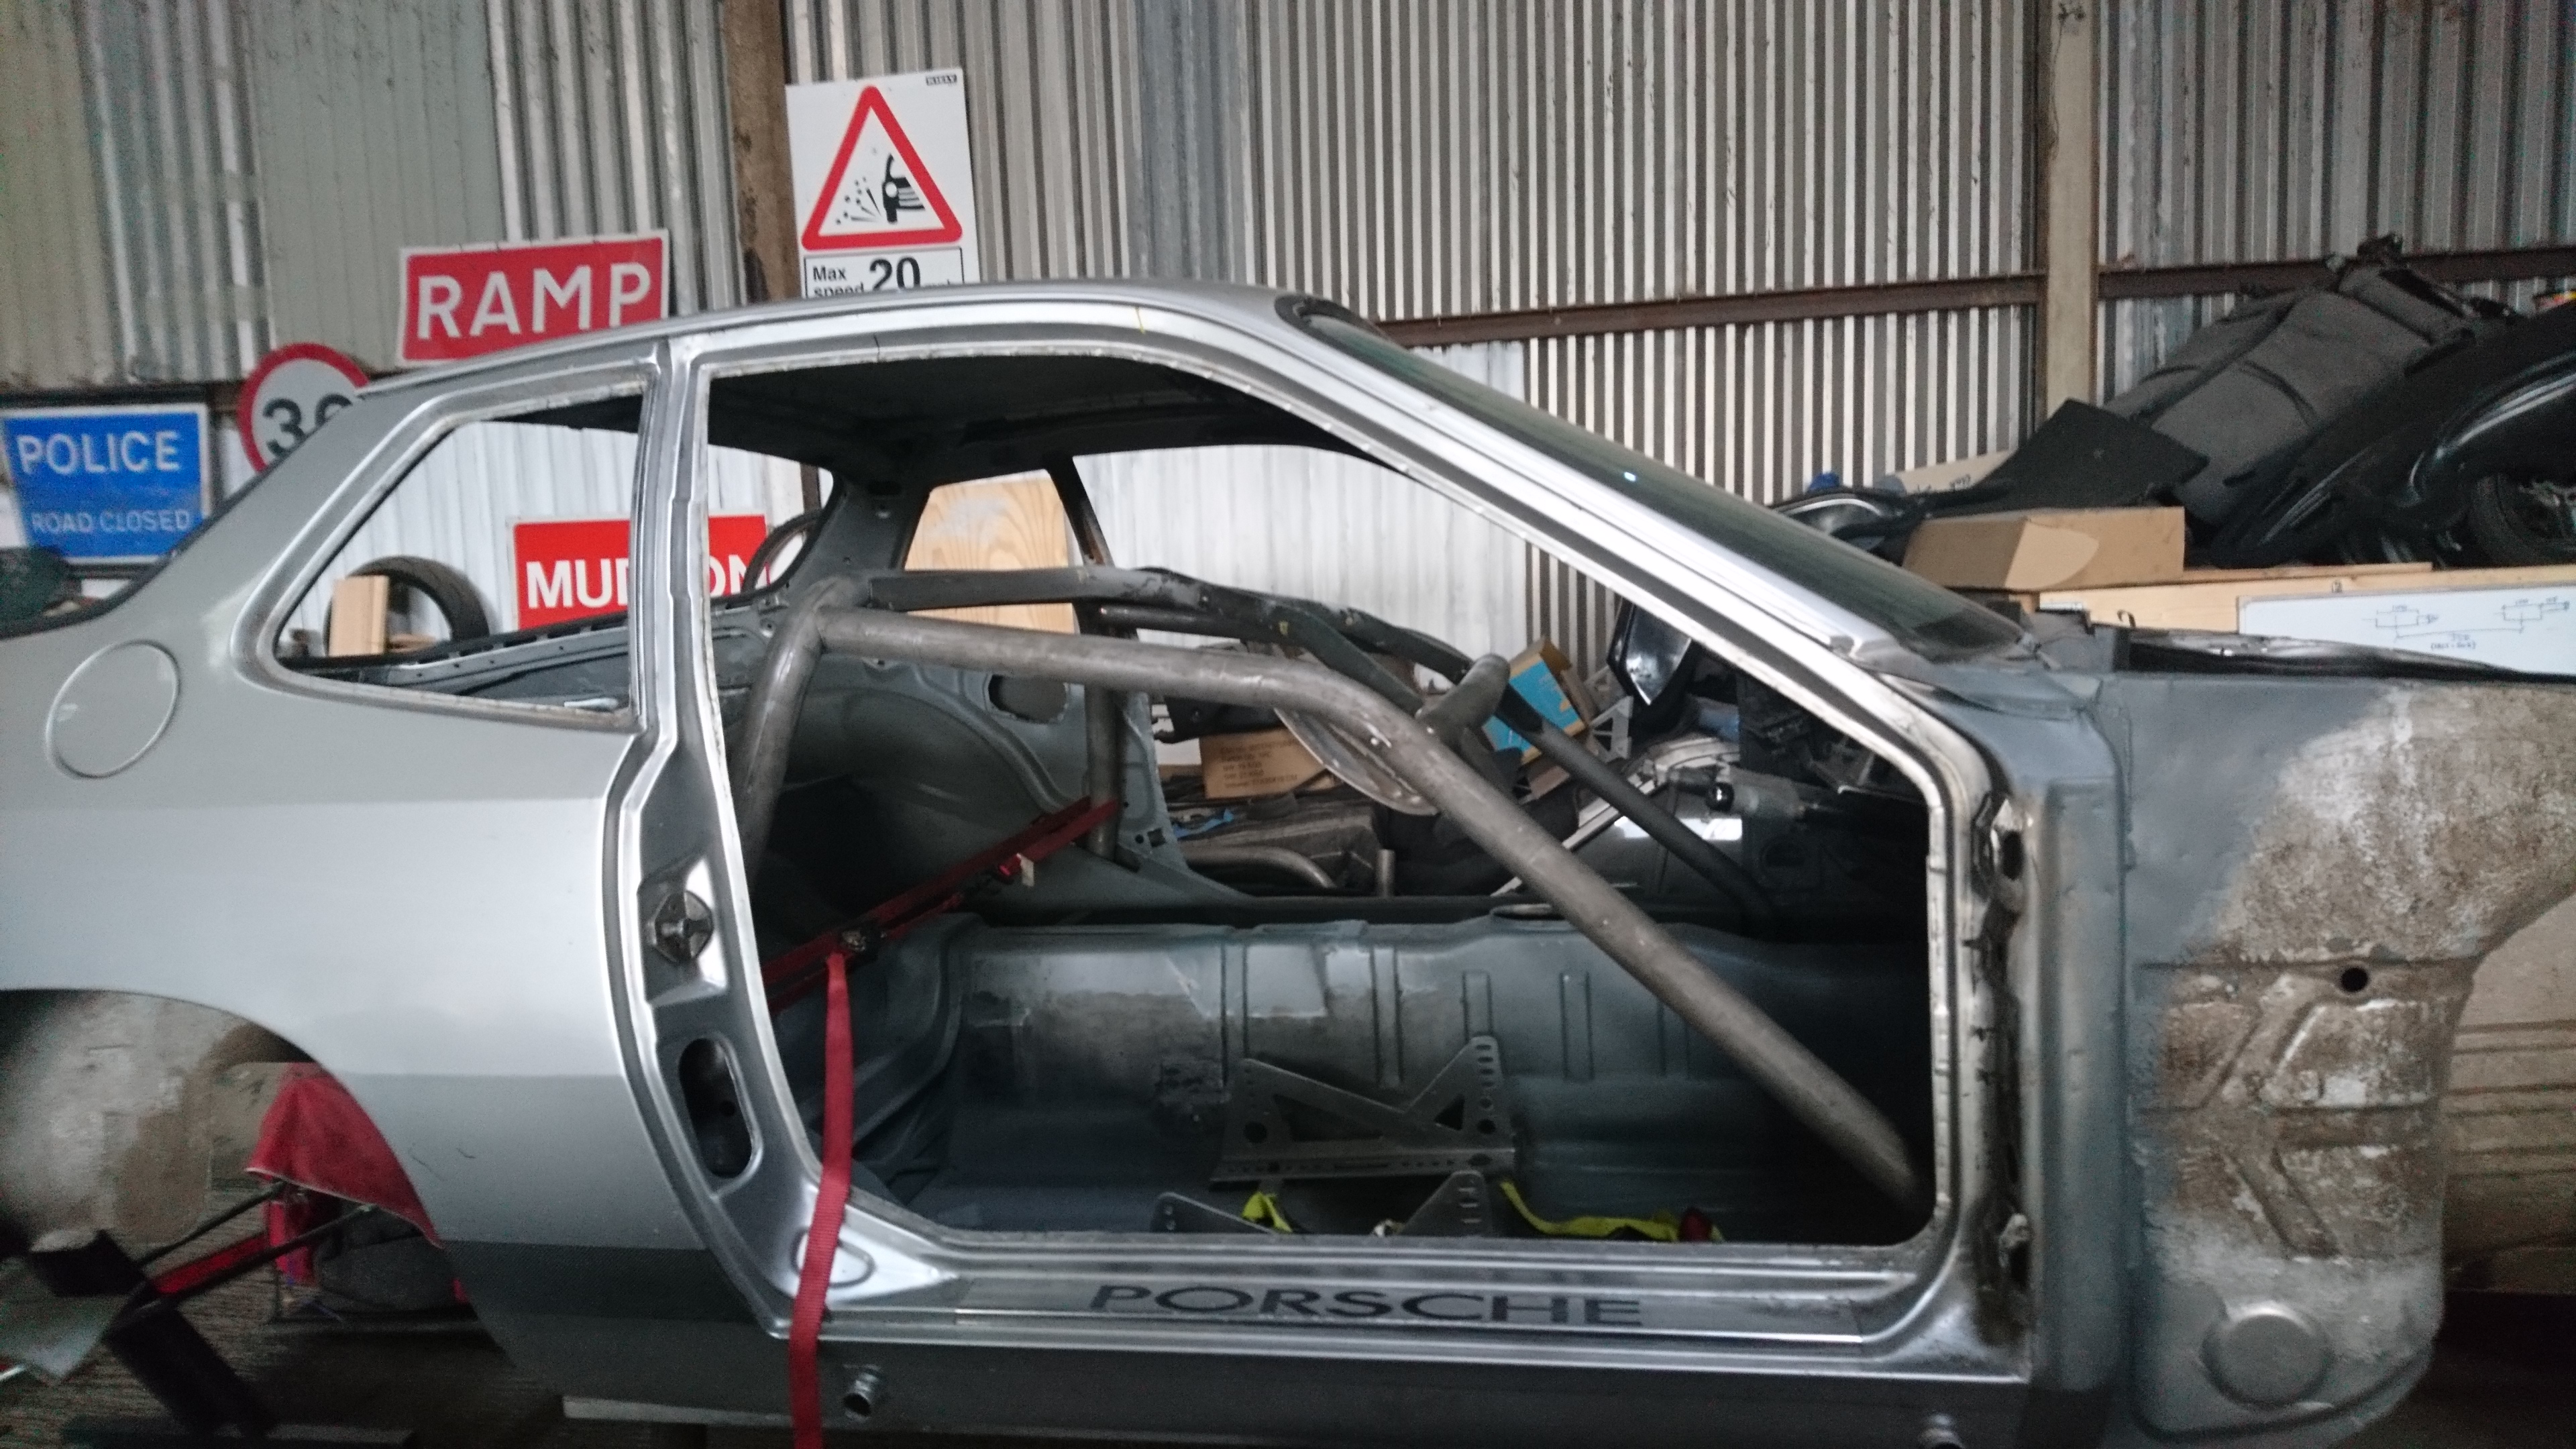
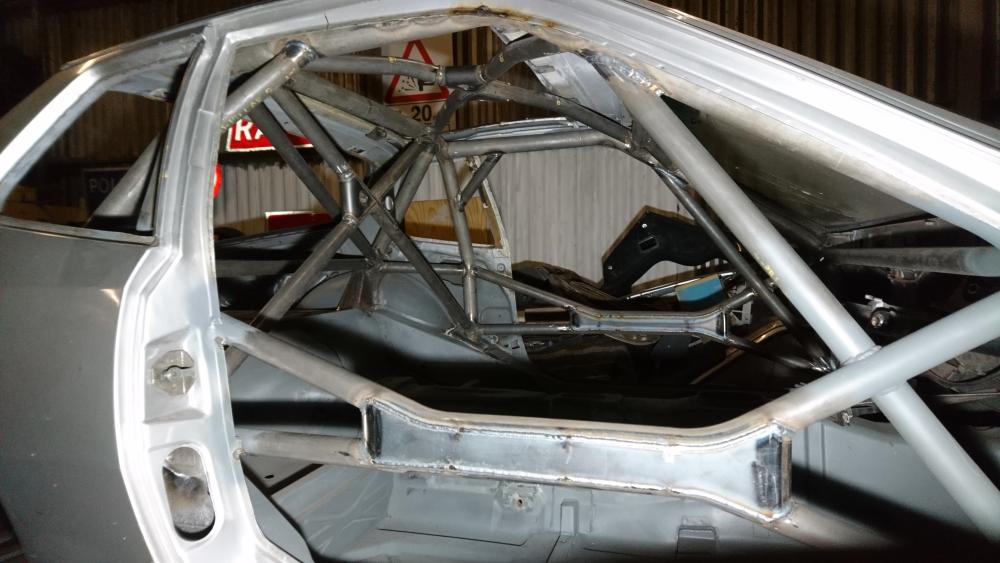
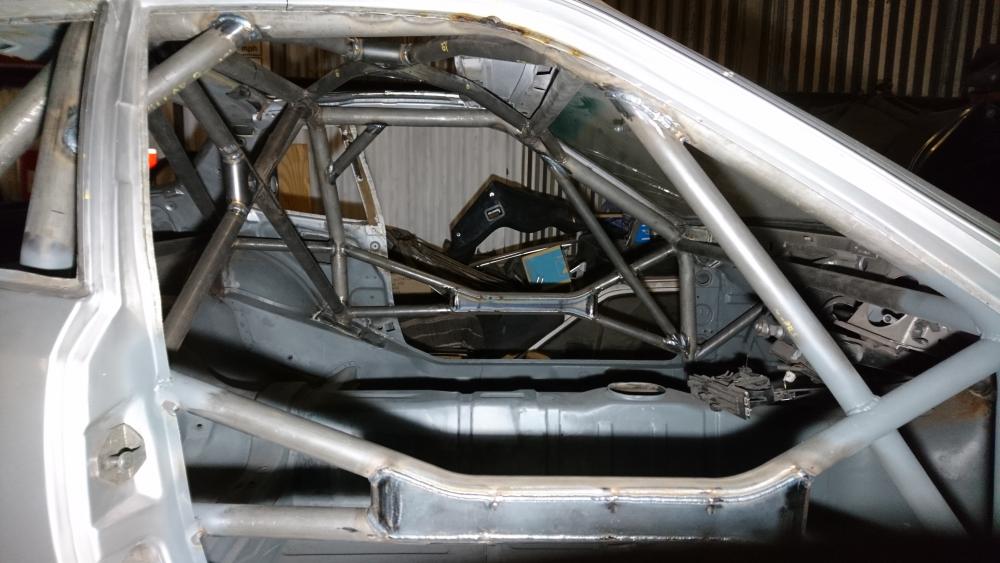
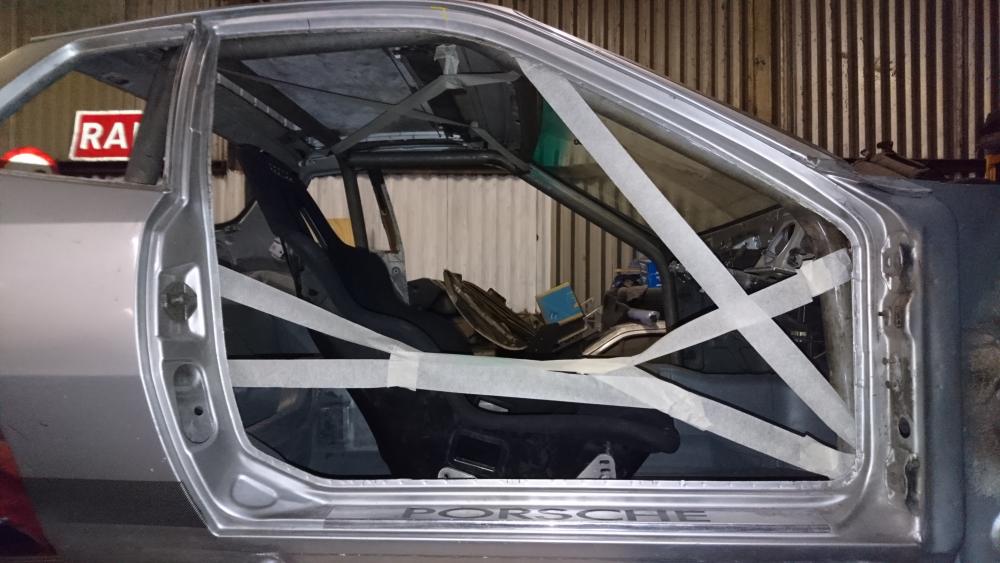
Not sure if I did say one here or just retrorides, but the cage tubing is a mix of 51x2mm and 38x2.6 cds to the spec required by the MSA yearbook. It's MSA compliant, but not FIA. Although not from day one due to budget, I want to try and build the car to MSA spec for all the bits that aren't discipline specific, so if I ever wanted to race it I won't have to re-do too much work. Nice to see some good progress with the Leon, and bloody lucky you caught the flywheel in time! Is the turbo adapter the one I got water-jet cut for you? How did it finish up if so? I hope the slight tapering didn't cause too much of a headache. Oh, and Tom, thanks for the recommendation, I'll check them out. Any idea which model of pioneer you've got?
-
Both cars are looking awesome guys. Dan, is that fuel filter up the the pressure and flow of a turbo injection fuel system? It looks just like the ones I've always run on old carbed engines at 1/10th the pressure your engine will be running. Could be ok but may be worth checking if you haven't already. I can't remember where I'm at in terms of updated on here but I finished off the cage the other day (besides a little tidying up). It's pretty over the top, but at least it should be fairly well future-proofed, and if I run out of talent, hopefully my choice of a car from long before ncap won't bite me as hard. I'm starting a new job in the new year which will need me to start commuting by car again, (I cycle at the moment) so I think the daily e36 will be seeing some love over the Christmas break in preperation. There's a rattle at low revs I need to sort (aux belt tensioner I think), and its due some fluids and filters. Also, I wouldn't mind fitting some better speakers as mine sound terrible. Does anyone have any recommendations of half reasonable speakers that won't break the bank?
-
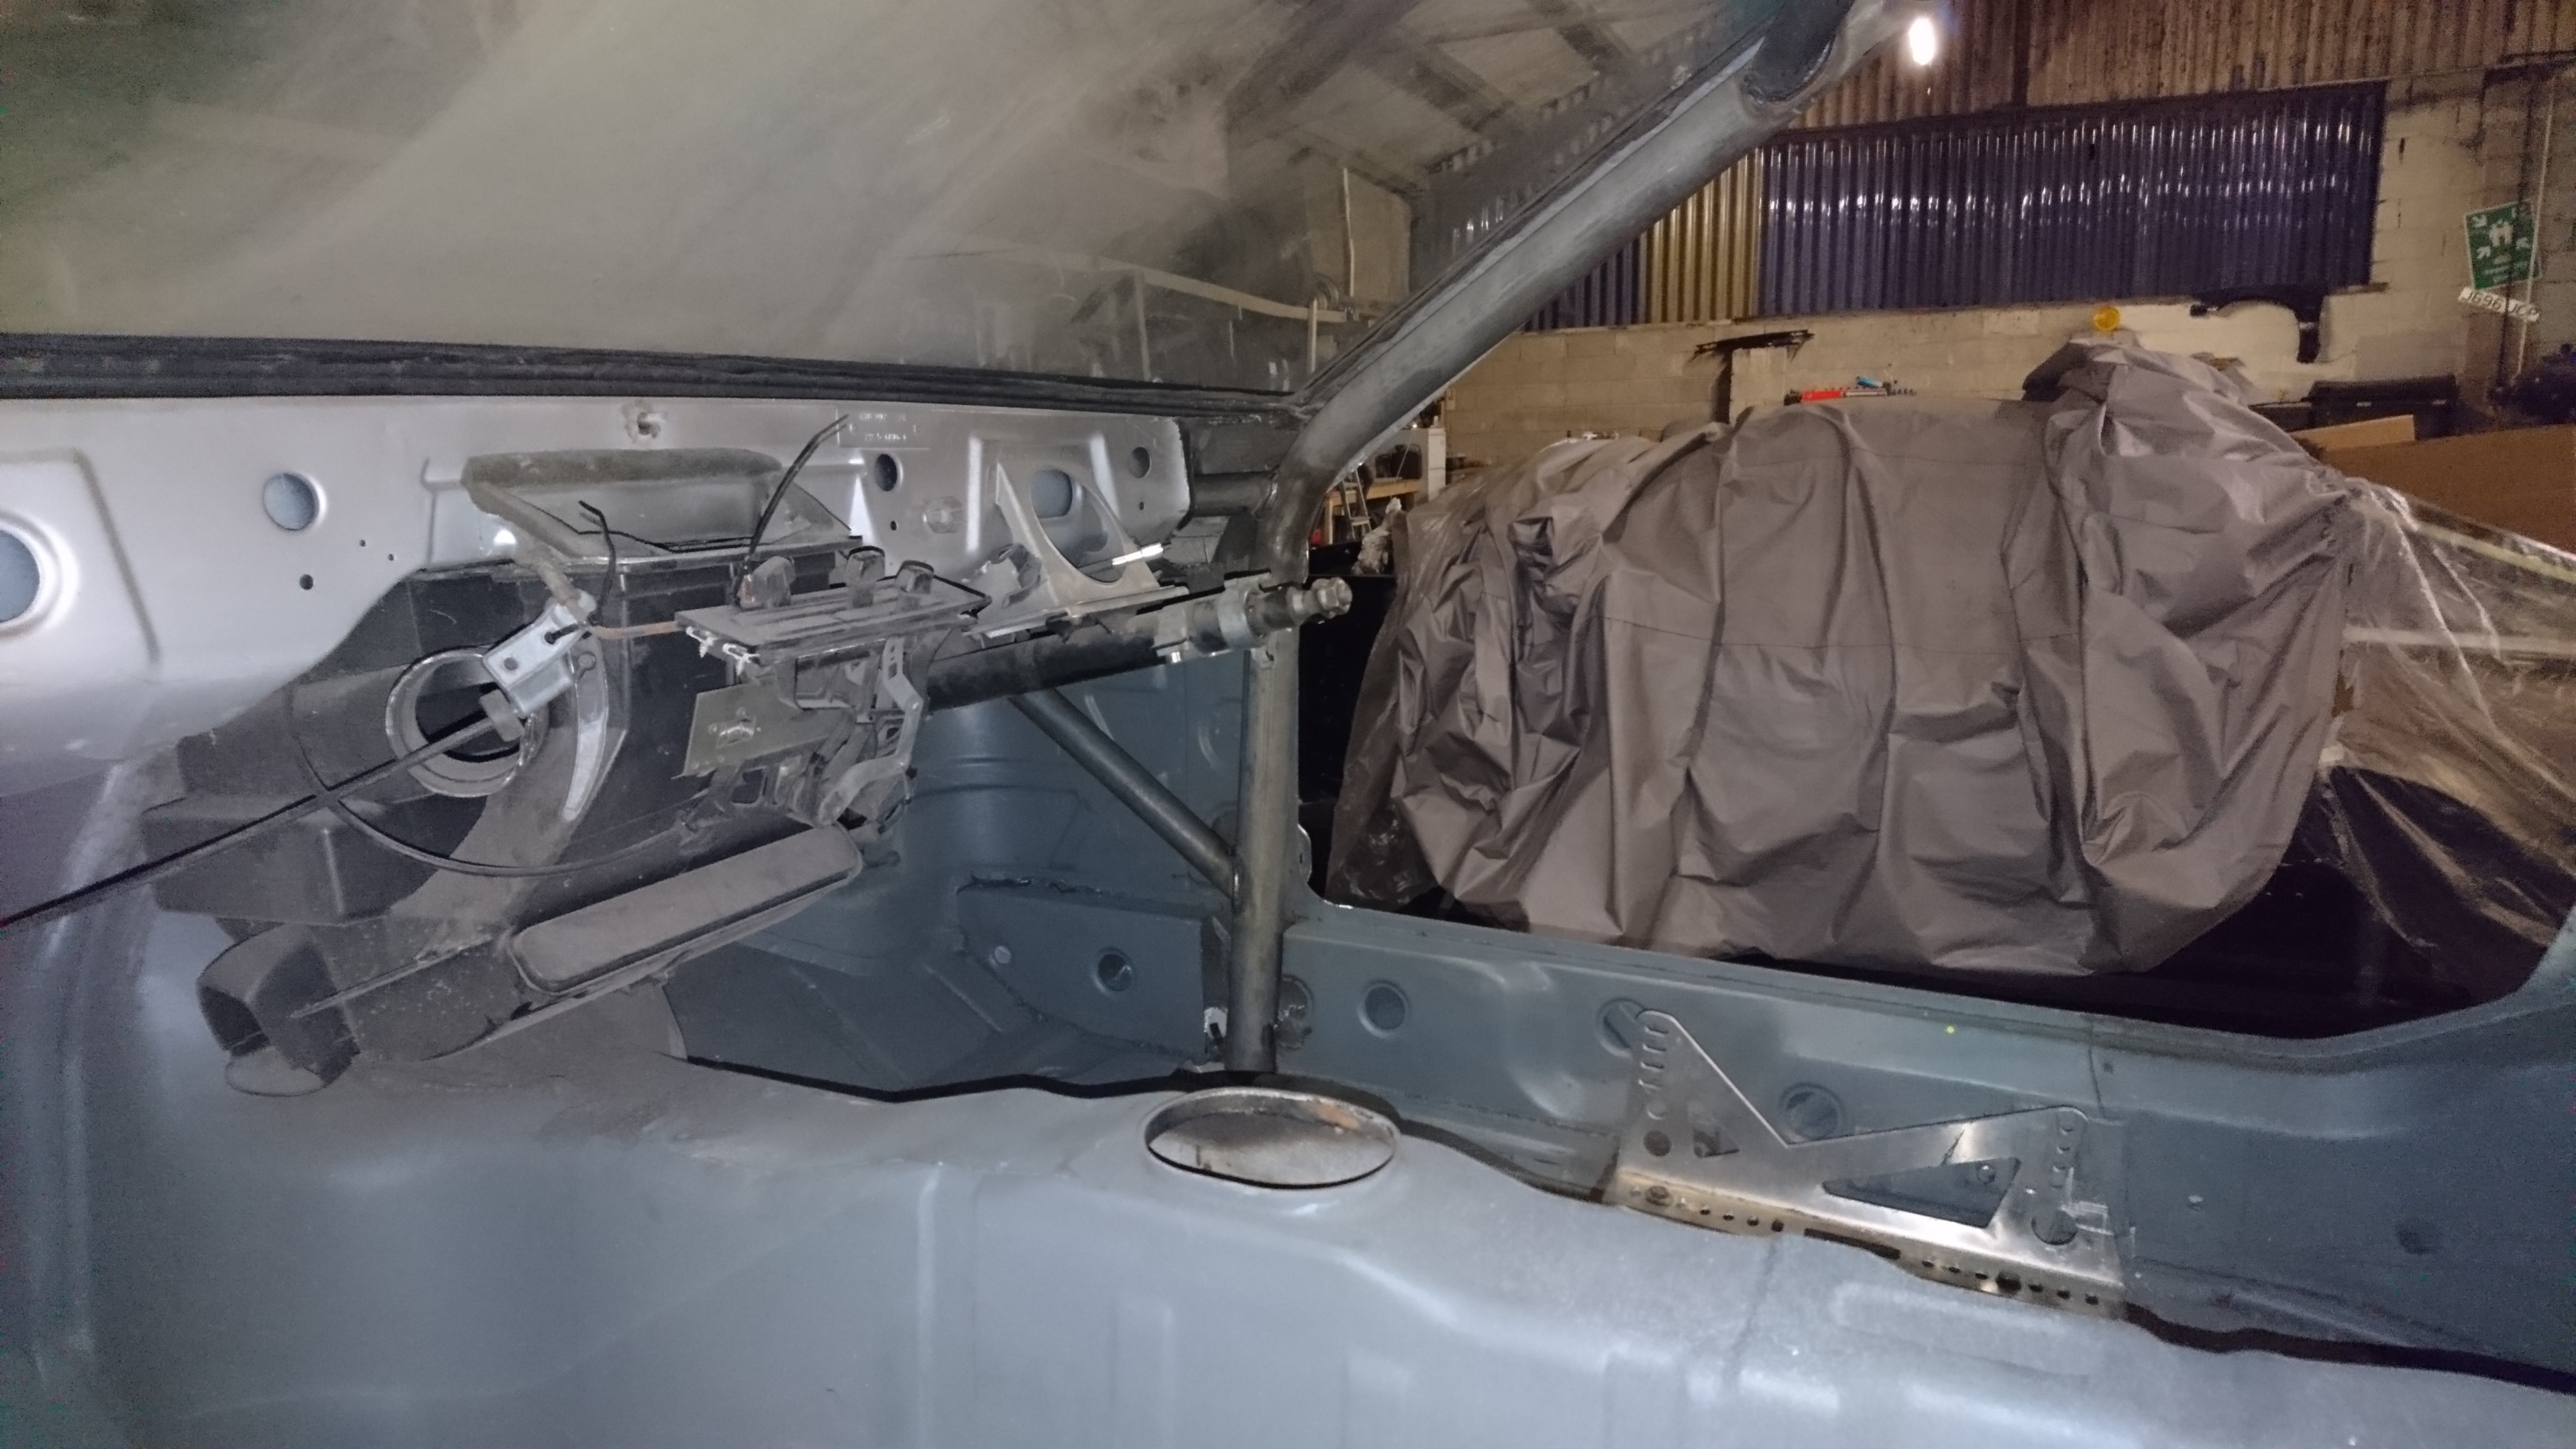
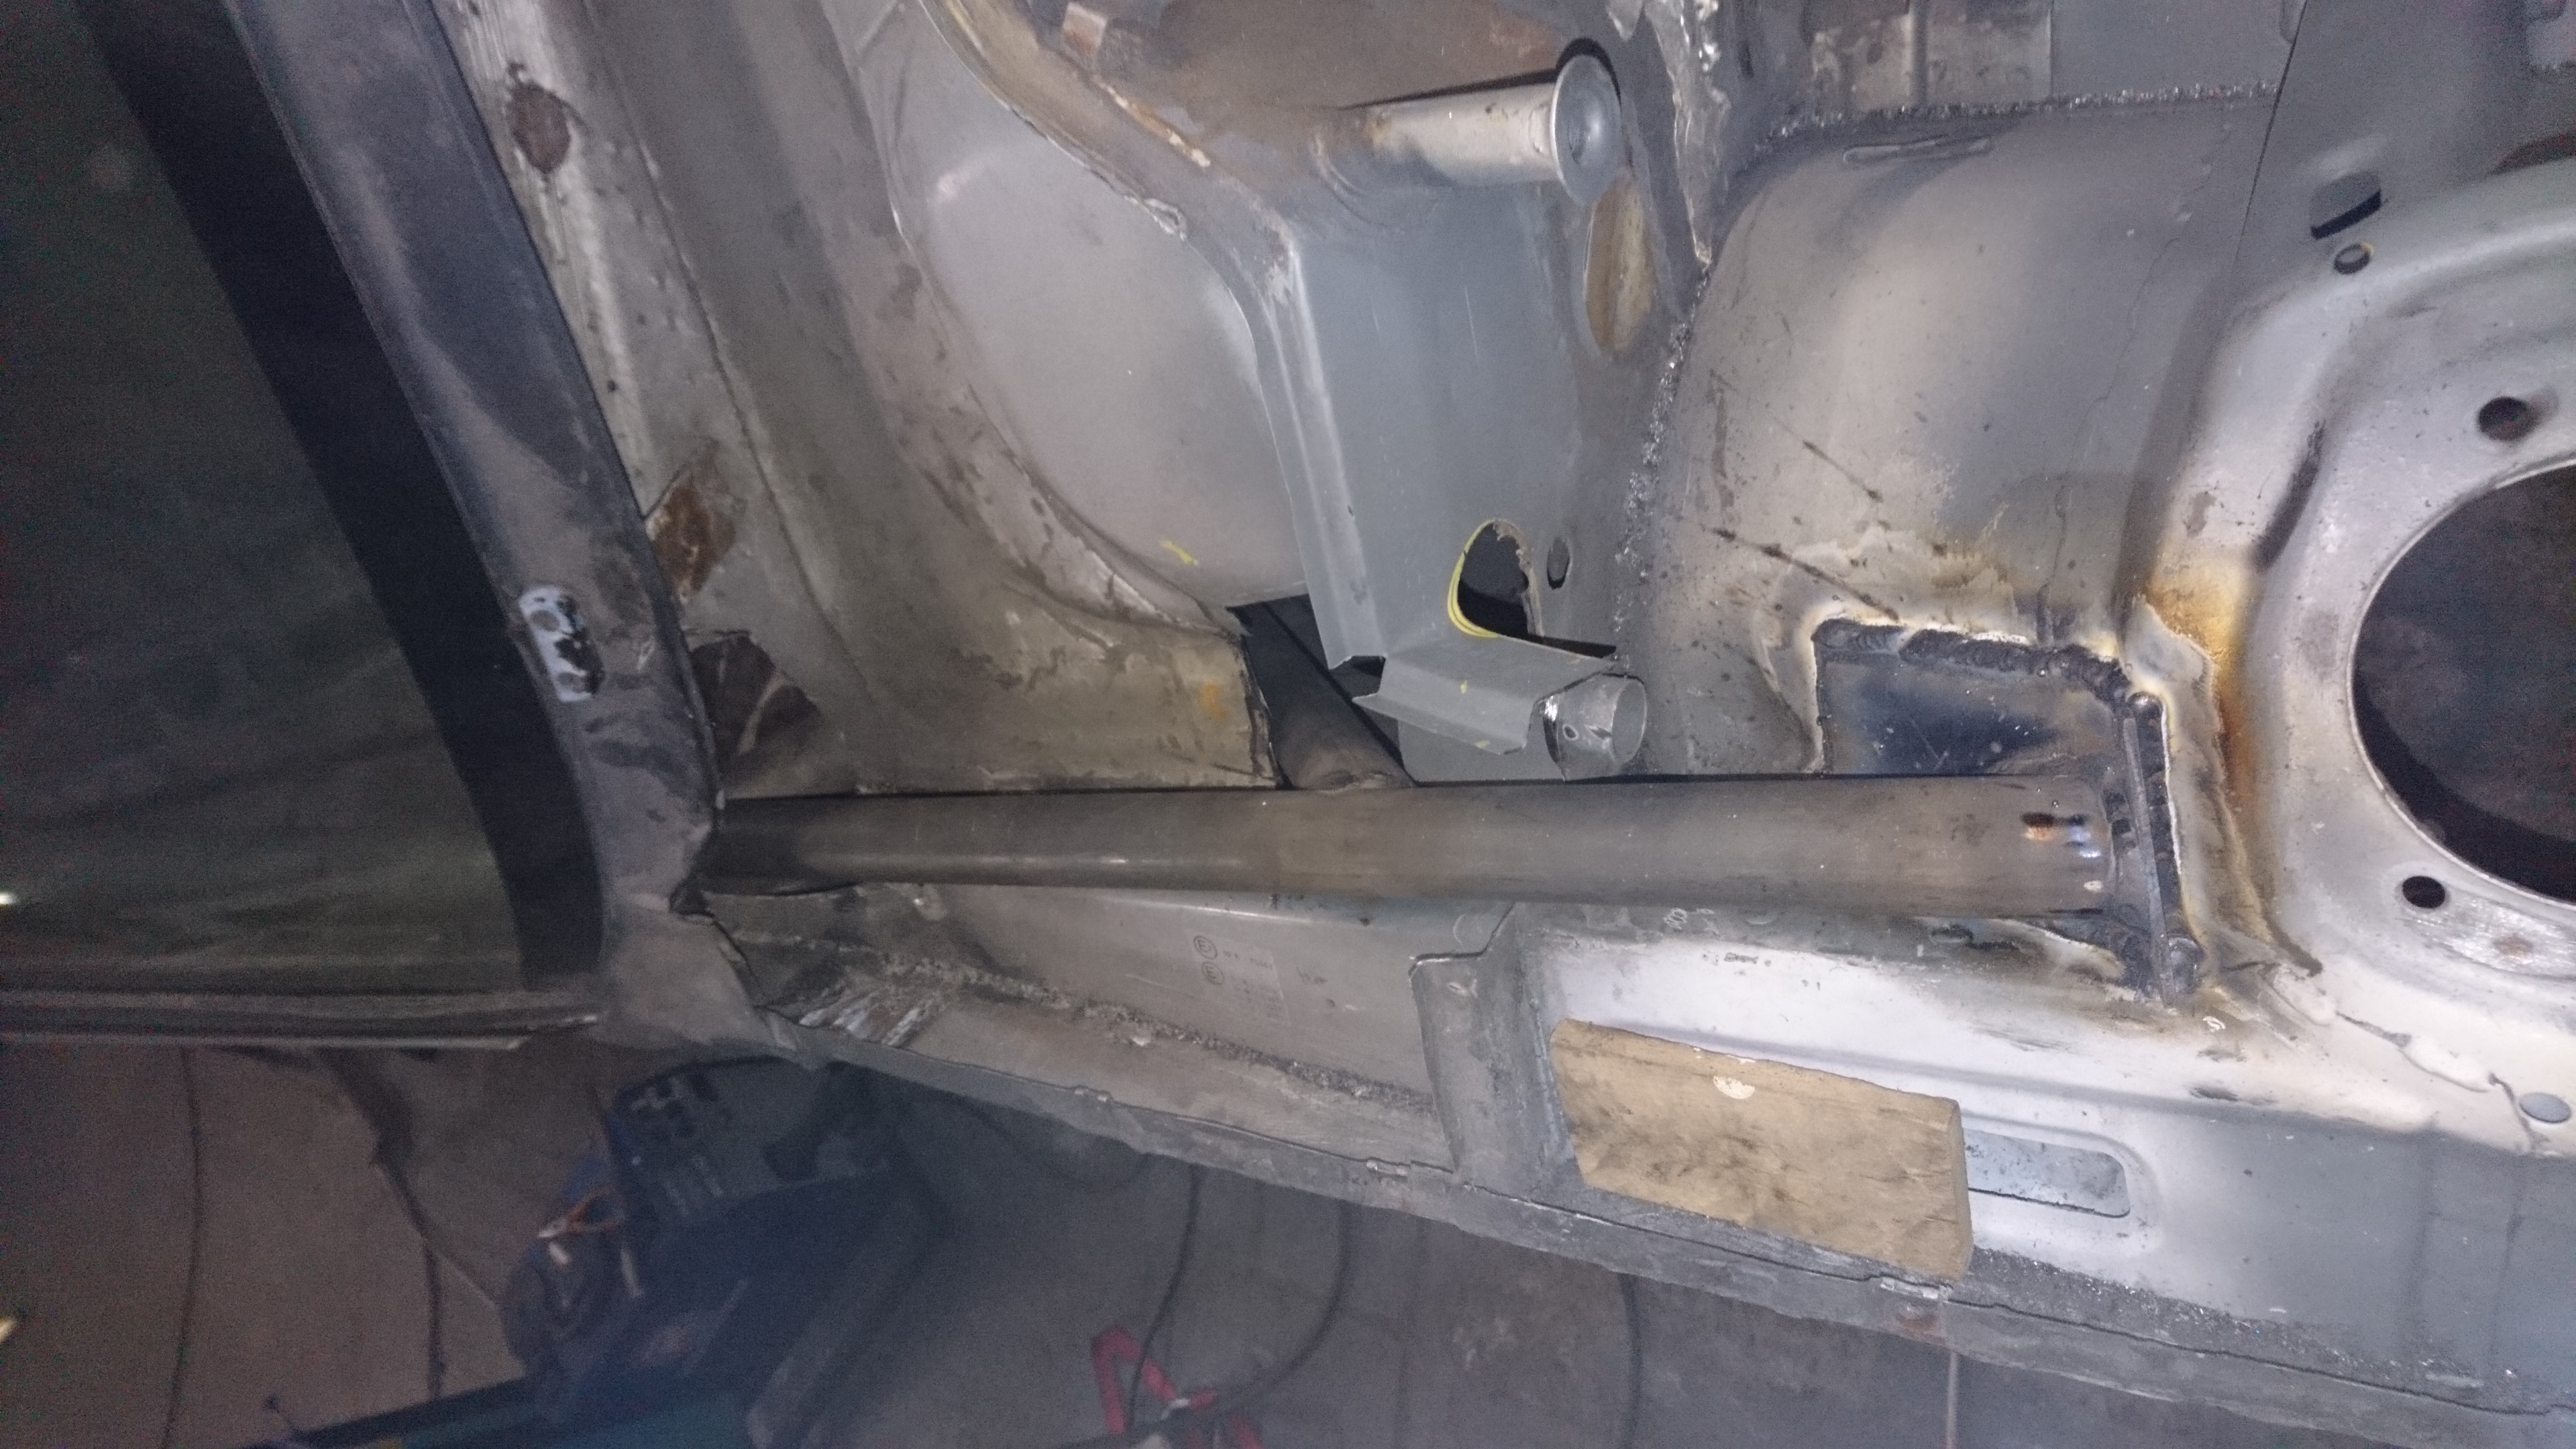
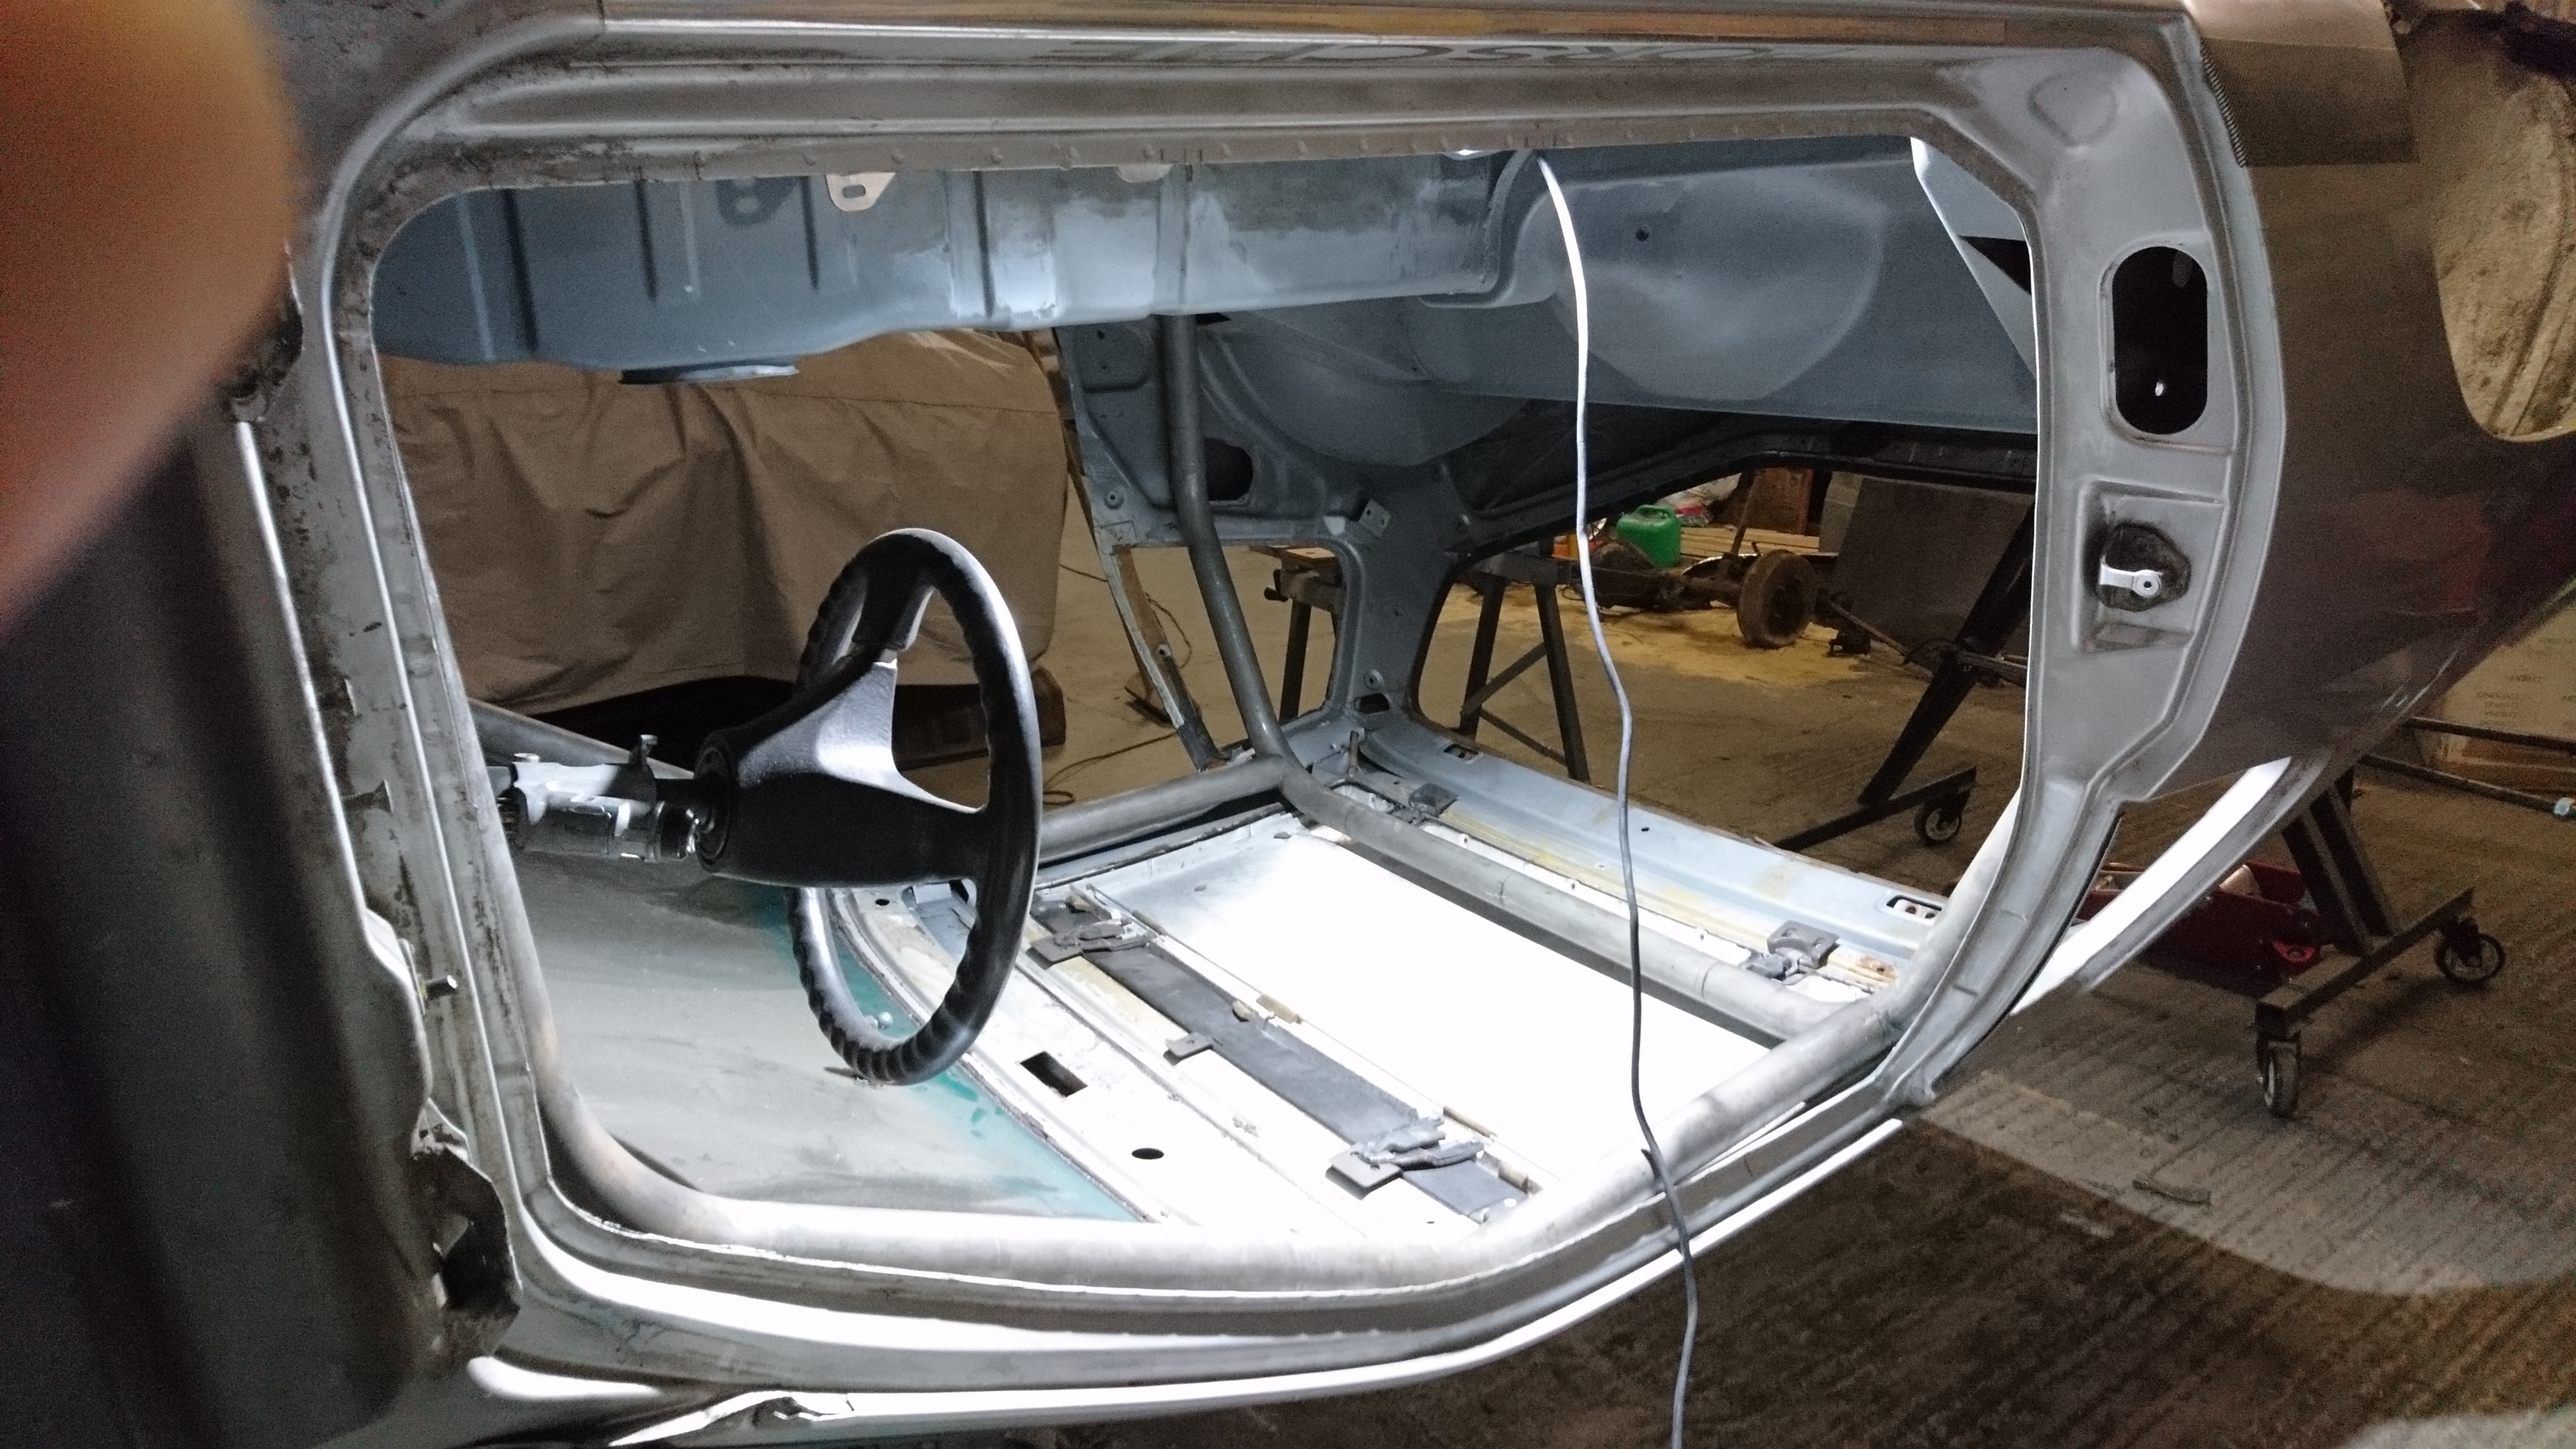
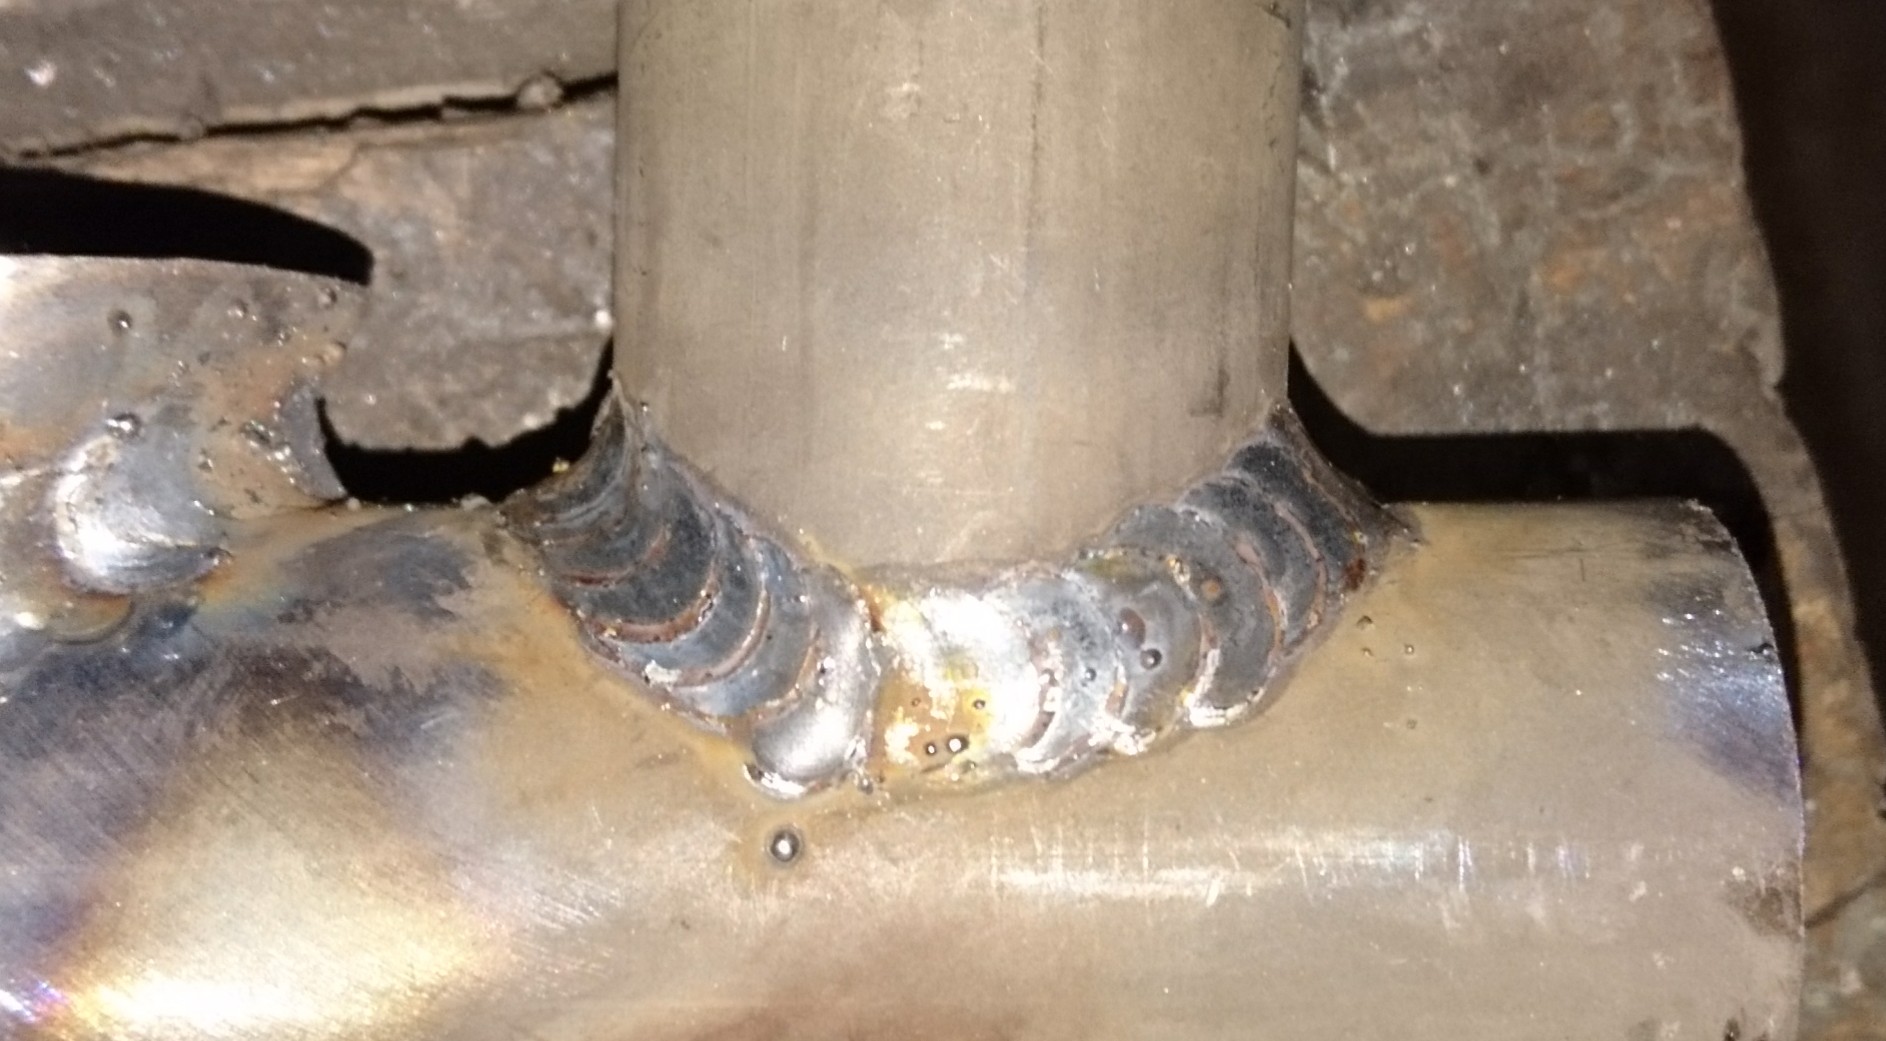
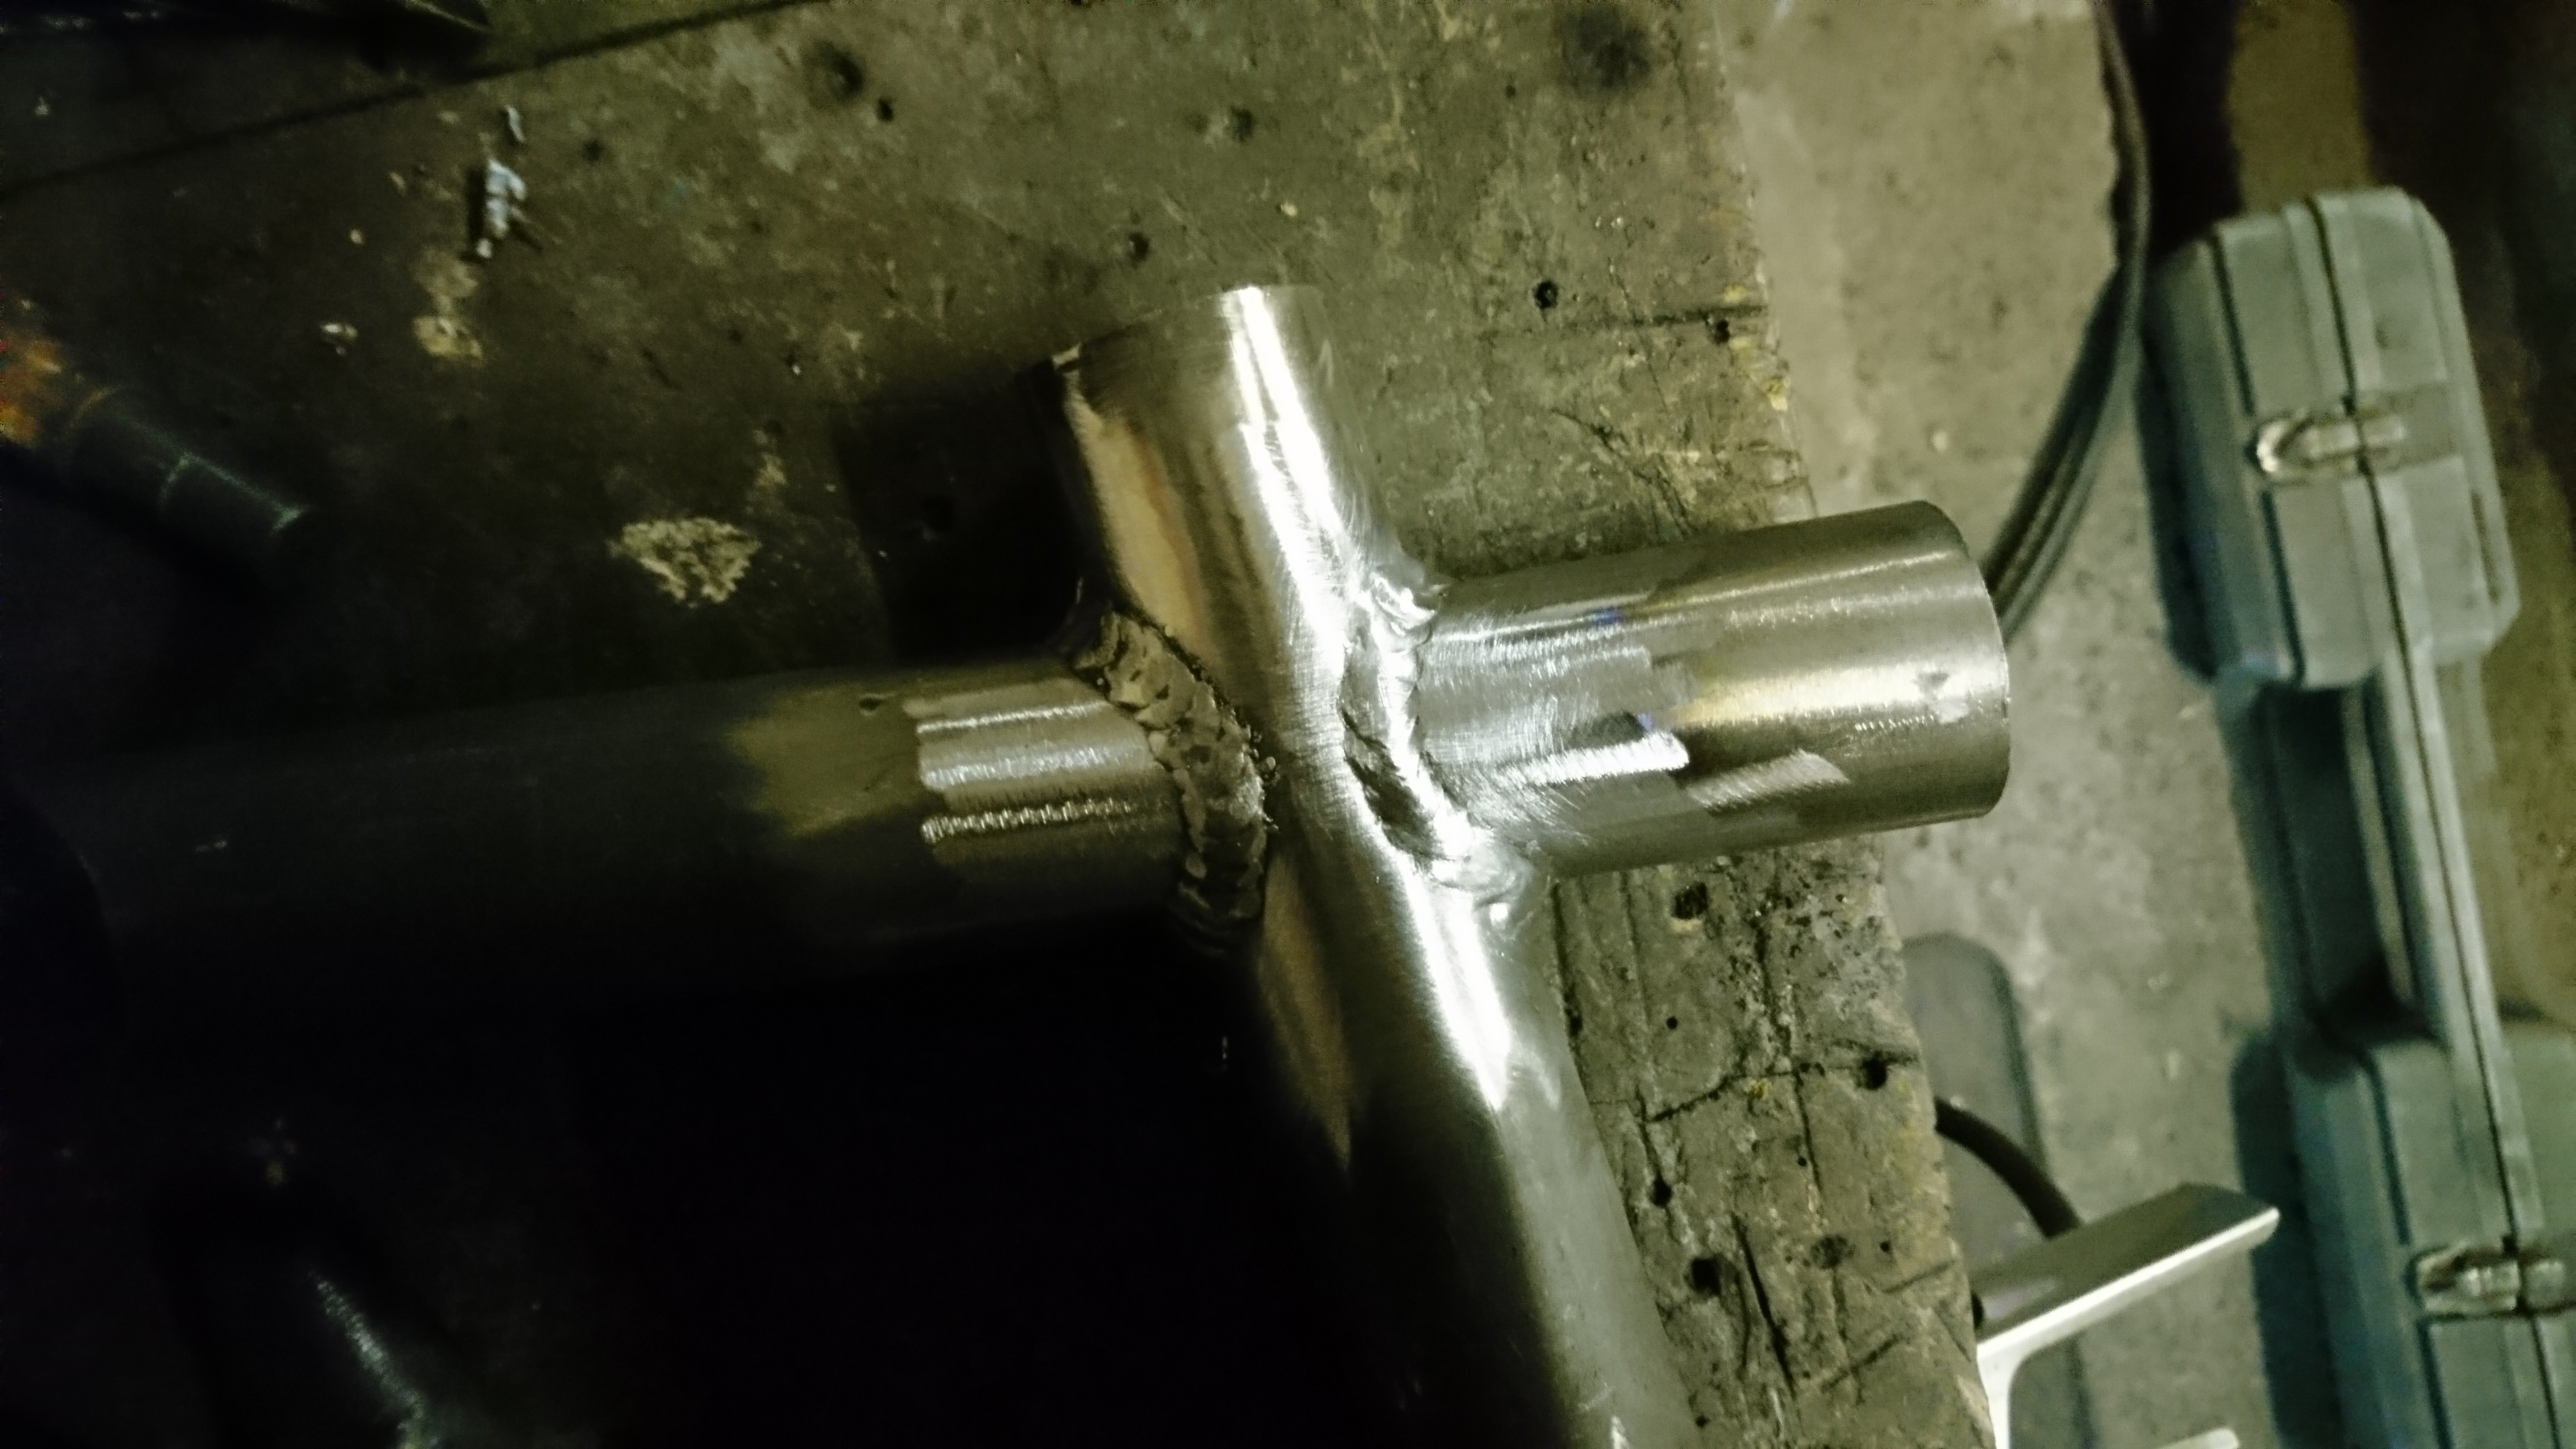
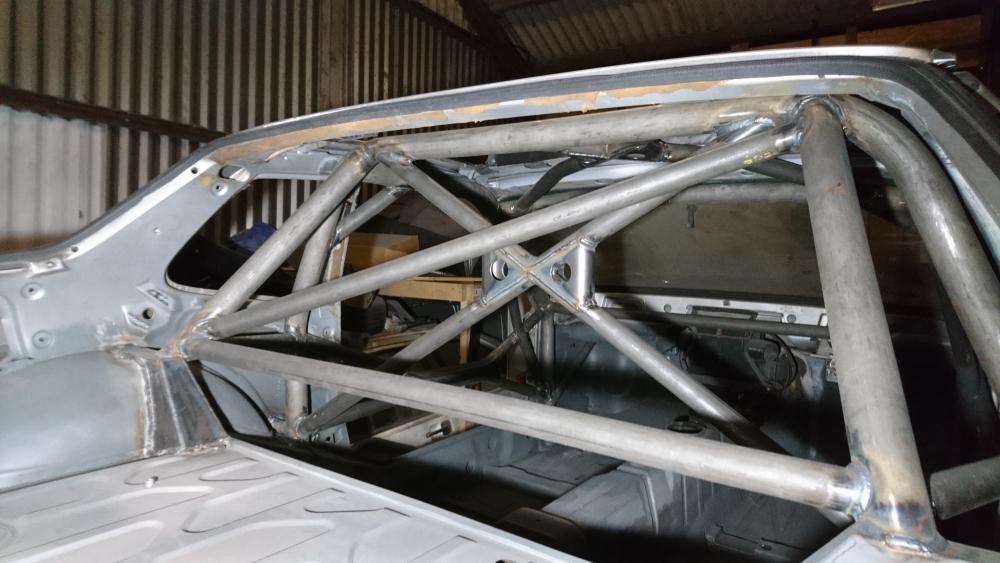
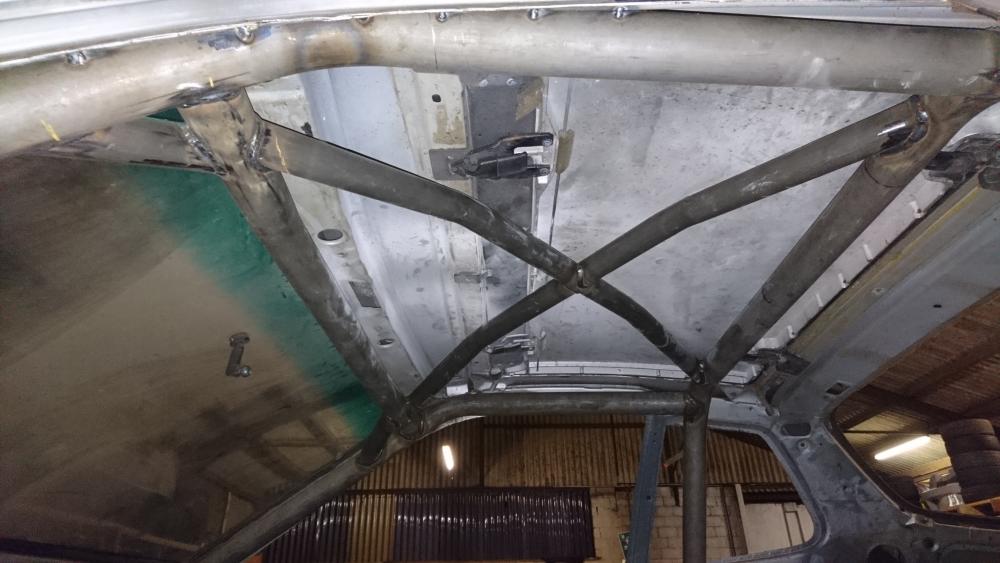
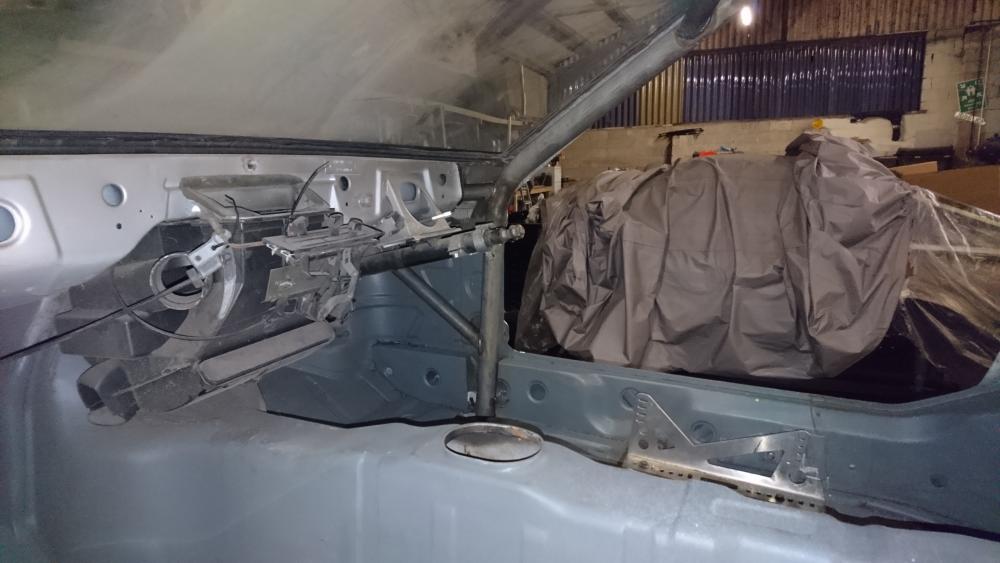
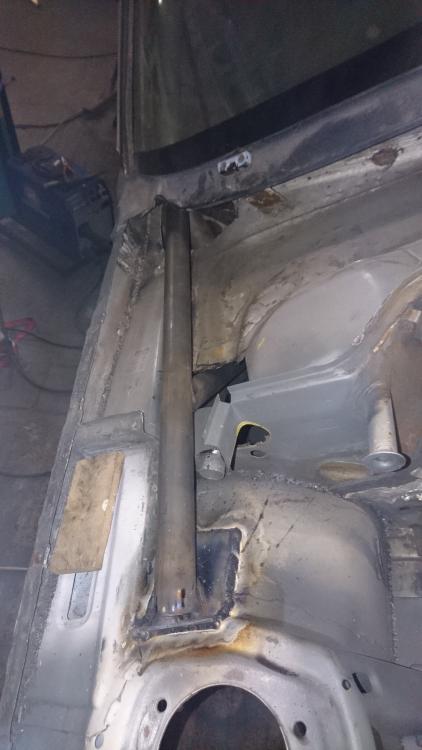
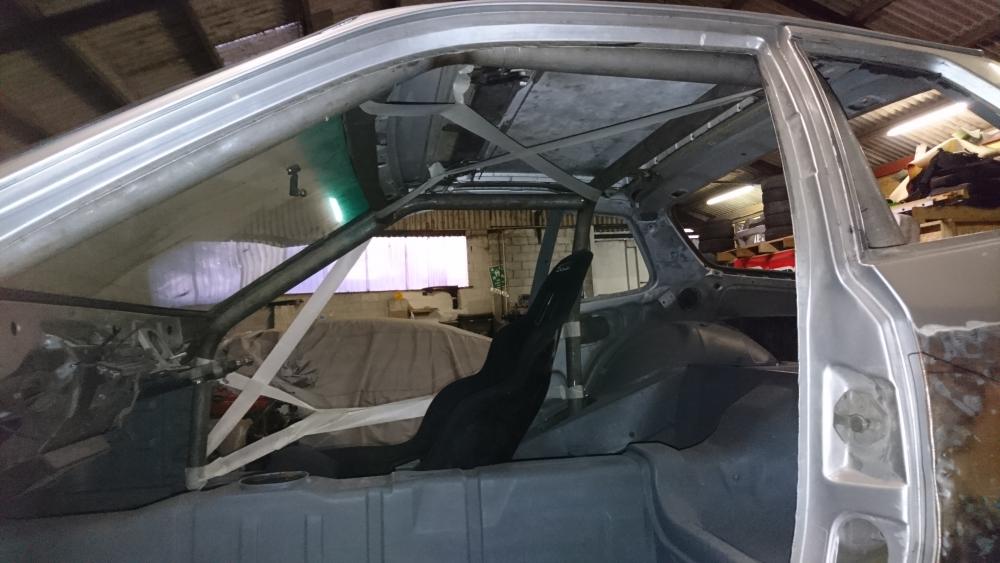
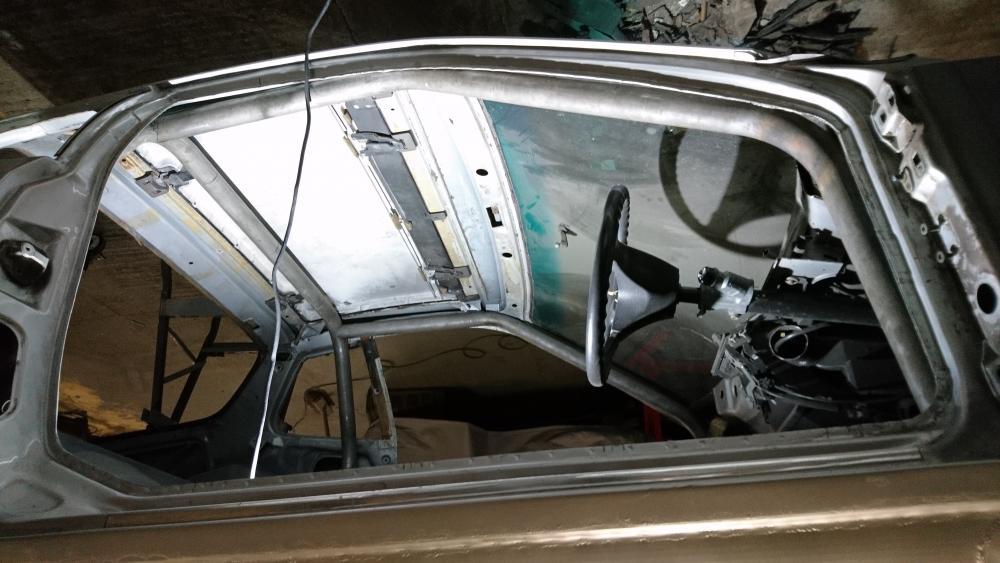
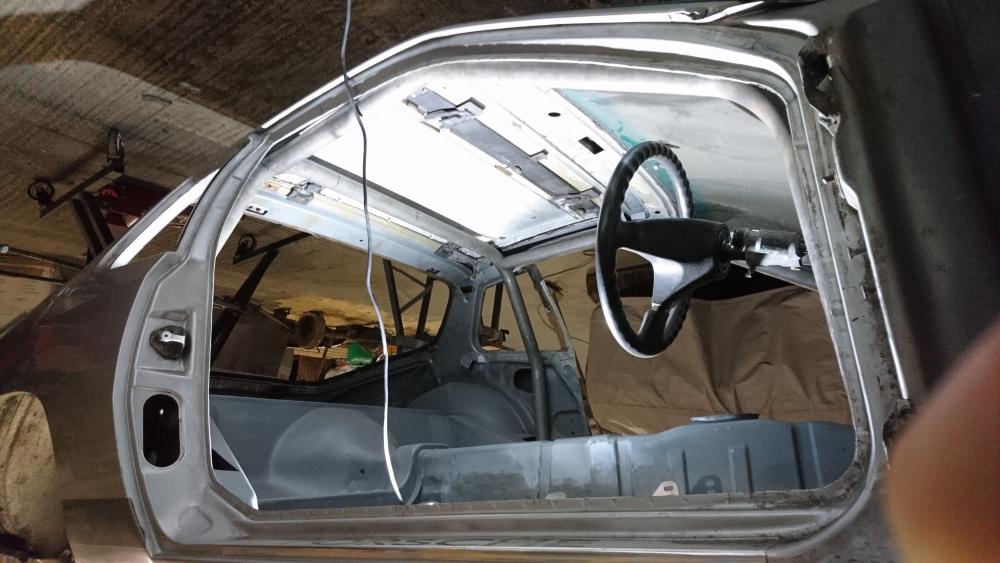
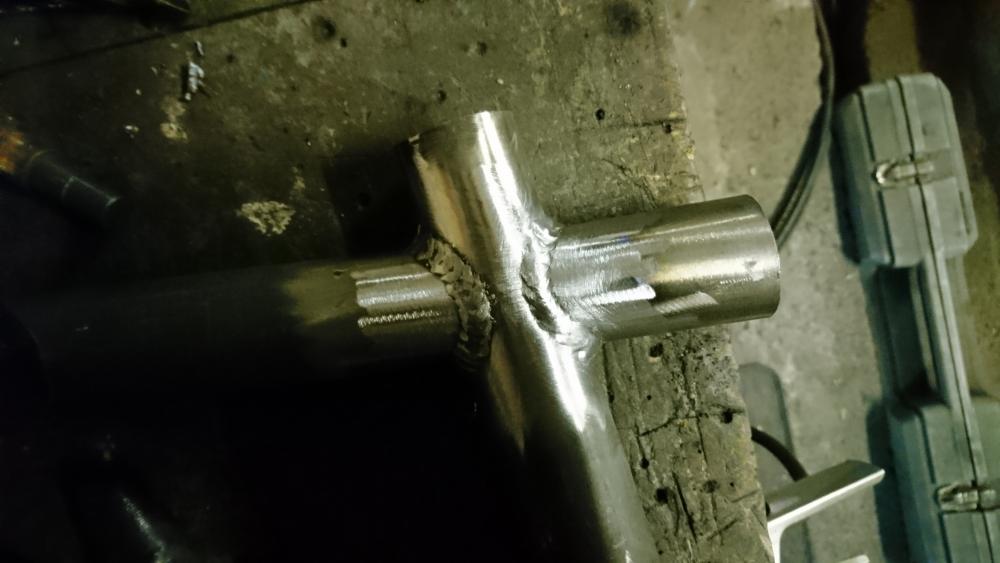
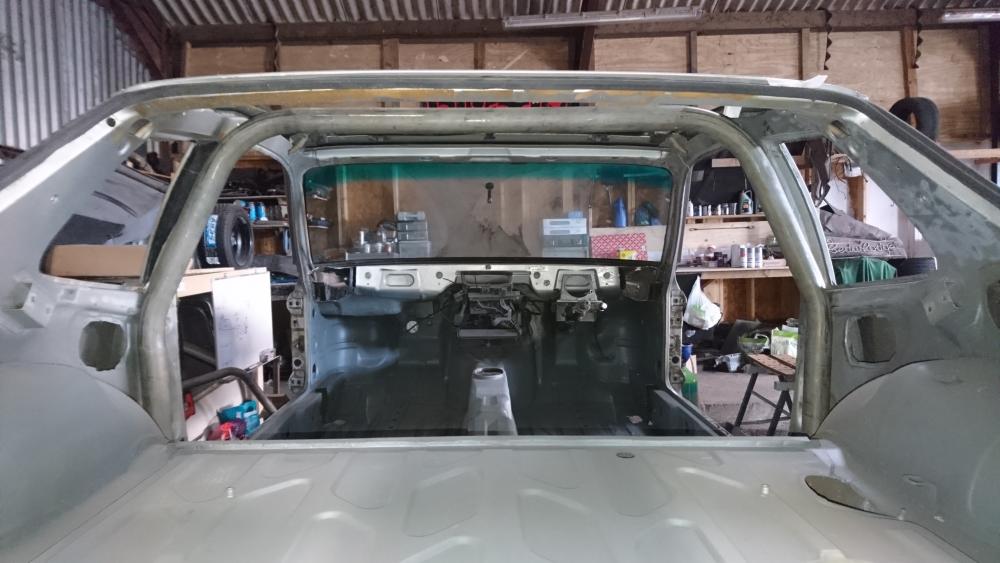
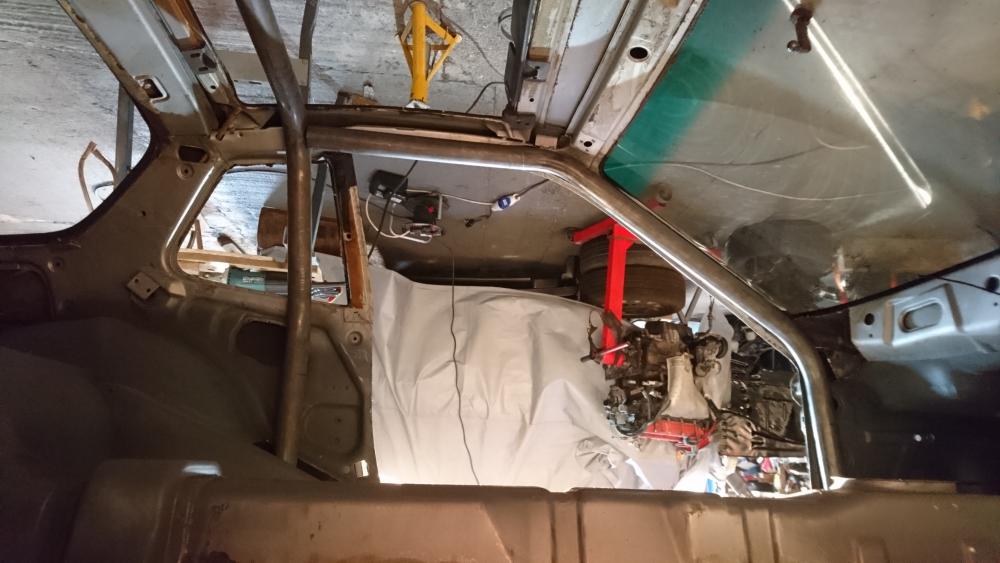
The 1.8t's are a rat's nest of pipework and wiring aren't they? My cage is coming along well. I've welded up all the roof level stuff, raised the cage back up into place and done the front strut-tower bracing on one side. Dropped down to weld round the top: All welded up: And the farward bracing: Once the front bracing's done it's time for door bars, then welding the feet into place, then the main hoop cross, then the rear legs, then gussets on the crosses and door bars.

-
Elise seats do seem popular, but I don't think they're enough of a true bucket for what I'm after, plus I'm going to be using 6 point harnesses, which I don't think any of them work with. I fitted a set of sprints to someone's mini a while back and they were nice seats, but I want something composite really, and I remember them suiting the mini well, which means they're probably a bit upright for the 924. In quite liking the look of some of the cobras, but I'm not sure how well they'd suit being laid back. The Imola looks like it might work, but it's hard to tell from photos alone, and I'm not sure about width for me (although in a pretty average sized guy.)
-
I can't say I'd noticed the price, that is a bit steep! How much smaller is the thread on the lower section? You may be able to helicoil it down to the right thread to suit the lower portion of the stick if it's close. My cage is coming along, I've got the main hoop, front legs and windscreen bar tacked into their final place, dropped the roof X bracing off to be bent, and cut and marked up the door bars and a-pillar supports ready to drop them off for bending. Once the roof bracing's back from bending (it should be done tomorrow) I can drop the cage through the holes in the floor and fully weld all the joints at roof-level. The tape's to work out the tube position/routing. I also realised I need to find a new seat, the one I've got's designed to be sat more upright than I can get away with (if I want any headroom), so when I lean it back enough my knees get kicked up too high. I don't suppose any of you MX5 guys have any experience with seats that suit a low roof line?
-
You could buy one of these mike, or do you not want a short shift? (mx5's aren't exactly crying out for one unless you extend the stick) https://www.mx5parts.co.uk/quick-shift-mk1-25-p-556.html If you don't mind the fact it'd be pretty permenant, filling the knobs thread with epoxy would be strong enough to take a new thread, especially if you used an epoxy with some structural fillers (like chemical metal).
-
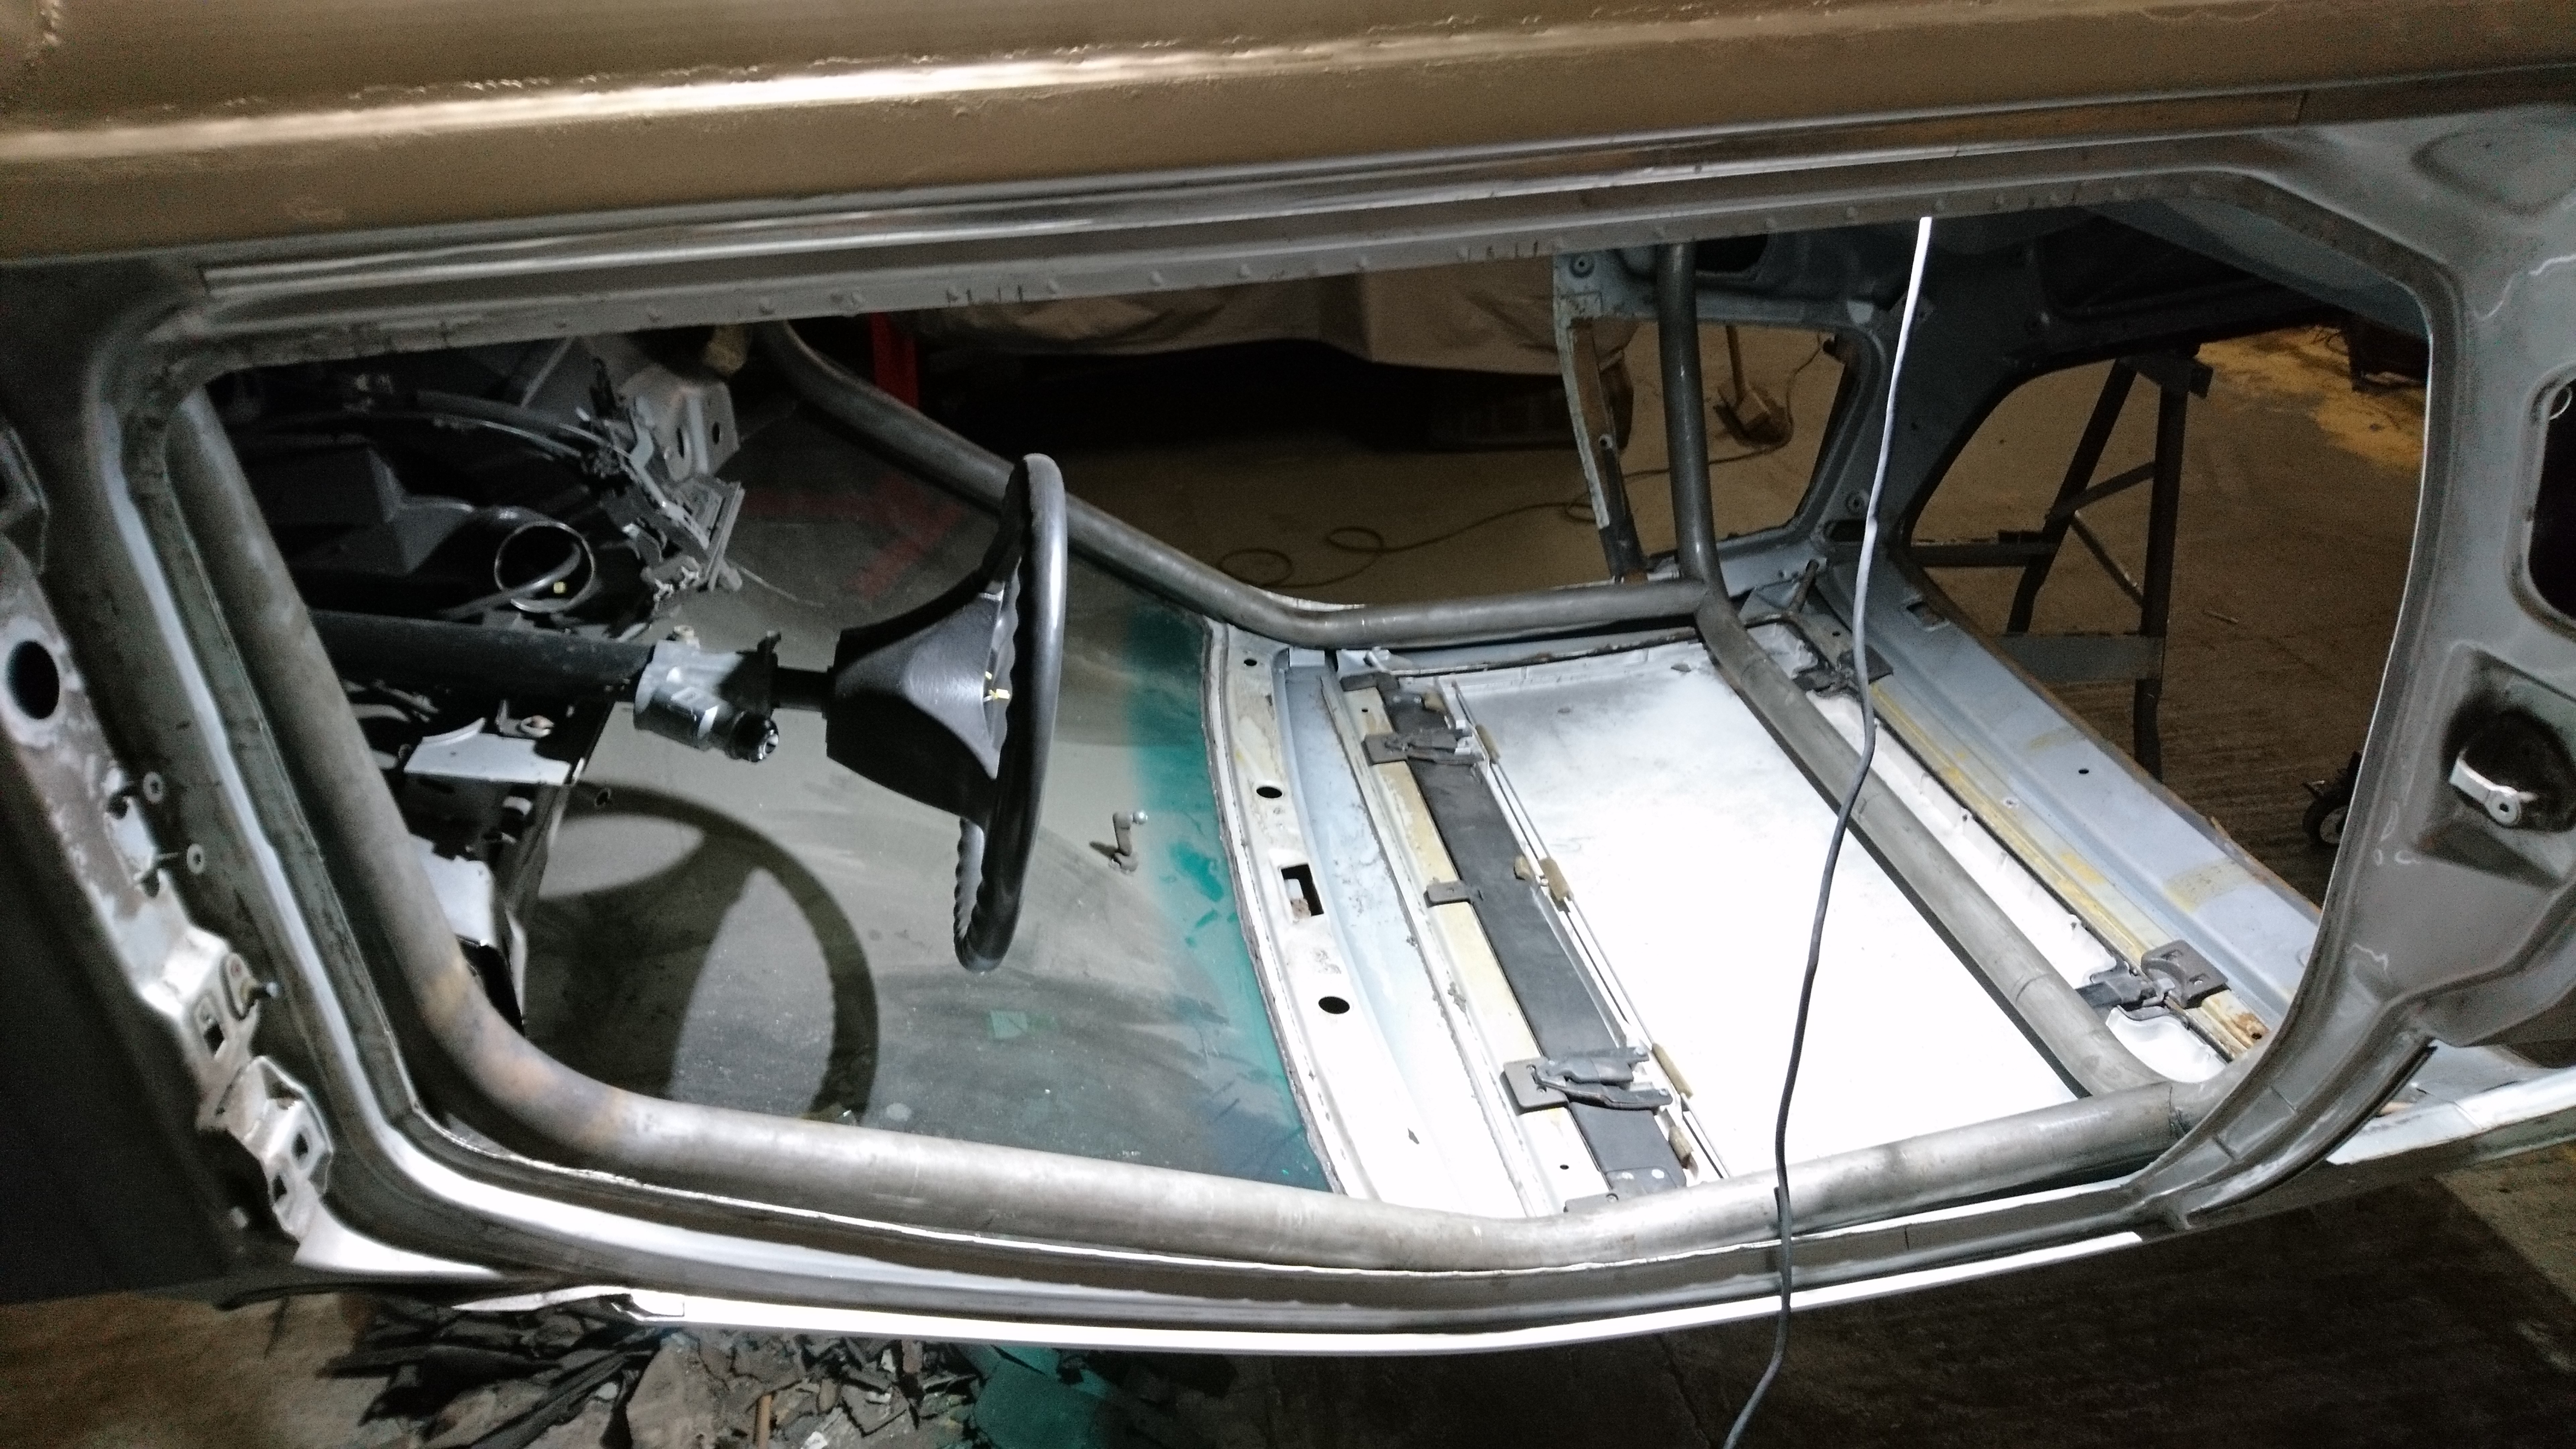
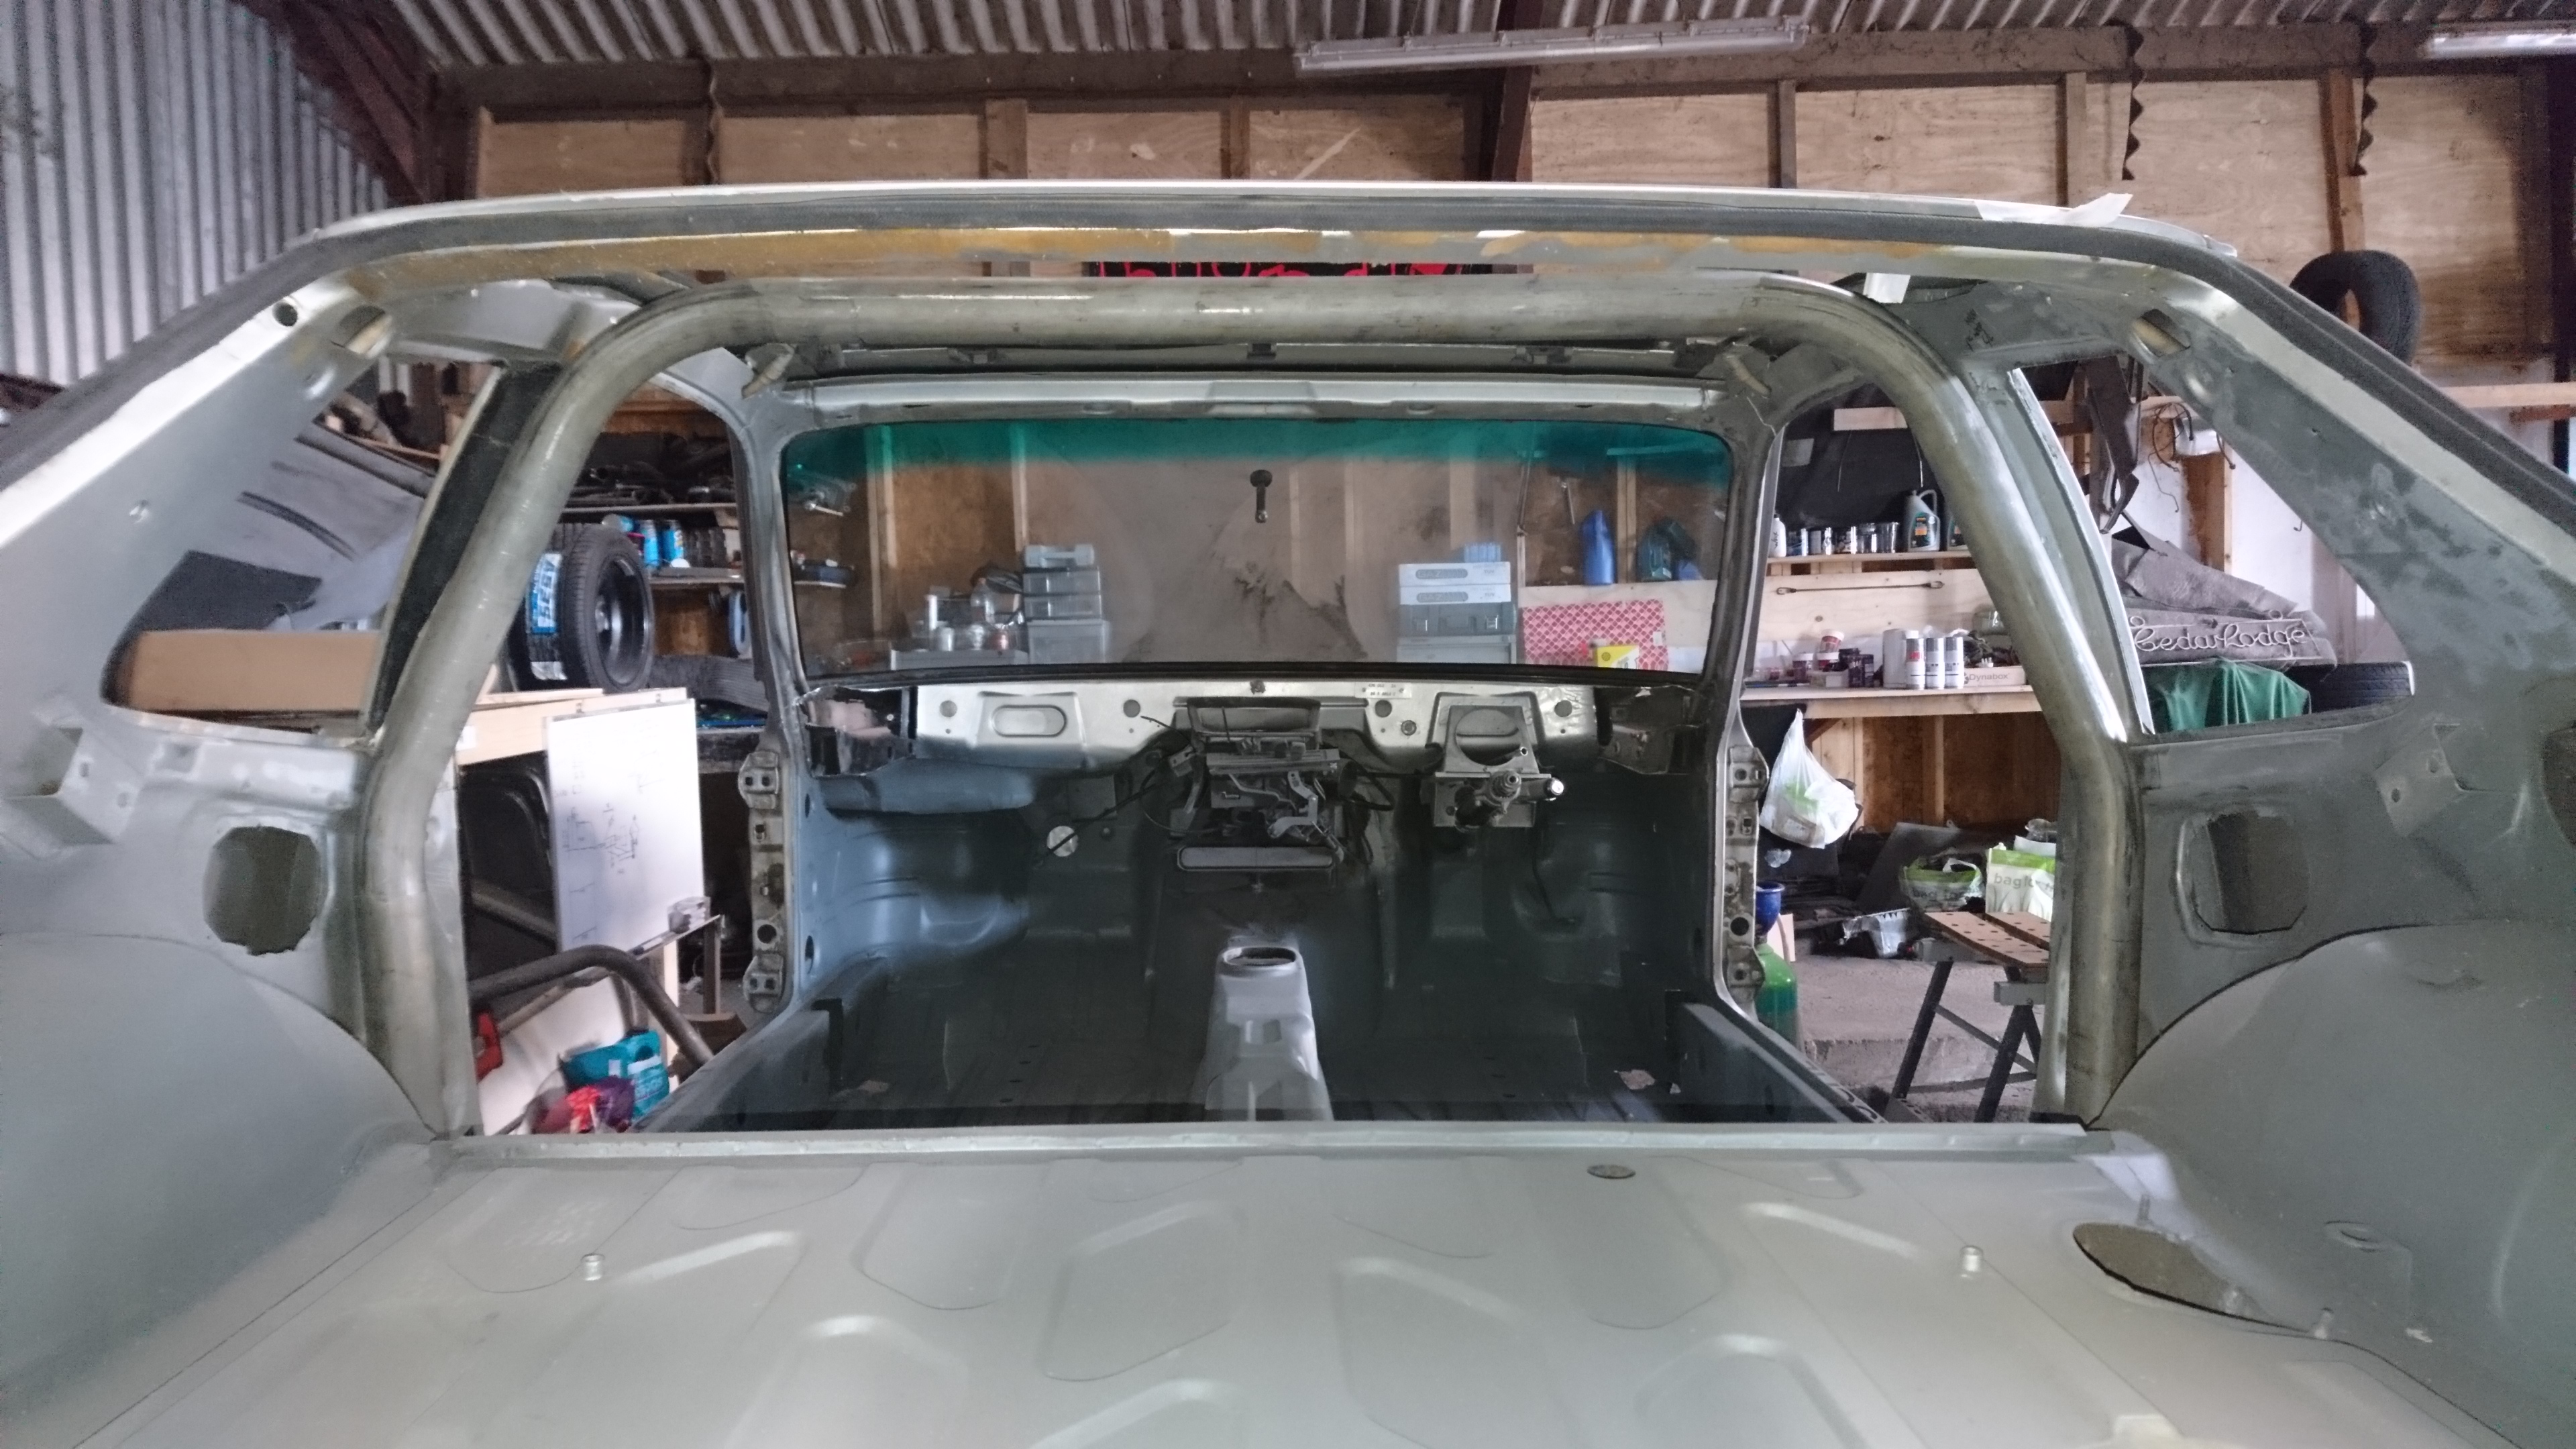
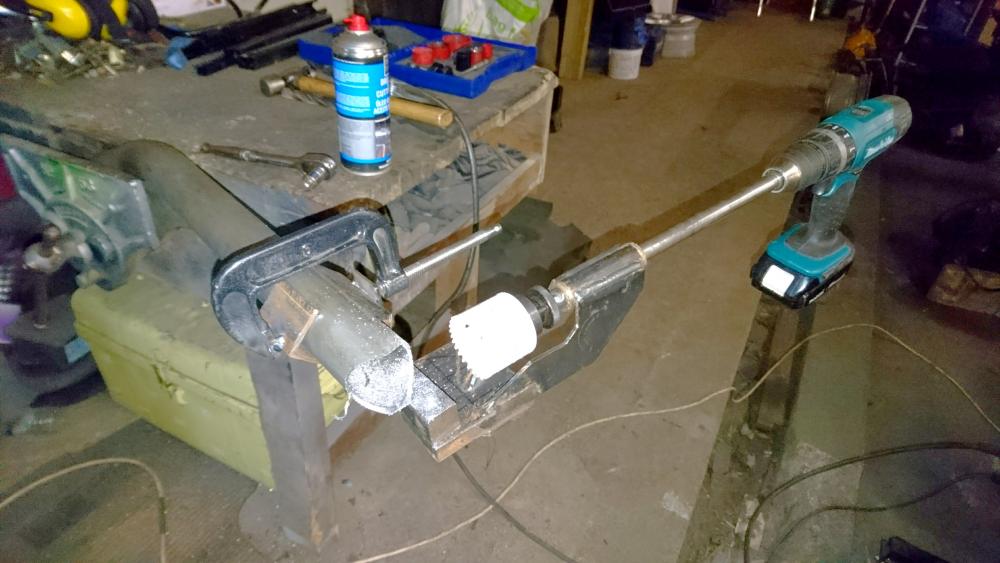
Glad to see an update on binky. They are moving at a snail's pace, but I enjoy the process as much as the finished result, so I still like watching it. There's a thread on retrorides about a mazda RX3 restoration that's similar, endless tangents, crazy home made tools and amazing skills, but very little progress with the car. It's still a good read even if they guy's years away from finishing it. The last couple of evenings I've finished off my tube notcher: Got the cages a-pillar bars fitting nicely: And I did a few practice welds with different techniques: Getting there.

-
Haha! 'experts' like that can be hilarious sometimes. The car's looking good Tom! I finished welding up the last of the rust in the 924 a week or 2 ago, so I finally pulled my finger out and got the tubes for the cage ordered, then got the guy in the next unit to stick some bends in them for me. I'm really happy with the fit so far: I've got a couple of bits in the post to finish a tube notcher I'm making, then I can get really stuck in putting a whole lot more tube in there!
-
I can't see the IVA thing being too big of a deal, any hint of those 3 letters has always got all the hot rod guys throwing toys and making huge assumptions left right and centre. My guess is it'll carry on pretty much as is, but if your car's modified you won't get MOT exemption, and if you lie and say it's not, you'll get in deep shit. Which seems fair enough. Personally I'd rather they just left it as it is, as the more segregated as a 'historic vehicle' our old cars become, the easier it will be when they eventually decide to restrict their use like they do in some parts of Europe. I'd rather pay tax, go through an MOT and know I can jump in my car anytime I like, than get some free stuff but be told where and when I can drive. I can't help think the government have got some bigger fires of their own causing to worry about rather than dicking around changing needless regulations about a handful of old cars.
-
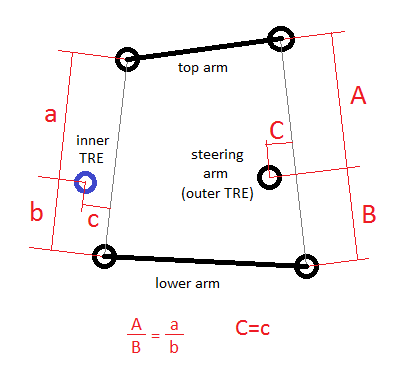
This is basically what I was badly describing. All the black circles are the existing pivots that you probably don't want to mess around with moving. If you get the inner track rod as close to this position as possible, all's good. I know you say you're not arsed about performance, but the the car being on air may exaggerate any issues, because you're using more travel more often than most people will. If you can't achieve this width with a rack you can get your hands on, then it being too short is better than it being too long. Like Adam says, parallel to the lower arm's likely to be close, as most cars have the steering arms quite low, putting the track rod end not far off in line with the lower arm.
-
@Tom Booth It depends what height the rack's mounted at, and what type of suspension it's got. If it's a double wishbone like I think most of those yank tanks were, then you want the inner track rod end on a line drawn through the 2 wishbones inner pivots. Height wise you want the inner and outer track rod ends the same distance between the wishbone pivots. So if the steering arm puts the outer TRE 1/3rd of the way between the top and bottom ball joints, the inner TRE wants to be 1/3rd of the way between the wishbones inner pivots, on a line drawn between them. Hopefully that makes some sense! Oh yeah, nearly forgot that as the steering arm will be offset from the line of the top/bottom ball joints, (to give ackerman), the inner TRE will need offsetting from the position I described by the same amount.
-
It was a great car. Really nice to drive in a quiet, comfortable way, and a nice mix of being modern enough to feel comfortable, smooth and effortless, but old enough to be mostly mechanical enough to fix at home and keep going for years if you wanted. (not that anything really went wrong with it in my ownership) I only sold it because it was immaculate, and I was finding myself wanting something I didn't have to worry about so much. Plus I wanted something that was less of a barge in the narrow back roads around here, and preferably a bit kinder on the wallet to run. A £600 diesel e36 fitted that bill nicely.
-
Yeah, it seems very intuitive in how it handles, it never feels intimidating to throw into a corner. The big side-walls probably help that too. This is my first e36. I had an e61 525d before it, which was great, but very much just a mode of transport. You might be thinking of Boumsong who also has a Scirocco, and I seem to remember having a 328i after it.
-
Sadly is just a 318tds, so very unexciting in a straight line but bloody cheap to trundle around in. It sticks surprisingly well in the corners though, which makes it hilariously point and shoot to drive, and really satisfying to throw down a twisty road.
-
I know this was a while ago, but I'm not sure you went to the same show as me!? I really enjoyed it and thought there was a really cool varied turnout. Speed hunters just put up a good write up too: http://www.speedhunters.com/2017/08/celebrating-character-retro-rides-gathering/ I'm a little biased though, as it always doubles as a chance to catch up with some great friends I've made through retro rides. For the record, I didn't take my e36 and add to the handful that were there, I jumped in the orange Datsun's passenger seat. I hadn't seen your post saying you were going or it would be been cool to say hello. Also, I cleaned the daily wagon earlier, and realised it was the first time since I'd fitted the suspension, so I may as well chuck a picture up. Although compared to the M3 above it's definitely at the crappy end of the e36 spectrum!