AndyT Posted November 9, 2017 Report Share Posted November 9, 2017 If you are unfamiliar with the slx it comes with 3 spacers to be used on the bottom bracket- two drive side and one non drive... I had been running all three on the drive side for a while when a friend said beware doing that- not good for the bottom bracket! When the cranks are run properly, 2 spacers drive and 1 non drive the chainring is just stuck into the bb yoke. I’ve been spending the last two days filing the four bolts that the chainring links to, still no good... need another mm at least if not 2. Afraid I’m going to fully ruin the crank if it goes another 2 mm away. @Ali C didn’t you run slx cranks on the hex?? What was the secret?? I’m light and a light rider, is 3 spacers on driveside going to lead to a premature failure?? Not enough thread in the frame? Would like to keep as they are the greatest cranks I’ve ever had. Do they sell driveside cups with extra long BB threads?? Ala hope? Quote Link to comment Share on other sites More sharing options...
monkeyseemonkeydo Posted November 9, 2017 Report Share Posted November 9, 2017 I seem to remember leaving the BB alone and adding a spacer on the axle between the BB and the crank arm... Will have a look when I get home tonight as I put it on a long time ago! Edit: Ok, may be lying but it is an option: Linky. And another discussing the issue: Linky. 2 Quote Link to comment Share on other sites More sharing options...
Ali C Posted November 9, 2017 Report Share Posted November 9, 2017 yeah, 2 spacers drive side and then a 2-3mm spacer on the axle before sliding it through the bb. Also if the teeth on the chainring are quite tall a very quick blast around with a grinder to reduce the height gives a few more mm as well. 1 Quote Link to comment Share on other sites More sharing options...
John Shrewsbury Posted November 9, 2017 Report Share Posted November 9, 2017 In the past I've taken a Hope rear sprocket spacer from a hope free wheel that you get with a new hub, added that instead of the plastic spacers that come with Shimano bb. Only because they crush quite easily. Plus as the Dave + Ali have said as well, I've also added the spacer on the crank axle to help. But from looking at your cranks now I wouldn't of filed the tabs for the bolts, only because they maybe more weak now and your chain may rub on the bolts holding your bashguard. 1 Quote Link to comment Share on other sites More sharing options...
ben_travis Posted November 9, 2017 Report Share Posted November 9, 2017 (edited) http://www.chainreactioncycles.com/shimano-saint-bb80-hollowtech-ii-bottom-bracket/rp-prod38345 If you can't find an axle spacer, there are extra threads on the drive side cup of this BB to help as well Edited November 9, 2017 by ben_travis 2 Quote Link to comment Share on other sites More sharing options...
AndyT Posted November 9, 2017 Author Report Share Posted November 9, 2017 Wow, three of my favorite riders writing in a row... thanks for the help guys!! @Ali C - fantastic idea why did i not think of such a thing @monkeyseemonkeydo Adding a spacer after the cup is already in... huntin in my spacers drawer now. @John Shrewsbury thanks... i slowly filed it down, would check clearance and put a chain on there - making sure it still fits. There is still a lot of thread inside each bolt so I’m hoping they stay strong, may use some blue loctite. @ben_travis awesome, thank you! Now if anyone can magically make the hashtag cranks go to 25% of its price my pogo will have its drivetrain issues corrected...”when i was a kid cranks cost $75!” will edit when I figure everything out and get it working ! 2 Quote Link to comment Share on other sites More sharing options...
AndyT Posted November 28, 2017 Author Report Share Posted November 28, 2017 Seems to be in good order now thanks to you guys ! went to my lbs and got a 25mm spacer, same width as the 24mm shimano spacers. Worked a treat, hopefully nothing goes foul when I pedal kick- I’ve got ~1mm or so of clearance now... I will end up grinding a tiny bit off the teeth if such a thing happens, for future readers- just added the spacer on the drive side crank before I slipped it on like they suggested here. Fired up to get back on this bike... crashed hard January ‘16 and haven’t properly been able to ride since... slowly recovering with the help of a good pt. Life’s a b#### sometimes Quote Link to comment Share on other sites More sharing options...
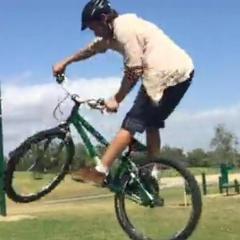
John Shrewsbury Posted November 28, 2017 Report Share Posted November 28, 2017 (edited) 4 hours ago, AndyT said: Seems to be in good order now thanks to you guys ! went to my lbs and got a 25mm spacer, same width as the 24mm shimano spacers. Worked a treat, hopefully nothing goes foul when I pedal kick- I’ve got ~1mm or so of clearance now... I will end up grinding a tiny bit off the teeth if such a thing happens, for future readers- just added the spacer on the drive side crank before I slipped it on like they suggested here. Fired up to get back on this bike... crashed hard January ‘16 and haven’t properly been able to ride since... slowly recovering with the help of a good pt. Life’s a b#### sometimes Still looks pretty close. If you took the the none drive side washer out and put it in the drive side with the other washers it should give you even more clearance. Or get a metal/aluminium washer the same thickness as all three (because those plastic ones can be rubbish to tighten further then you want. Try some single speed washers off a freewheel like this. That's what I run, and you can tighten it as much as possible Edited November 28, 2017 by John Shrewsbury 1 Quote Link to comment Share on other sites More sharing options...
AndyT Posted November 28, 2017 Author Report Share Posted November 28, 2017 Aye I used to have all 3 on the drive side, but someone said I would prematurely ruin the B.B. cup as there wouldn’t be enough thread contacting the frame... that’s how his whole thing started! A new longer B.B. cup like what was posted in here would be my next idea... unless all 3 are fine to work on the drive side, and this whole thread has no meaning and shouldn’t of been started Ive got free moving cranks, better than before- the teeth just stuck into the chain stay. Cheers for the help, I won’t know if it really works till I properly ride the bike... but yes it is CLOSE Quote Link to comment Share on other sites More sharing options...


Recommended Posts
Join the conversation
You can post now and register later. If you have an account, sign in now to post with your account.