


Alex Dark
-
Posts
7733 -
Joined
-
Last visited
-
Days Won
25
Content Type
Profiles
Forums
Gallery
Everything posted by Alex Dark
-
That frame will be 135mm spacing , so I would personally look at a 2011-2015 echo pure 26”. Everything you’ve got will be compatible , it’ll be lighter with more modern geometry that won’t be too extreme.
-
Spec looks fairly good , frame would be the thing I would change
-
I don’t ride street trials , but use these tyres on echo sl rims.... 25psi rear 18ish front
-
I really don’t know , if I had vagcom I could check the outputs from each sensor whilst the car was moving. shit biscuits do you know if they need coding ? https://rover.ebay.com/rover/0/0/0?mpre=https%3A%2F%2Fwww.ebay.co.uk%2Fulk%2Fitm%2F183282838139
-
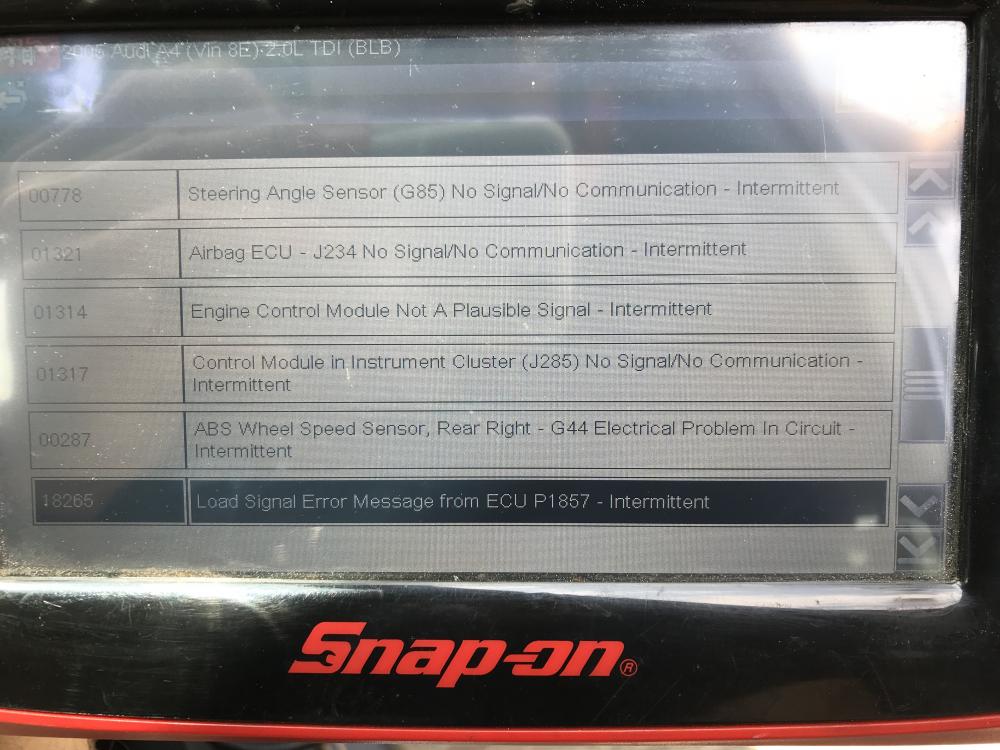
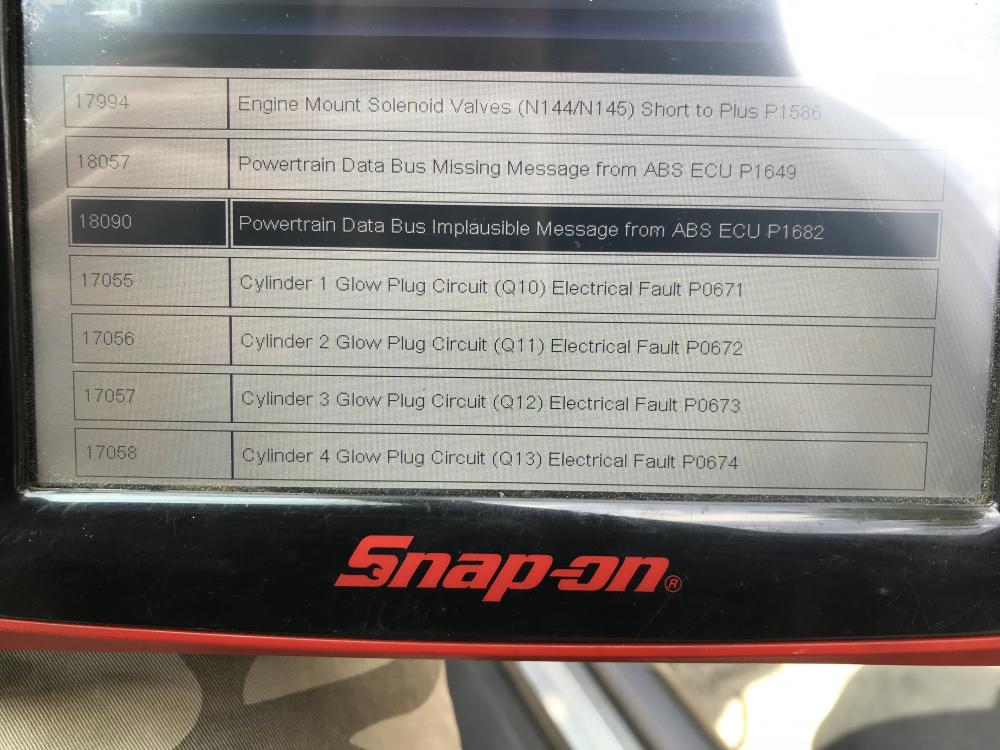
Argh having a nightmare getting the Audi through an Mot. Abs and esp lights on all the time . Had it scanned and called for right rear abs sensor to be replaced . Now it’s been replaced the lights are on all the time as opposed to being an intermittent fault. Abs ecu also looks pretty unhappy. Any ideas what to try next ? Loads of other random codes coming up too , that I’m choosing to ignore as I just don’t have time / money to chase them.
-
As I couldn’t go to Radfest this year I’ll be at tarty Heading up from Cornwall
-
Really enjoyed that Rich , must ride with you soon loved all the taps and a big variety of spots
-
Tyre recommendations for the mx5 ? got some hankook Ventus brand new x2... need another 2. For “spirited “ road driving , very occasional track use. 195/45/16 and around £50 each ideally . https://www.mytyres.co.uk/cgi-bin/rshop.pl?gclid=EAIaIQobChMI2KuXsZzd2wIVb5PtCh0SrQD1EAQYBSABEgK6rvD_BwE&dsco=110&typ=R-118050&partner=1&partner=1&Country=UK&ID=sea_rd_uk_Froogle_Shopping&partner=1&Country=UK&ID=sea_rd_uk_Froogle_Shopping&s_kwcid=AL!432!3!209143367941!!!g!!&ef_id=WyemtwAAAJPj61m2:20180618123359:s
-
Thanks man it’s coming along slowly ; boost is on the cards once it’s taken off the road again ( assuming it makes it onto the road this year ha )
-
Posted Today, 11:28 PM A few parts back from sandblasting. Engine mounts Also started stripping the calipers apart for a set of new seals. Drilled and tapped the banjo bolt out at M6 to suit a grease nipple, used a spacer to block the banjo holes and a grease gun to force the seized pistons out from their bores. Rear piston in need of some scotchbrite Also managed to get all the exhaust manifold nuts removed, copper greased and replaced.
-
Posted Today, 11:17 PM The old gearbox had a tendency to jump out of first, unfortunately the new box that was purchased had suffered from water ingress. Pulled the new box apart to figure out how it all worked, then tackled the second. Turned out the synchro for first gear had loads of instant gasket sealant stuck in it preventing it from fully engaging, Hopefully this will remedy the issue.
-
engine bay sprayed in 2k PZ gloss black
-
Decided to get the engine bay sprayed first so got everything masked off , 320 grit wet and dried the whole lot with some small rotary wire brushes for the awkward areas then put down some MIPA Etch Primer for the bare metal parts.
-
Inlet Manifold got treated to a few coats of VHT Paint Gave the rotors a quick wire brush and hammerited the centres. Started to do some body repair on the mk2.5 NBFL bumper Sideskirts also needed some TLC
-
Changed the clutch for a new Exedy unit and did the rear main crankshaft seal at the same time.
-
Is anyone keen for a big London Ride then ?
-
London sounds cool akin to the big 2009 ride
-
I'm keen but Manchester is a fair jaunt for me in Cornwall
-
Been a bit too long since the last update, but this what has been achieved since the end of February: Started a wire tuck on the engine bay as the engine itself was well out of the way Ran the cable through the indicator routing holes ( had to enlarge to fit the bigger multi plugs through ) Engine bay before starting rust removal etc prep work Engine bay during prep Front hubs were looking terrible, so wire brushed them with the grinder and gave them a few coats of hammerite. After paint Noticed a fair amount of corrosion on the coils of the BC racing coilovers, so going to give them the same treatment to try and protect them. Stripped the rear lights down to do the halo LED ring mod, and add a red filter to both sides so the backend is more symmetrical. Bought a donor shell for the windscreen, rear quarters and some other little clips etc. £50 + 40 for the next door neighbour to transport it for me. Drilling out many spot welds. Some damage to the drivers side quarter Unfortunately found some rot too New gearbox also sourced from the same place for £30 Grotty rusty calipers after wire brushing Painted the calipers purple to match the cam cover. Plenty more updates to come once i get some more pictures from my old phone. Hopefully having a flurry of activity to get the car done for Summer!
-
I would say so, goes on really well and has good coverage. Managed 4 x subframes , 4x wishbones and one subframe to 1 litre. Time will tell how well it wears!
-
So got a few hours in on the weekend ; wire brushed the subframe and gave it a couple of coats of raptor. Also cleaned up the entire length of the chassis rails, some small patches of corrosion near the brake lines / front subframe mounts and gave it all 2 layers of raptor. I REALLY don't understand how anyone can repair the chassis rails without taking the engine out!
-
As always much appreciated Mr Rainbird Hows the new LCR? The best colour....still fancy a PD FR
-
Had a fun distraction in the form of every bolt for my disc shields / abs sensors in the front hub snapping. Cue some inventive fixturing, a couple of carbide endmills and an m8 tap and I had all the threads recovered. Started the job of cutting the old rails out to see what I was working with. Used the drivers side that hadn't been previously repaired. Turns out the rail had blown out so far it was unreal. You can see on the side where its rotted right the way through. Picked up some box section £11 for both sides, over length by 100mm! Chopped one to size and did a trial fit. Unfortunately when speccing the box section I measured it at 90mm on the width ( I'd measured a section that was blown out clearly ) so cut 85mm up from the bottom. When I remeasured the internal width and added the wall thickness I realized it was actually only 80mm square! Leaving me with a small gap at the top to fill What a bellend. I decided to take out the maximum amount of material easily possible, and went from the very edge of the subframe mounting plate ( So I could weld into this thicker circa 6mm material ) right along to the gusset that reinforces the slam bar at the front ( cut off the spot welded tabs and welded directly onto this ) Rail length was around 570mm each side. Drilled all the holes on both pieces of box on a mill at work using the old rails as a guide; remembering of course that the passengers is the mirror image of the drivers +/- a few mounting holes. I needed to shape the box into more of a Vee shape, so chopped the top and used a car jack to widen the top width ( |__| to \__/ ) Rot inside the passenger side. Chopped the passenger and found an even more delightful sight, with some lovely previous repairs. Proper abortion of a repair, plates and angle iron here there and everywhere with the ARB bracket welded on every face possible Out with the old and in with the new. Originally planned on replicating all the holes, bolting nuts to the inside and welding these into position. Got convinced to give rivnuts a try and can say I'm converted ! They look super clean. After welding the OEM brackets back, and drilling the ARB brackets to accept the larger rivnuts it all looks proper. Got busy with the melty stick: Smoothed all the welds off ready for paint with a 40grit flap wheel.
-
Got a friendly neighbour to trailer the Mx over to my mums place with a nice double garage, requisitioned one bay of it and parked up. Had to drag the car in with a lawnmower of all things due to not having a drivshaft of diff in place Was an interesting few minutes So couple of weekends ago I managed to get a mate to give a hand pulling the engine and box from the mx. You can see the pretty prodigious coolant leak onto my gearbox from the bulkhead coolant pipes Pulled the bumper and the rest of the front end off too ready for chassis rail replacement and mk2.5 NBFL upgrade. Dropped the subframe off ready for blasting, had one casualty in the form of a snapped subframe stud General detritus boxed for blasting Took the subframe over to a friends for blasting; gave it a quick pressure wash off first. Seems to be far better nick than the rear! Moody sandblast shed shot: interior..... Got it all sandblasted, cleaned up really nice.... shame its not alu as would look so good polished Sneak peek of what lies ahead....


