Private Repress Posted April 10, 2023 Report Share Posted April 10, 2023 (edited) Got the bug for another bike build… After building up a 24 inch Marino back in early 2021, I couldn’t help but feel it was too small and twitchy for me to get on with. As much fun as it is, it feels more BMX than trials at times, so nimble that it’s almost too unstable for me at least. I spotted a post on here from @smiddy86 who was looking to swap a 26inch Marino for a 24inch frame. I thought I could rebuild the 26 using the bits from the 24 having done a swap. Long story short I ended up getting the whole bike which had also been owned by @Eldertroll Here it is as as purchased: A relatively nice spec, but I still wanted to change some bits and the colour. Edited April 10, 2023 by Private Repress Typo Quote Link to comment Share on other sites More sharing options...
Private Repress Posted April 10, 2023 Author Report Share Posted April 10, 2023 (edited) So first job was to strip the bike down and begin to remove the paint. This is when I discovered it wasn’t a BSA bb, it’s Spanish. I genuinely didn’t realise when I picked it up and never thought to ask. This was a bit of a stumbling block, as I wanted to run SRAM GXP cranks. I’ll come back to that shortly! I debated about having the frame powder coated, but having done this on a few bikes in the past, I know that I worry I’m going to scratch them! So the idea came about to strip the frame and clear coat it, in an attempt to get a finish and colour scheme something like Akriggs custom mongoose: Needless to say I won’t be rushing to strip paint off a frame again having spent an accumulative 12hrs attempting to remove every last bit of purple! Beneath the purple was black paint. this came off easy on some areas and not so in others. Which led me to a more of a rat look. Edited April 11, 2023 by Private Repress Typo Quote Link to comment Share on other sites More sharing options...
Private Repress Posted April 10, 2023 Author Report Share Posted April 10, 2023 I quite liked the dirty look, deciding to leave some bits of the black paint, and even some of the purple - a nod to those that have owned it before, giving it a little bit of character (in my mind). But to get it looking more like Akriggs build, I needed rust. I contemplated forcing the rust with chemicals, but had time on my hands whilst I worked on a solution for the bb. So the frame spent a week in the garden after being soaked in water: Quote Link to comment Share on other sites More sharing options...
Private Repress Posted April 11, 2023 Author Report Share Posted April 11, 2023 (edited) With surface rust starting to form I got in touch with @Ben Davies who is a master at making graphics. Absolute top bloke who I can’t recommend enough. I sent Ben some pics of what I was after along with some measurements and he came up with these: While I was waiting on the frame to rust , I rebuilt the rims it came with using black spokes onto some black Hope Pro 2 trials hubs which I already had - using these hubs also meant I didn’t need to split the 24inch Marino, which has pro 4s (if I get on with this bike I’ll possibly rebuild the wheels with the pro 4s). A fresh set of black Billy bonkers tyres will go on for the build. Edited April 11, 2023 by Private Repress Typo 1 Quote Link to comment Share on other sites More sharing options...
Private Repress Posted April 11, 2023 Author Report Share Posted April 11, 2023 Next job was to clear coat the frame, I bought two cans of clear coat from somewhere like Poundland, hung the frame on the washing line and proceeded with this ultra professional application, with a total of around 5 coats. I was pleasantly surprised with the results: At this point only two coats had been applied: Quote Link to comment Share on other sites More sharing options...
Private Repress Posted April 11, 2023 Author Report Share Posted April 11, 2023 So after another 3 coats, and allowing it to dry overnight I added some decals: the pictures really don’t bring out the bronze of the lacquered rust, but it looks so damn good in person. 1 Quote Link to comment Share on other sites More sharing options...
Private Repress Posted April 11, 2023 Author Report Share Posted April 11, 2023 Now to tackle the bb. I could have kept the middleburns on, but having used the SRAM gxp cranks on the 24 inch, and on my enduro bike - the stiffness and clean look of them felt like it was worth a battle to get them to work. I spent hours searching for some sort of adapter to no avail. I asked for advice on this forum and @Swoofty mentioned a product, which were press fit bb cups that housed a bb30 bearing. This is what I needed, but with cups that would house the SRAM bearings. So I ordered to SRAM bb replacement bearings (which are such an odd design due to the stepped crank spindle): I then got in touch with a mate who works in a company that does a lot of machining. He was able to get a colleague to make these beauties: I picked these up yesterday - and god was I impressed. The tolerances these have been made to is spot on. Needless to say, I got to work fitting them: once pressed, I then pressed the new bearings in and fitted the sram cranks: the true test will be riding it, but it feels good in terms of movement by hand. 2 Quote Link to comment Share on other sites More sharing options...
Private Repress Posted April 11, 2023 Author Report Share Posted April 11, 2023 Tonight I actually got a bit impatient, I’d dropped the forks off to be powder coated last week, but wanted to see how the cranks would feel under my feet, so built up a rolling rig with some bits I had kicking around. the forks, bars, stem and seat will be changed for the final build: Thankfully the cranks feel great so far, but keen to see how they perform when pedaling! Looks wise, I’m stoked that it’s not a million miles away from what I set out to achieve: (squint a bit haha) 4 Quote Link to comment Share on other sites More sharing options...
Private Repress Posted April 11, 2023 Author Report Share Posted April 11, 2023 Disc wise I’ll be running either 203mm magura storm HC rotors, or some Shimano 180mm, I’m currently undecided. The brakes themselves will be shigura. The bike came with Shimano XT’s front and rear. I happen to have a spare MT5 calliper, which I’ll run on the rear with standard pads (manual heaven). For the front I have an MT4 left from selling a bike in bits, so I’ll pinch the calliper. Hoping to pick the forks up tomorrow and get it built in the evening. I’ll get a picture up as soon as it’s done 1 Quote Link to comment Share on other sites More sharing options...
The Dark Knight Posted April 11, 2023 Report Share Posted April 11, 2023 Looking good so far, those bottom bracket cups look very nicely machined. Do you know the geo of the frame? I looked at these frames years ago. 1 Quote Link to comment Share on other sites More sharing options...
Private Repress Posted April 11, 2023 Author Report Share Posted April 11, 2023 (edited) 40 minutes ago, The Dark Knight said: Looking good so far, those bottom bracket cups look very nicely machined. Do you know the geo of the frame? I looked at these frames years ago. Thanks @The Dark Knight Main numbers as follows: Wheelbase: circa 1030mm Chainstay: 380mm BB: +20mm (I need to check this with the correct forks on it) Head Angle: 73.5˚ Edited April 11, 2023 by Private Repress 1 Quote Link to comment Share on other sites More sharing options...
Luke Rainbird Posted April 11, 2023 Report Share Posted April 11, 2023 Looking good man, nicely done. Geo looks in a similar ballpark to an early Hex, so will no doubt ride as well as it looks My old Marino was arguably the most fun bike I ever built. Sure as shit wasn't the "best" in any other respect but that's largely irrelevant if you're enjoying yourself. It got used and abused and was genuinely missed once it move on to pastures new (Paging Adam Whittingham...) 1 Quote Link to comment Share on other sites More sharing options...
Private Repress Posted April 11, 2023 Author Report Share Posted April 11, 2023 41 minutes ago, Luke Rainbird said: Looking good man, nicely done. Geo looks in a similar ballpark to an early Hex, so will no doubt ride as well as it looks My old Marino was arguably the most fun bike I ever built. Sure as shit wasn't the "best" in any other respect but that's largely irrelevant if you're enjoying yourself. It got used and abused and was genuinely missed once it move on to pastures new (Paging Adam Whittingham...) Thanks @Luke Rainbird, I’ve had fun doing this one. Yes the geo is based on the early Hex, so the numbers I posted above need to be double checked once finished. Been itching for a modern street 26, so I’m really looking forward to having a blast on this Quote Link to comment Share on other sites More sharing options...
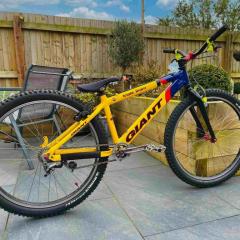
Private Repress Posted April 13, 2023 Author Report Share Posted April 13, 2023 Build complete! The bike feels great, running a 90x25 stem keeping the front a little lower relative to the bb - feels a little more old skool like that somehow. 11 Quote Link to comment Share on other sites More sharing options...
Swoofty Posted April 13, 2023 Report Share Posted April 13, 2023 Wow! That's quite a looker. Proper urban camo 1 Quote Link to comment Share on other sites More sharing options...
Private Repress Posted April 13, 2023 Author Report Share Posted April 13, 2023 2 hours ago, Swoofty said: Wow! That's quite a looker. Proper urban camo Thanks mate, I’m so happy with the finish, really looking forward to a proper ride on Saturday Quote Link to comment Share on other sites More sharing options...
Private Repress Posted April 15, 2023 Author Report Share Posted April 15, 2023 A few more pics from todays ride: 3 Quote Link to comment Share on other sites More sharing options...
Private Repress Posted April 15, 2023 Author Report Share Posted April 15, 2023 Quick vid of a small line I did today 4 Quote Link to comment Share on other sites More sharing options...
Private Repress Posted October 15, 2023 Author Report Share Posted October 15, 2023 So after a switch to back wheel cracked the rear disc mount earlier this year the bike had been sat in the garage, until today. welded up and ready to ride again 🙂 5 Quote Link to comment Share on other sites More sharing options...
Swoofty Posted October 17, 2023 Report Share Posted October 17, 2023 Oh the beauty of steel. Do you have a pic of it broken? 1 Quote Link to comment Share on other sites More sharing options...
Private Repress Posted October 17, 2023 Author Report Share Posted October 17, 2023 (edited) 11 hours ago, Swoofty said: Oh the beauty of steel. Do you have a pic of it broken? Yes, this is a shot on the inside edge of the mount: To be honest, when I got the bike I thought the mount looked a touch flimsy, and was in the dilemma of do I run 180 or 203 rotors. I decided on the 203s with a view ‘I’ll just get it welded if it snaps’ 🤣 So for the fix, I had the gap in the middle of the weld completely filled, hoping that now there is more contact area to create a stronger bond. Here is what it looked like before: If you compare it to the now welded mount, there is a lot more material in contact with the seat stay. Edited October 17, 2023 by Private Repress Typo 1 Quote Link to comment Share on other sites More sharing options...
La Bourde Posted October 17, 2023 Report Share Posted October 17, 2023 On the first picture, it looks like neither the mount nor a tube is cracked. It seems the weld did not penetrate correctly. Which would not speak for Marino's quality. But it is difficult to see correctly. Do you have a better picture? Quote Link to comment Share on other sites More sharing options...
Swoofty Posted October 17, 2023 Report Share Posted October 17, 2023 Did you consider moving the IS mount to the +20 or +40 position to decrease the lever moment on the mount from the adapters? Marino's quality has much improved since this frame was made. 1 Quote Link to comment Share on other sites More sharing options...
Private Repress Posted October 17, 2023 Author Report Share Posted October 17, 2023 5 hours ago, La Bourde said: On the first picture, it looks like neither the mount nor a tube is cracked. It seems the weld did not penetrate correctly. Which would not speak for Marino's quality. But it is difficult to see correctly. Do you have a better picture? Sadly I don’t, but it seemed to me that the it went on the very edge of the weld, where the mount met the additional reinforcing plate of steel that is welded on to the seat stay (hope that makes sense). In Mario’s defence, this is an early frame that I bought second hand with little knowledge of its use. I’m not the lightest person, but at the same time I’m not a heavy rider. Running 203mm rotors was probably pushing my luck. Still going to run them though 😉 Quote Link to comment Share on other sites More sharing options...
Private Repress Posted October 17, 2023 Author Report Share Posted October 17, 2023 5 hours ago, Swoofty said: Did you consider moving the IS mount to the +20 or +40 position to decrease the lever moment on the mount from the adapters? Marino's quality has much improved since this frame was made. I replied to @La Bourde before I read your comment @Swoofty. You are bang on in terms of how they have improved. I know first hand as I have a 24inch Marino that I bought from them in 2021. The build quality is far superior. I did consider taking the mount off all together and starting again, but at the same time the mate that did the welding isn’t a frame builder, so we went down the path of least resistance and made good of what was already there to save messing about with alignment/creating a new mount etc. I’ll see how it holds out, if it goes again then I may well go down that route. just spent the evening at my mates getting another project sorted. Not trials though, it’s a 1995 alpinestars, I’ll do a thread on this separately, but some pics for your viewing pleasure… Forks… a 2mm plate welded to the back to spread the load of the new disc mount. This is the first time he’s done disc mounts, and I just guided him where things needed to be etc. all things considered I’m really happy with it. Some cleaning up to do which I’ll tackle with a grinder and a dremmel. These were 1 1/8th threaded forks, which we cut the steerer down on, tacked an inner shim to, then extended the steerer to make it threadless: Very happy with the way these turned out. Rear disc mount being added: This was tricky, because the way the the rear triangle tapers in, so it kind of ended up with a little over hang: I’ll build the bike up, check everything is working as it should, then I’ll consider taking off some of the surplus mounts and possibly doing something to fill the gap on that rear mount overhang, before painting. 1 Quote Link to comment Share on other sites More sharing options...


Recommended Posts
Join the conversation
You can post now and register later. If you have an account, sign in now to post with your account.