


BikeDotStuffAtOnzaDotCom
-
Posts
200 -
Joined
-
Last visited
Content Type
Profiles
Forums
Gallery
Everything posted by BikeDotStuffAtOnzaDotCom
-
The New Limey 2- It's finally here! ...well, a very few are in at Supercycles, airfreighted in at great expense so we could have a look. The first Limey was very well received. We've had an extra year to working on the stiffness of the frame, so we've been adding metal where it does the most good. Because of that we've also had to look for places to remove bits of metal to keep the weight down. The final result weighs 2.12kg, heavier than before but only by 90g or so... This is the final version. You can instantly see the metalwork that's been added behind the seat tube (...) and joining the down tube and top tube. What you can't see and what we hope to show in the following pictures is where the metal has been removed to keep the weight down. As well as veing considerably shorter, the head tube has had the reinforcing rings rounded off, making it look smoother as well as shaving a fraction of the extra weight off. Then we get really inventive. The inside of the head tube, previously a straight walled tube, has had some of the insides shaved and the usual small holes for welding purposes (to let the heated air out) are much enlarged. The CNC top yoke has had more machining done to it, to the point where it's a lot more hollow than it used to be. The part that has the alloy stiffener welded on it is also hollow. The bottom bracket shell was worked on, with some shaved out of the rear (although not creating a hole through to the bottom bracket unit). Then the creative department got to work again and did another hole job on the inside of the BB shell, where it isn't exposed to mud or weather. Just to finish off, we have a couple of close ups, if you really needed them, of the CNC stiffeners between the stays... and between the top tube and down tube. The colour of the frame is a dark metallic blue grey that is probably best illustrated in this photo. Click on any of the photos for a larger version of the same image.
-

Wooopsie Haha..mp3 Player Help.
BikeDotStuffAtOnzaDotCom replied to Joe Papasnap Maher's topic in Chit Chat
search on Google for "rest2514". Lazy link to the result (a program called Restoration): http://www.snapfiles.com/download/dlrestoration.html Freeware undelete program that is also a single file executable. You "Restore by copy" to somewhere else. If that won't do it, then that's bad luck... -
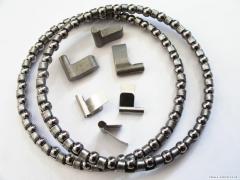
The Tensile boosters and offset mounts finally arrived (well, some, by air freight). I was going to put up all the other images but instead I'll just say that initially they're available to all on the EBay webshop (item 200052917945) and the other photos are there of the booster from lots of different angles. The offset mounts in the picture mean that the gap between the brake pads is 45mm with a load more extra space for the 55mm rims that someone will eventually bring out. That's not a hint, by the way. I thought the booster pictures might make a nice animated gif, but I might need a few more angles.
-
Met 5th Element Helmet
BikeDotStuffAtOnzaDotCom replied to IFallOffLots's topic in Beginners Trials Chat
You can't (or shouldn't) buy a helmet because of what it looks like. Get one that fits, which means you have to try them on (Met, Giro, Bell, whatever). I have a 5th Element, it fits, and the vents only seem to do anythiing when I have a very short haircut (in common with most helmet vents). -
I have no idea what you're talking about. The T-Pro frames are the same now as they were, with the exception that the gussets at the front are now open ended... although that's been achieved by not welding the gusset all the way round and leaving a bit that looks 'unfinished' at the end opposite the head tube. As for EVO mounts, look a little more closely:
-
It isn't. It's a copy but none of the parts were used from someone else's parts bin. At the moment and for the foreseeable future it's the only one.
-
It only goes down to 20T... I tried it and didn't suggest "Fix Me Up" for that reason. Does anyone else know of any others...?
-
Not sure why... they aren't going anywhere.
-
The competition one is a whole 15g lighter... And we have spare parts for the freewheel if you like: I'm going a bit funny in the head. I keep thinking "pawls and springs and balls in rings" and wonder if there shouldn't be a chorus of "these are a few of my favourite things"
-
Pawls and springs and balls in rings
BikeDotStuffAtOnzaDotCom posted a gallery image in Member Galleries
From the album: Onza Bikes and Parts
Tensile parts if you need to service the freewheel. -
Onza Fall Guy forks. A bit shameless, I know, but I dare you to try and break some just by riding them. I don't dare anybody to break some with powertools, etc. as I should think that's relatively easy...
-
Well how about THIS one, then... weight 2.10kg
-
It hasn't been abandoned yet. The chief reason for dropping the stays was so that the chain tensioners could be brought "inboard" and stop them being slapped up by landing on them. It also removes any problems with the width/height/positioning of chainstays between the chain and gives a nice chain line. Other things still need to be considered but that's the way it goes... Personally I thought the second one (which Mark has currently) looks a lot nicer than the first because of the CNC part after the bottom bracket continuing in line with the down tube. Removing the chain without a link tool was just a side issue, not the reason it was tried in the first place. Regarding looking for problems to solve, I'm sure everyone could supply you with one if they thought about it; there are usually things I think of while riding but which are forgotten quickly. If you can conveniently get to Coventry you should visit the transport museum, which has a fantastic number of bicycles which might give you some inspiration. Alternatively there are some books, but they aren't usually easily found. Names if required... The only way to put the changer on the top would be to pedal backwards (like people have said the chain needs to be in tension between chainring and sprocket). There has been one gearing method which gave you one gear when pedalling forward and another when pedalling backwards... how many gears did you need?
-
Buy a new freehub, if you can satisfy yourself that's what has broken. They can break two ways: either they freewheel in both directions or they're fixed in both directions. It sounds like you're on your way to the second. You get the freehub off by pulling off the alloy caps, tapping out the axle from the drive side to the non drive side, which also pushes out the non drive side bearing, clamping the short end of a 12mm allen key in a vice and pushing the long end into the non drive side of the hub. Then, depending on whether your freehub is screw-in or splined you turn it anticlockwise or clockwise respectively. You can tell usually by looking into the non drive side with a torch. If it's a screw in one you can see the end of a very coarse thread, and with the splined one there isn't, as what you unscrew with the splined one is sort of a hollow bolt that the axle goes through but which holds the freehub on. It's best to leave the tyres on and well inflated while you do this because it's an absolute b*****d to grip it hard enough to do the turning otherwise. Then you phone Supercycles (among others) and tell them what sort of replacement freehub you want. It'll be about fifteen quid. If it turns out to be something else, you'll have to weigh up your options.
-
It'll go. The reason that it's front specific is the lockring has a right hand thread. If you need an example think of how the ACS Claws freewheel has a left hand lockring thread and frequently unscrews when used on the front. They never have that problem when used at the back, which is where they were designed to be used.
-
If you look closely you can spot a few other things. I'll start you off: they aren't Shin Digs. EDIT: I think the (revised) description will get revised again shortly as I think the person reads this page. I didn't see it say Kona T-Mag.
-
We use 3/32" freewheels and chains, so you might need to be careful... BMXs can use 1/8" chains and freewheels. Agreed, there are freewheels with smaller centres and threads the other way (but they freewheel the other way too, so you can fit them to the left hand side of the bike) but I think you'd spot them quickly enough.
-
Large bump, but... It's out now and Supercycles have a special offer on them at 299GBP with a Chris King headset. We're sure people will ask how much without if they already have one, so 259GBP. Personally I think you'd get more than the 40 quid for the headset on EBay, but maybe that's just me.
-
The keyboard " and @ switched means your keyboard is currently set up as English US when it's an English UK keyboard. Go into "Regional And Language Options" in control panel and change it. You'll probably find your pound sign is a hash sign above the number three. I guess your PC is a Dell Dimension 9150 (from that username?). Have you got a driver-install type disc? It would have come with the PC. Unless you've upgraded a load of bits, in which case yes, you'll have to find the drivers on the web. If the graphics driver isn't found at first windows goes to it's basic and fairly rubbish graphics driver, which might be why your monitor isn't at the correct resolution. Try letting windows search for the drivers it needs - Control Panel -> System and find the hardware/device manager, have a look whats there and any drivers you'd like to update or things that have an exclamation mark next to them because they haven't started properly, find the update driver option and windows hunts on the web for it. At least, I've done that a few times and it's worked.
-
I've never done this: go through the install procedure and choose repair when you can. Someone with experience should be able to tell you if it works.
-
I've got a couple of things that might help. How much data do you think you might need to copy? Starting the PC shouldn't be a problem with various Linux's on CD or a (probable best option) Windows PE-alike CD (like windows running off a CD, no problems reading NTFS). I don't know if you have anything like that already. At the very worst, I suppose it could cost the price of a SATA PCI adaptor or a new hard drive. I can send you the CDs though...
-
Off topic a bit, but: Very dodgy. If you have one handy, attach the block to the magura caliper and hold onto that instead? The setup you've described looks like a recipe for sanded-off fingertips.
-
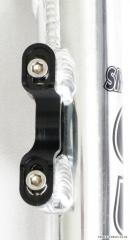
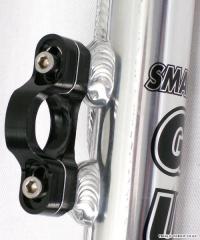
We routinely fit the Hog rim (same rim) to the T-Rex, so as far as I know there's no problem. But in case you DO have problems needing extra adjustment - like fat brake blocks - we might have an answer. This is relevant because as far as I know there's nothing else like this... I know Supercycles has had early samples of the new Tensile (patented) offset Magura mounts. They are still working on them to make sure they work properly both ways, but the idea is to let the Magura body in or out an extra 5mm each side (10mm extra in total compared to normal Magura mounts). They have some for 2mm each side as well (4mm extra in total). They're still working on the right shape to be able to move the calipers in 5mm, but they work fine if you need a little extra width. You'd have to get in touch to see if you could have some, though. You can see pictures here: Front view Side view
-
From the album: Onza Bikes and Parts
Allow adjustment for wider or narrower rims. Two sizes exist in the samples received by Supercycles - 2mm offset and 5mm offset each clamp. -
Tensile offset mount, three quarter view
BikeDotStuffAtOnzaDotCom posted a gallery image in Member Galleries
From the album: Onza Bikes and Parts
Intended for use as ordinary clamps, but allowing adjustment a fair bit either way to accomodate wider or narrower rims.